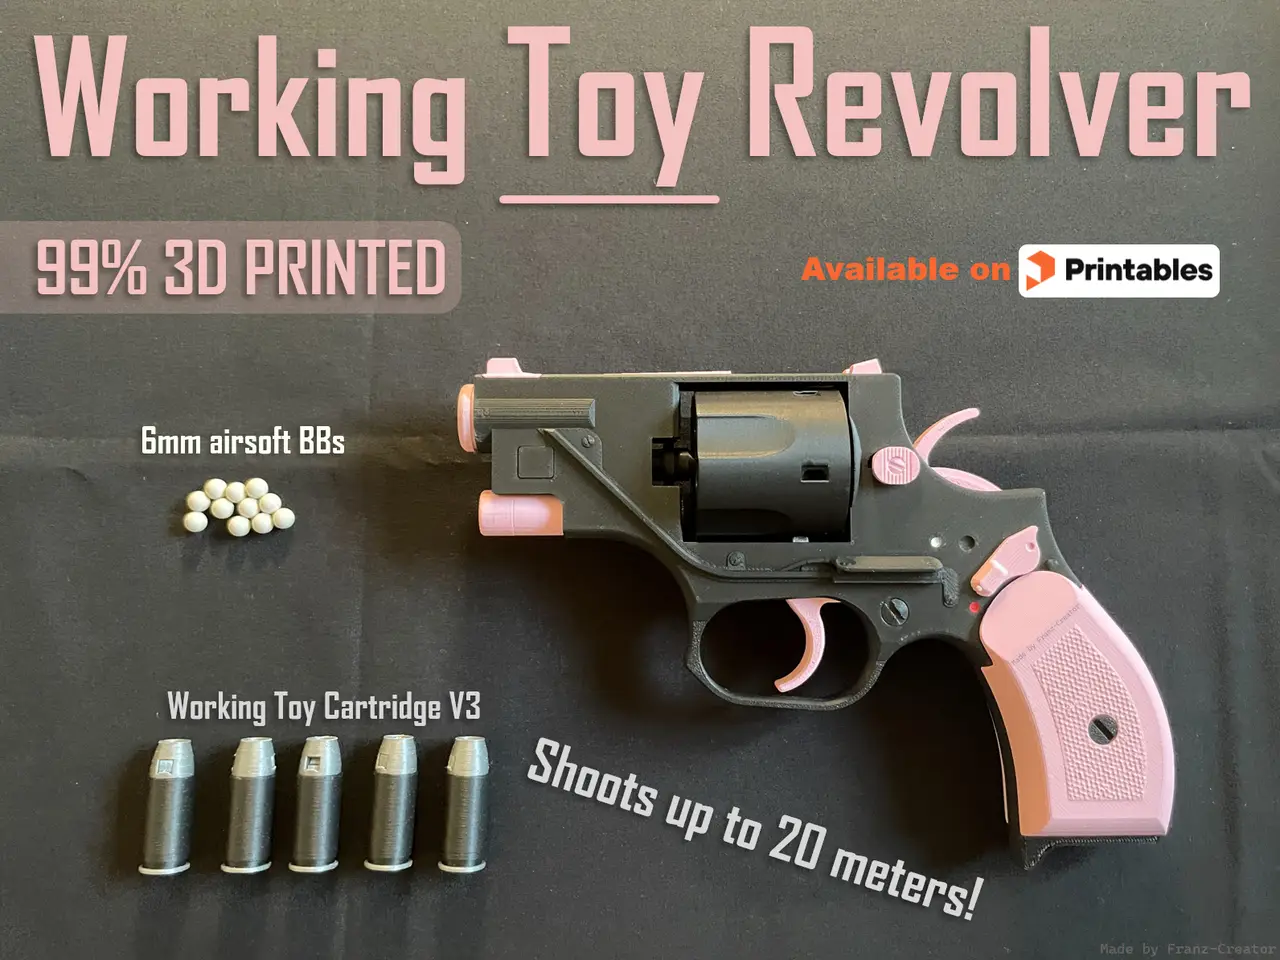
Working Toy Revolver • 99% 3D Printed
por Franz-Creator en Printables
Toy revolver that fires BBs using: https://makerworld.com/en/models/3434155-working-toy-cartridge-v3#profileId-3915761
Licencia
Solo uso personalCC BY-NC-SA 4.0 — Atribución, no comercial, compartir igual
Uso personal dando crédito; sin fines comerciales y las modificaciones con la misma licencia.
Al descargar aceptas respetar la licencia y dar crédito a Franz-Creator.
Archivos (33)
- 1_PLA.3mf 3MF · 326 KB
- 2_PLA.3mf 3MF · 162 KB
- 3_PLA.3mf 3MF · 153 KB
- 4_PLA.3mf 3MF · 227 KB
- 5_PLA.3mf 3MF · 74 KB
- 6_PLA.3mf 3MF · 57 KB
- 7_PLA.3mf 3MF · 76 KB
- 8_PLA.3mf 3MF · 113 KB
- 9_PLA.3mf 3MF · 126 KB
- 10_PLA_A.3mf 3MF · 43 KB
- 11_PLA.3mf 3MF · 35 KB
- 12_PLA.3mf 3MF · 28 KB
- 13_PLA.3mf 3MF · 67 KB
- 14_PLA.3mf 3MF · 25 KB
- 15_PLA.3mf 3MF · 59 KB
- 16_PLA.3mf 3MF · 18 KB
- 17_PLA.3mf 3MF · 12 KB
- 18_PLA.3mf 3MF · 37 KB
- 19_PLA.3mf 3MF · 10 KB
- 20_PLA_A.3mf 3MF · 12 KB
- 21_PLA.3mf 3MF · 8 KB
- 22_PLA.3mf 3MF · 11 KB
- 23_PLA.3mf 3MF · 14 KB
- 24_PLA.3mf 3MF · 3 KB
- 25_PLA.3mf 3MF · 14 KB
- 26_PLA.3mf 3MF · 14 KB
- 27_PETG.3mf 3MF · 31 KB
- 28_PETG.3mf 3MF · 22 KB
- 29_PETG.3mf 3MF · 10 KB
- 30_PETG.3mf 3MF · 20 KB
- 31_PETG.3mf 3MF · 11 KB
- EXTRA_PLA.3mf 3MF · 9 KB
- Working Toy Revolver_Multicolor_Slice_Franz-Creator.3mf 3MF · 1,5 MB
- Categoría
- Juguetes y juegos
- Formatos
- 3MF
- Descargas
- 3,456
- Publicado
Sobre este modelo
Before printing this model, read the entire description carefully THIS MODEL IS PURELY A TOY I assume no responsibility for inappropriate use of the model or any damage caused by it. Never point this toy at your face (or anyone else's) or at fragile objects. Please also be careful when using this model around pets (cats, dogs, etc.). The model is prohibited for children under 5 years of age, especially without the presence of an adult. PLEASE USE THIS MODEL RESPONSIBLY AND ETHICALLY
After numerous requests from users, months of development and test after test after test, I am extremely proud to present... the Working Toy Revolver! This is a model that is 99% 3D-printable (with the sole exception of a single pen spring) and capable of firing up to 5 airsoft BBs using the Working Toy Cartridge V3, available at the link below (for accessibility reasons, the model has been published on MakerWorld).
Instructions (must read before printing!): Materials As stated in the title, the model is 99% 3D-printable. This is because it requires a single pen spring. After destroying all (almost) the click pens I had on hand, including the ones I use at school, I determined that no specific pen spring is required, provided that it meets the following specifications: - The spring must be at least 20 mm long and must not have an outside diameter greater than 5 mm.
- A spring that is too long or too stiff risks making the cylinder's movement too difficult, thereby causing problems with the toy's operation and loading.
- It is recommended to slightly stretch the spring to a length of 22 mm for improved operation.
Before printing: - Before starting the print, do a quick automatic calibration of your printer (mainly bed leveling).
- With parts 1_PLA and 4_PLA, some warping may occur with certain filaments if the bed temperature is incorrect, so I recommend ensuring you use the appropriate temperature. Warping on these two parts should not affect functionality (unless it is severe), but it can spoil the toy's appearance.
- Make sure the print bed is clean, so that the components do not have adhesion problems.
- Use the recommended materials. For the springs in particular, it is absolutely necessary to use PETG (translucent PETG is recommended) to ensure proper functioning of the toy (PLA for the springs is not suitable and will not work). The final test prints of the toy were conducted using Matte PLA, so using this filament is highly recommended, not to mention that it looks great ;) Since it is a toy, I recommend printing this model using bright colors, such as Sakura pink.
I'll be more than happy to see what crazy color combinations you can come up with XD, I therefore kindly ask you to post pictures of the printed toy in the comments :)
- This model currently features a Bambu Studio print profile with multi-color parts, but I will soon publish a print profile for Orca Slicer as well, along with a single-color version (per plate) for both.
During printing: - Make sure the first two layers are printed correctly (serious errors often occur in the first layer).
- Check on your printer every now and then to make sure everything is running smoothly, especially during the most critical layers.
- Once the printer is finished, don't remove the components immediately, but wait for them to cool down a bit. Removing them too soon could cause slight deformation of the material, which could negatively affect the toy's operation.
After printing: - Gently remove the supports with the help of the pliers and make sure the brim is completely removed. Some supports require a little more force and patience to remove, even if optimized. Make sure to remove all remaining support material, especially from part 1_PLA; failure to do so could interfere with the operation of the spring (27_PETG).
- Use the following tutorial to assemble the toy. For assembly, the following tools are recommended/required: - Pliers - Scissors - Flat-head screwdriver - Super glue - Piece of 1.75mm filament (about 20 centimeters), cut directly from the filament spool (the one used for printing)
Using the toy: - Although this is a toy, it is important to know how to use and handle it correctly. It is strictly forbidden to use this model outside of your private property, even if you use the colored tip (orange/red).
- Even though I have invested a great deal of time in designing and testing the toy, malfunctions could still occur, even after several iterations. I haven't encountered any issues so far, but if any were to occur, please don't hesitate to contact me so I can help you resolve them as best I can. Below, you will find a list, which will be updated over time, of potential issues and their corresponding solutions. However, this relies on your feedback (though I certainly hope there won't be any problems! XD).
- When using the toy, it is worth noting that it is made of plastic, consequently, certain parts could break, especially if the toy is accidentally dropped (something that has happened to me several times). These are the components most likely to break: - 10_PLA_A is the most fragile part of all. If the model were to fall, this is the part most likely to break. Due to space constraints, I couldn't make it any sturdier, so I recommend printing 2 or 3 spares just in case. Also, I advise following the tip from the tutorial not to permanently attach the toy revolver's cylinder; doing so would mean having to reprint it along with the broken part. - 13_PLA (the screw) risks breaking if overtightened; therefore, it is recommended not to tighten it too much. - The gear teeth on part 9_PLA (the cylinder), along with the tip of part 17_PLA (which rotates the cylinder), tend to wear down after repeated use; therefore, replacement may become necessary.
Old versions As previously mentioned, this model required a huge number of tests before it worked, and just as many, if not more, updates to its components to ensure everything operated perfectly and without issues. I’d like to thank everyone who encouraged me to create this model; although it may be small, it was surprisingly complex to make. As for future models, I kindly ask you not to flood me with requests; while I do note them ALL down, they really add up and many of them are extremely difficult to make, if not ALMOST impossible. Following the release of this model, I will also update the Working Toy Pump-action Shotgun with new accessories. After that, I’ll consider creating a new toy weapon. I’ve already decided which one it’ll be, but I’m not telling you... ;D That said, it’ll take a huge amount of time to make, so in the meantime, I plan to prioritize publishing other models, especially ones that aren’t toy weapons. Furthermore, since I’m still in high school, I also have to dedicate time to studying, which inevitably slows down the design and creation process.
Descripción original del autor, publicada en Printables.