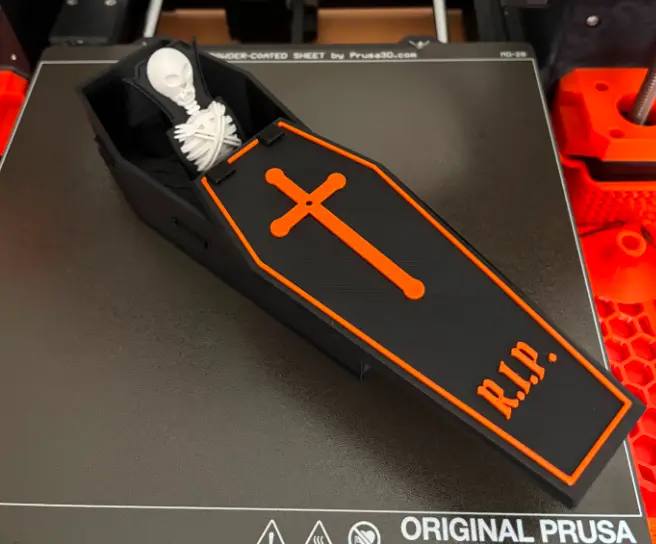
Nosferatu's Coffin - slide the lid and the vampire sits up
por amedeos en Printables
Pull the lid and the Count wakes up: he sits up and stares at you. Five parts, no supports, colour changes set.
Licencia
Uso comercial permitidoCC BY-SA 4.0 — Atribución, compartir igual
Puedes usarlo y modificarlo dando crédito; las versiones modificadas deben compartirse con la misma licencia.
Al descargar aceptas respetar la licencia y dar crédito a amedeos.
Archivos (17)
- plate_1_black_box_and_nails.3mf 3MF · 68 KB
- plate_2_lid_black_then_orange.3mf 3MF · 222 KB
- plate_3_vampire_black_then_white.3mf 3MF · 352 KB
- coupon_all_pieces.3mf 3MF · 57 KB
- coupon_nail_gauge.3mf 3MF · 79 KB
- box_black.stl STL · 130 KB
- lid_black_M600_orange.stl STL · 833 KB
- vampire_black_M600_white.stl STL · 1,1 MB
- coupon_rail.stl STL · 2 KB
- coupon_nail_gauge_nail.stl STL · 53 KB
- nail_black_x2.stl STL · 53 KB
- coupon_pelvis.stl STL · 112 KB
- coupon_nail_gauge.stl STL · 251 KB
- coupon_nail.stl STL · 53 KB
- coupon_bearing.stl STL · 17 KB
- coupon_lid_slide.stl STL · 4 KB
- coupon_lid_nails.stl STL · 5 KB
- Categoría
- Juguetes y juegos
- Formatos
- 3MF, STL
- Descargas
- 7
- Publicado
Sobre este modelo
The idea A classic six-sided coffin with a sliding lid. The vampire inside is fast asleep. Pull the lid towards you. For the first half of the way nothing happens: the lid only uncovers his head. Then the vampire sits up, slowly and stiffly, like Count Orlok in Nosferatu (1922). At the end he looks straight at you over the lid. Push the lid back and he lies down again. The black cape, the high collar and the fangs make it clear who he is. There is also a small candy stash at his feet, under the lid. How it works - Hip joint. The skeleton turns around his hips. Two stubs on the pelvis sit in a bearing block, with a bayonet fit: they only go in when he is half sitting up.
- Levers. Two levers stand up from the pelvis. The lid always covers them.
- Coffin nails. Two square nails go through the lid. Each nail has a pin underneath. When you pull the lid, the pins reach the levers after 54 mm and push them: the vampire sits up to 70°.
- Gravity. When you push the lid back, his own weight takes him back down.
- Dovetail rail. A straight rail at the foot end keeps the lid straight and holds it down, so it cannot tip over when it is open. There are hard stops at both ends.
- When the lid is closed, you can lift it off to reach the candy stash.
The pictures with a cut-away side show the nail pushing the lever. Features - Printed and tested. We printed the files on this page on a Prusa MK4 with Prusament PETG, assembled the coffin and tried the mechanism. The photos show that print.
- Five printed parts: coffin, lid, vampire and two nails. No glue is needed (a drop is fine for the nails).
- No supports. PrusaSlicer does not add any, even with automatic supports turned on.
- Colour changes already set in the 3MF files: the lid's cross and lettering turn orange, and the vampire has a black cape behind white bones. One extruder is enough.
- Designed for 0.2 mm layers and 0.45 mm lines. Every flat surface sits exactly on a layer, and the walls are a whole number of lines, so nothing gets rounded away.
- Tolerance coupon included: test the three fits in less than an hour before you print the real thing.
- Fully parametric source code (Python and build123d) with automatic tests for the mechanism, the print layers and the files.
Print settings - Printer: Prusa MK4 (Input Shaper firmware). Any printer with a 165 × 70 mm bed area works.
- Nozzle: 0.4 mm
- Profile: 0.20mm STRUCTURAL (0.2 mm layers)
- Material: Prusament PETG (PLA also works)
- Supports: none
- Sheet: textured or satin (PETG sticks too much to smooth PEI)
Plates: - plate_1_black_box_and_nails: coffin and 2 nails, black. 3 h 08 min, 68 g.
- plate_2_lid_black_then_orange: lid, black, then orange from 5.20 mm. 1 h 01 min, 28 g.
- plate_3_vampire_black_then_white: vampire, black, then white from 1.80 mm. 40 min, 9 g.
- coupon_all_pieces (optional): tolerance coupon, any single colour. 47 min, 12 g.
- coupon_nail_gauge (optional): nail gauge, any single colour. 14 min, 3 g.
The whole coffin takes about 4 h 50 min and 105 g of filament. Which files to use - 3MF files — easiest. These are PrusaSlicer projects with the MK4 settings and the colour changes already loaded. Open, slice, print. With another printer, choose your own printer profile after you open them.
- STL files. One file per part, already in its print position. Add the colour changes yourself (see below).
Colour changes (only needed with the STL files) In the PrusaSlicer preview, move the vertical slider to the layer and click the +: - Lid: at 5.20 mm (start black, then orange). The cross, the border and R.I.P. come out orange.
- Vampire: at 1.80 mm (start black, then white). The cape and the collar stay black; the bones are white.
Before you print: the tolerance coupon Printers and materials are all a bit different. The coupon pieces are cut from the real parts, so if they fit, the coffin fits. - Hip joint. Tilt the pelvis to about 45° and push the stubs into the slanted slot. Lay it down: it should stay in, turn freely and fall back on its own.
- Rail. Slide the lid piece onto the rail from the wide end. It should slide smoothly and not lift off.
Descripción original del autor, publicada en Printables.