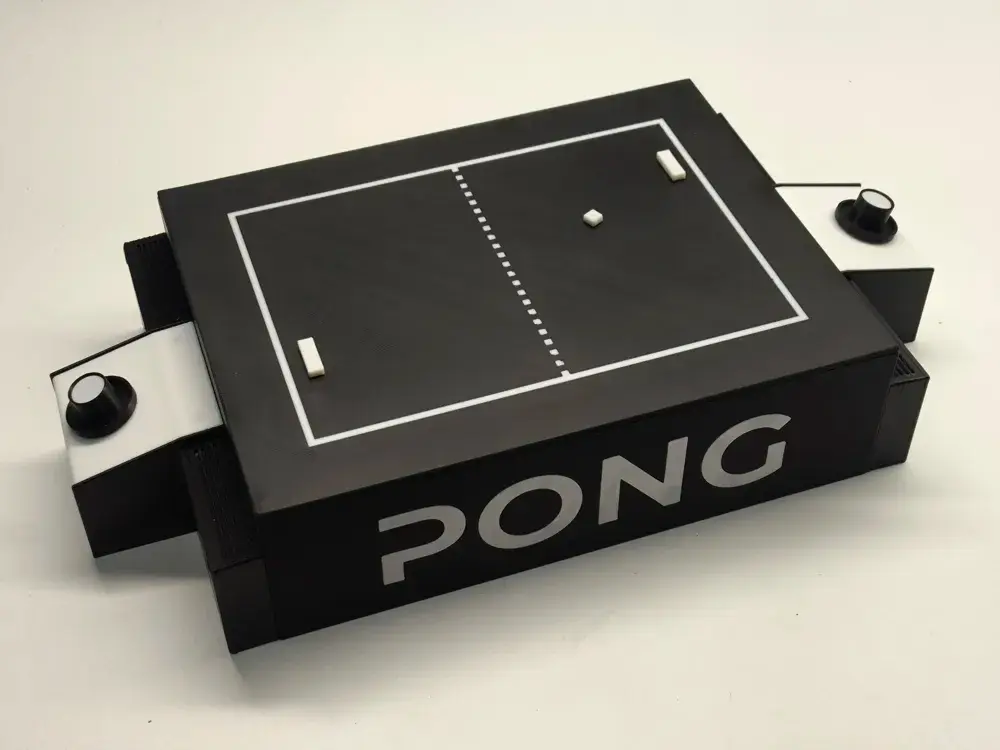
Mechanical Arcade Pong. Atari Concept
por Axolotal_Kid_666 en Printables
A game from MakerWorld by Alberto Nicás
Licencia
Solo uso personalStandard Digital File License
Licencia estándar de archivos digitales: solo uso personal. No se permite compartir, revender ni subir el archivo a otros sitios, ni vender las impresiones.
Al descargar aceptas respetar la licencia y dar crédito a Axolotal_Kid_666.
Archivos (8)
- Categoría
- Juguetes y juegos
- Formatos
- STL, 3MF, INO
- Descargas
- 3
- Publicado
Sobre este modelo
Mechanical Pong Imagine playing the classic Pong game, but in the real world, on your table, with physical pieces moving before your eyes ⚙ That's precisely what I've created! I present the Mechanical Pong project, a tangible and fully playable version of the legendary video game, elevated to another level through engineering and creativity
Now you can play and feel in your hands what previously only existed on a screen A unique experience for nostalgics, makers, and lovers of retro games 🎮✨
🕹 I wanted to pay homage to this video game classic by bringing it into the physical world This idea was born from the inspiration I received from Maker World's arcade competition It sparked the idea, motivated me to develop this project Without this incredible initiative, I might not have been encouraged to design and build this creation Thank you for motivating the community with these creative ideas! I hope you enjoy the result as much as I enjoyed the process
🔹 Project Rationale and Target Audience - Arcade Nostalgics seeking a tangible Pong experience
- Board Game Enthusiasts with a technological twist
- Collectors of unique replicas of classic video games
- Bridging the Digital and Physical: Combining the essence of the original Pong with the satisfaction of manual interaction
- Educational Project: Perfect for teaching mechanical and electronic concepts
- Decorative and Functional: An eye-catching object for any shelf
🔹 Functionality - Concealed Mechanics: A mechanical system, hidden beneath the game platform, uses magnets to bring the movement of the ball and paddles to life
- Stop!: When you stop the ball, it's returned to the opponent
- Goal!: When you score a goal, the system pauses for 3 seconds before resuming
- Minimalist Electronics: Magnetic sensors, magnets, motors, and simple components provide tactile feedback to a classic
Assembly Instructions Before you begin assembling the game, please note the following:
- VERY IMPORTANT Never connect the Arduino to the USB while it is powered with 7.5V
- It does not operate at 5V A standard USB will not work You will need to increase the voltage to 7.5V using a USB Speed Controller (IA002) This is because the motor control drivers operate at 6.5V, but don't worry, the motors will not operate at 7.5V (as they could burn out) they will operate at 5V as I have lowered the voltage with PWM in the Arduino programming
- No programming knowledge is required Simply copy and paste the code I've provided into your Arduino and make the connections as explained in the assembly guide
- This is a first model, an Alpha version of the project, so it may require some adjustments or updates, both to the parts and the model or programming There will be significant updates and other versions Any suggestions, improvements, updates, or faults appreciated will be well received in the comments
- Print in PETG or ABS for greater durability in moving parts, although it is also functional with PLA
- Ensure that all moving parts slide freely Sand or file all moving parts to ensure they are smooth and glide easily
- Grease the worm gear and sliding guides for better operation
- Make sure to place the magnets with the polarity detected by the sensors
- If the main motor spins in reverse, reverse the polarity It should start moving to the right
- In the electrical connection diagram, the + and - polarities are simply marked in red and black These connections are all joined to the power distributor
------------------------------------------------- Updates and Improvements
25/07/2025: - Some model parts have been updated in the profile After observing that on certain occasions the goal cam collided with the ball support without being detected, 3 magnets have been added to each side of the ball support instead of 2, thus expanding the detection range and preventing collisions
- The distance at which the magnets are positioned on the goal cam has also been reduced by 2mm
- It was previously 37.5mm, now it is 35.5mm
-------------------------------------------------
(At the end of the instructions you have the list of necessary materials Almost all materials are available in the official Bambu Lab store) Materials not available at Bambu Lab have an Amazon link in the assembly instructions themselves
Descripción original del autor, publicada en Printables.