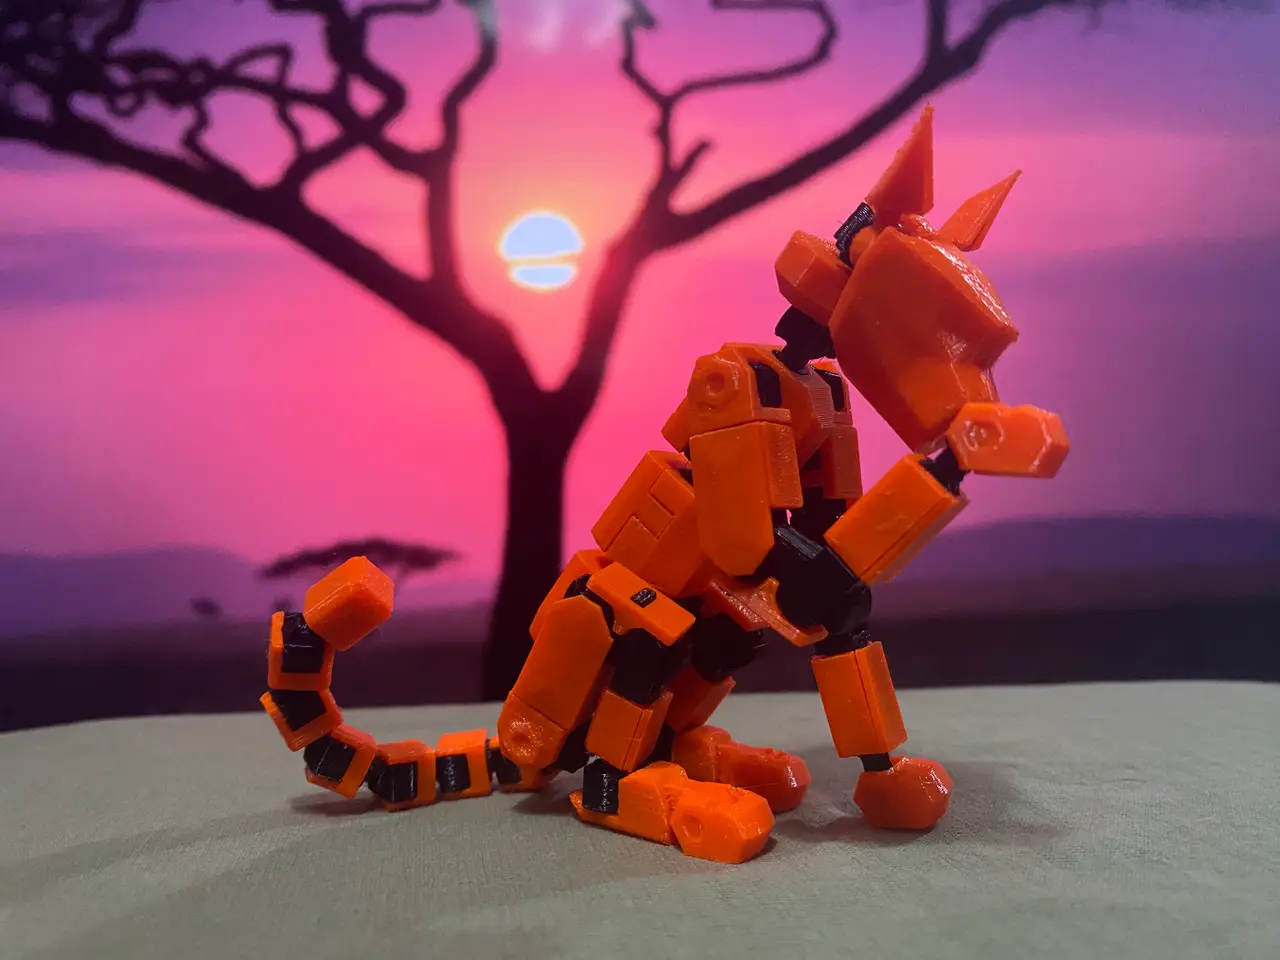
Gyro 7 Printable Jointed Cat
por Neybao en Printables
Inspired by and compatible with LUCKY 13. Named after my cat who is named after a gyroscope.
Licencia
Solo uso personalCC BY-NC-SA 4.0 — Atribución, no comercial, compartir igual
Uso personal dando crédito; sin fines comerciales y las modificaciones con la misma licencia.
Al descargar aceptas respetar la licencia y dar crédito a Neybao.
Archivos (61)
- Gyro-7-Plating.stl STL · 2,4 MB
- Gyro-7-Skeleton.stl STL · 11,4 MB
- Gyro-7-StiffSkeleton.stl STL · 11,4 MB
- Gyro 7 Plating On Runner.stl STL · 2,7 MB
- Gyro 7 Skeleton On Runner.stl STL · 11,6 MB
- Gyro-7-StiffSkeleton On Runner.stl STL · 11,6 MB
- Gyro 7 Plating - LegPlating.STL STL · 5 KB
- Gyro 7 Plating - Paw2.STL STL · 119 KB
- Gyro 7 Plating - Body1.STL STL · 69 KB
- Gyro 7 Plating - Leg3.STL STL · 14 KB
- Gyro 7 Plating - Head.STL STL · 76 KB
- Gyro 7 Plating - Paw1.STL STL · 25 KB
- Gyro 7 Plating - shoulder.STL STL · 23 KB
- Gyro 7 Plating - Body6.STL STL · 19 KB
- Gyro 7 Plating - Body4.STL STL · 29 KB
- Gyro 7 Plating - NeckPlating2.STL STL · 56 KB
- Gyro 7 Plating - Body2.STL STL · 79 KB
- Gyro 7 Plating - LegPlating2.STL STL · 3 KB
- Gyro 7 Plating - NeckPlating.STL STL · 32 KB
- Gyro 7 Plating - Leg1.STL STL · 14 KB
- Gyro 7 Plating - Body7.STL STL · 143 KB
- Gyro 7 Plating - Tail1.stl STL · 72 KB
- Gyro 7 Plating - Tail2.STL STL · 196 KB
- Gyro 7 Plating - Paw3.STL STL · 74 KB
- Gyro 7 Plating - Leg4.STL STL · 14 KB
- Gyro 7 Plating - Body5.STL STL · 18 KB
- Gyro 7 Plating - KneePlating.STL STL · 11 KB
- Gyro 7 Plating - Ear.STL STL · 286 KB
- Gyro 7 Plating - Body3.STL STL · 24 KB
- Gyro 7 Plating - Leg2.STL STL · 14 KB
- Gyro 7 Skeleton - Leg1.STL STL · 211 KB
- Gyro 7 Skeleton - Neck.STL STL · 402 KB
- Gyro 7 Skeleton - Body1.STL STL · 458 KB
- Gyro 7 Skeleton - Paw.STL STL · 322 KB
- Gyro 7 Skeleton - Body2.STL STL · 336 KB
- Gyro 7 Skeleton - Leg3.1.STL STL · 164 KB
- Gyro 7 Skeleton - Leg2.STL STL · 224 KB
- Gyro 7 Skeleton - Tail.stl STL · 670 KB
- Gyro 7 Skeleton - KneeHinge.STL STL · 455 KB
- Gyro 7 Skeleton - Body3.STL STL · 485 KB
- Gyro 7 Skeleton - Leg3.2.STL STL · 281 KB
- Gyro 7 Skeleton - Head.STL STL · 698 KB
- Gyro 7 TightSkeleton - Paw.STL STL · 318 KB
- Gyro 7 TightSkeleton - Leg3.2.stl STL · 278 KB
- Gyro 7 TightSkeleton - Leg2.STL STL · 222 KB
- Gyro 7 TightSkeleton - Neck.STL STL · 400 KB
- Gyro 7 TightSkeleton - Body1.STL STL · 451 KB
- Gyro 7 TightSkeleton - Head.STL STL · 689 KB
- Gyro 7 TightSkeleton - Body2.STL STL · 334 KB
- Gyro 7 TightSkeleton - Body3.STL STL · 482 KB
- Gyro 7 TightSkeleton - Tail2.STL STL · 241 KB
- Gyro 7 TightSkeleton - Leg3.1.stl STL · 157 KB
- Gyro 7 TightSkeleton - KneeHinge.STL STL · 445 KB
- Gyro 7 TightSkeleton - Leg1.STL STL · 205 KB
- Gyro 7 TightSkeleton - Tail.stl STL · 667 KB
- Tool.stl STL · 28 KB
- Gyro 7 Assembled.STEP STEP · 4,3 MB
- Gyro 7 Stiff Assembled.STEP STEP · 4,3 MB
- Gyro-7_Plating_OnRunner_0.2mm_PETG_MK3S_3h24m.gcode GCODE · 7,3 MB
- Gyro-7_Skeleton_OnRunner_0.2mm_PETG_MK3S_2h14m.gcode GCODE · 8,5 MB
- Categoría
- Juguetes y juegos
- Formatos
- STL, STEP, GCODE, TXT
- Descargas
- 9,828
- Publicado
Sobre este modelo
The orange Gyro 7 in the pictures is printed in 0.20mm layer height Printing Material: PETG (PLA makes the joints too loose when using the normal skeleton and too tight for the tight Skeleton. Assembly is also more difficult in PLA.)
Layer Height: 0.10mm - 0.20mm lower makes the ball joints work a bit smoother and the model looks nicer. Supports: None, But the ears have some model-in supports that can be broken off after printing all other settings are the system presets for 0.10mm - 0.20mmQUALITY
Added the option to print them connected which helps printing the smaller parts. And makes assembly easier because it is harder to lose parts. also looks a bit nicer to give a kit(ten)-card to someone instead of a heap of parts.
This one is printed at 0.15mm layer height. Added the option for a stiffer skeleton to make posing easier. but it might limit play a bit, something to keep in mind if for example it is intended for a kid
My very simplified design process and the reason for the 7 Gyro 1 is my actual cat who got slightly annoyed I kept inspecting his legs on how they move. Gyro 2 was the first printed skeleton but the ball joints where to lose. Gyro 3 had a better skeleton and was the first with the plating but some parts where to lose and some too tight, one of the hind paws wouldn't go on. Gyro 4, 5 and 6 had a few parts that where too difficult to assemble. Gyro 7 finally assembled nicely but i did decide to make a small tool to help assemble the tail.
Assembly Some Arrows are numbered to show the assembly order 1. all grey parts have a particular orientation look carefully. Especially with the smallest part. The black parts in the middle are the same. (for PLA: the body can be too loose)
2.1 The biggest black part DOES have a top and bottom note the protruding bit has chamfers and the “hands" for the ears have a curved corner
2.2 The head might need some force to be put in place (for PLA: The head requires more force to put in place)
3.1
3.2 Make this part 4 times
4.1 the right front leg. Note the 2 different types of paw. you need the one with a wider opening *there are 4 lower leg parts you need the longer ones for this step (for PLA: Knee plates aren’t as secure)
4.2 the left front leg (Part from step 3 is mirrored) (for PLA: Knee plates aren’t as secure)
5.1 make this part 2 times Note the 2 different types of paw. you need the one with a narrower opening *there are 4 lower leg parts you need the shorter ones for this step (for PLA: the black end point needs a lot of force to put in place. It helps if you push it in with the black part on the end of a table and pushing on the underside of the paw)
5.2 the right leg (for PLA: Knee plates aren’t as secure)
5.3 the left leg (Part from step 3 is mirrored) (for PLA: Knee plates aren’t as secure)
6.1 place the grey on the part
6.2 To help press the part into place use the tool to push it over the taps that hold it in place. (for PLA: requires more force and snaps louder in place)
6.3 make this part 6 times
6.4 Assemble the tail
7 Congrats this is the last step! Would love to see your makes!
Descripción original del autor, publicada en Printables.