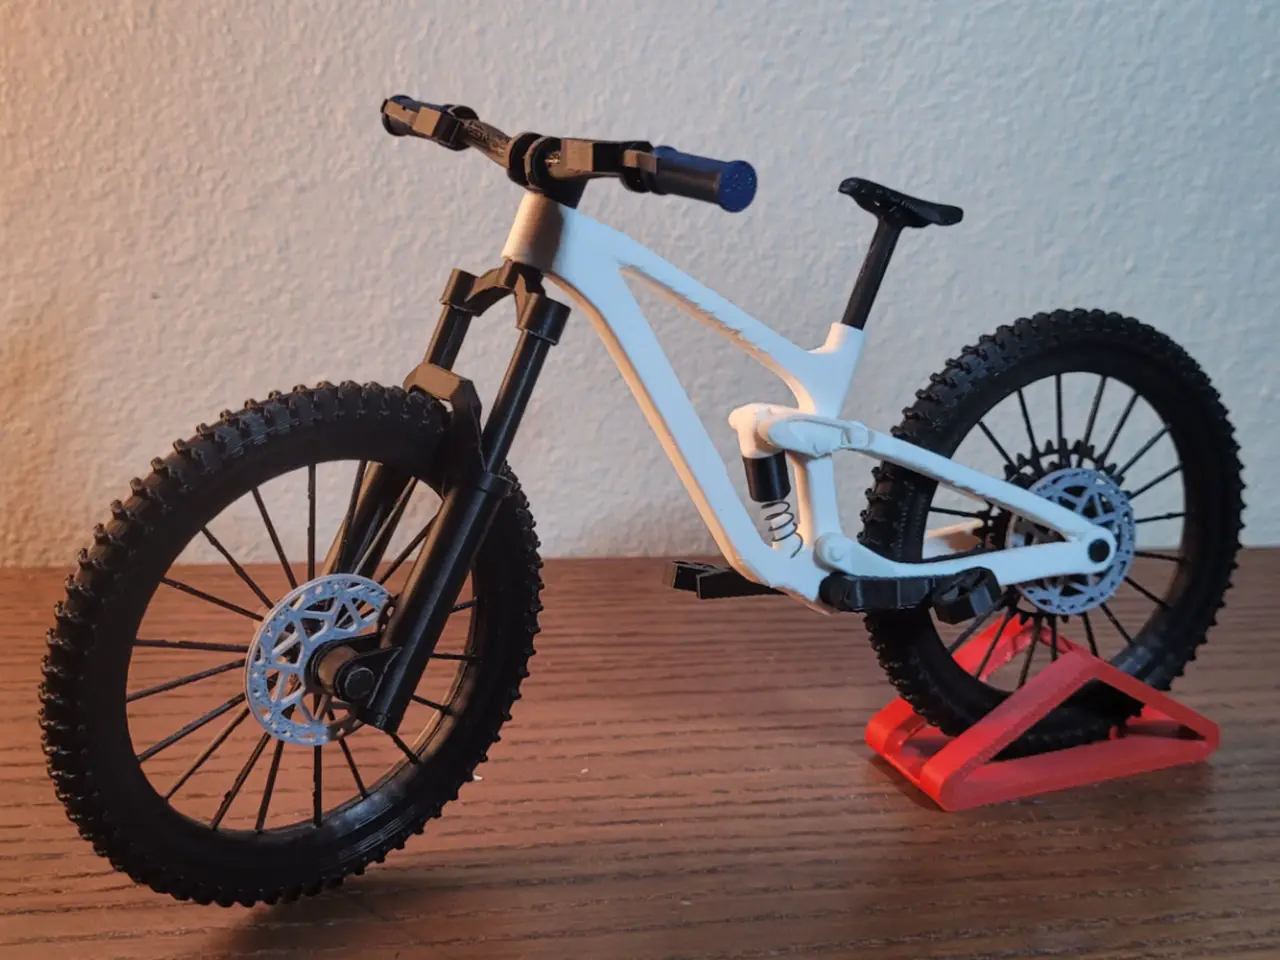
Full Suspension Model Mountain Bike (enduro bike)
por How2Random en MakerWorld
MembershipBecome a commercial member today! Subscribe and be able to legally sell physical prints of my models!Boost MeThis is a 1:9 scale Full Suspension Enduro Mountain Bike model with working front suspension, rear suspension, rotating wheels and pedals. It is easy to print and assemble and…
MakerWorld entrega los archivos a usuarios con cuenta gratuita
Licencia
Solo uso personalStandard Digital File License
Licencia estándar de archivos digitales: solo uso personal. No se permite compartir, revender ni subir el archivo a otros sitios, ni vender las impresiones.
Al descargar aceptas respetar la licencia y dar crédito a How2Random.
Archivos (29)
- FULL SUSPENSION Frame - Rear Axle (1).stl STL · 28 KB
- Rear Shock - Shock Body.stl STL · 34 KB
- Drivetrain - Derailuer (2).stl STL · 120 KB
- Crank LEFT.stl STL · 43 KB
- Crank RIGHT.stl STL · 43 KB
- Bottom Bracket - Bottom bracket (5).stl STL · 12 KB
- Saddle - Seat p2 (2).stl STL · 551 KB
- Saddle - Seat p1 (2).stl STL · 555 KB
- Cockpit - Brake LEFT (4).stl STL · 48 KB
- Cockpit - Grip LEFT (5).stl STL · 57 KB
- Cockpit - Brake RIGHT (4).stl STL · 48 KB
- Cockpit - Grip RIGHT (7).stl STL · 57 KB
- Cockpit - Handlebar (4).stl STL · 409 KB
- Stem - Stem (4).stl STL · 92 KB
- Fork - Front Axle (3).stl STL · 28 KB
- Fork - Fork Cap LEFT (5).stl STL · 21 KB
- Fork - Fork Stanchion LEFT (1).stl STL · 13 KB
- Fork - Steerer tube (6).stl STL · 81 KB
- Fork - Fork Cap RIGHT (5).stl STL · 21 KB
- Fork - Fork stanchion RIGHT (1).stl STL · 13 KB
- Fork - Fork Body RIGHT (7).stl STL · 143 KB
- Gears (8).stl STL · 820 KB
- Front Wheel - Brake Disc.stl STL · 124 KB
- Front Wheel - Wheel Connector (4).stl STL · 2 KB
- Front Wheel - FRONT Wheel P2 (4).stl STL · 965 KB
- Front Wheel - FRONT Wheel P1 (4).stl STL · 955 KB
- Rear wheel - REAR Wheel P2 (4).stl STL · 959 KB
- Rear wheel - REAR Wheel P1 (4).stl STL · 953 KB
- FULL SUSPENSION Frame (2).stl STL · 2,0 MB
- Categoría
- Juguetes y juegos
- Formatos
- STL
- Descargas
- 17,362
- Publicado
Sobre este modelo
MembershipBecome a commercial member today! Subscribe and be able to legally sell physical prints of my models!Boost MeThis is a 1:9 scale Full Suspension Enduro Mountain Bike model with working front suspension, rear suspension, rotating wheels and pedals. It is easy to print and assemble and has a lot of realistic visual detail. Fully 3D printed besides 2 spring (optional) for the suspension. Based on a Trek Slash SE Gen 5! For this model I tried to focus or realism as best as I could. All the bikes linkage is accurate to the real one - all freely moving and functional. also, accurate fork design and accurate scaling down of parts brings the whole build together!
Feedback is greatly appreciated!
You will need some glue! CLEAN BUILD PLATE BEFORE PRINTING FOR BEST RESULTS!! :) parts - especially on the frame have very tight tolerances! Frame along with all the functioning linkage is fully print in place
Assembly is pretty easy! See steps below -
Both the front and rear suspension uses springs which you can easily find in pens. Spring Dimensions - Front Spring →
- Diameter - 5mm or less.
- Length - 40 mm or less
Rear Spring →
- OUTER diameter - 5mm or less.
- INNER diameter - 3.5mm or more.
- Length - Around 16mm or more (not a defined number - you can experiment!)
ASSEMBLY- (may seem long but don't worry - it's not really!) Wheels ASSY -
- - Place the wheel alignment guides (2 small blue pieces) into the grooves on one half of your wheel.
- apply glue all around wheel if needed.
- Find the 2nd half of the wheel using the text to match - then place the 2nd half of the wheel onto the first. Ensure proper alignment of the tire tread.
- Keep pressure on the wheel until glue sets - then set aside
2. Repeat step 1 for 2nd wheel 3. On the wheel with the little keyhole on the hub (light blue thing) - slide on the gears - aligning the keyhole.
4. Slide on the derailleur - in front of the gears. (this is supposed to be loose)
5. Turn the wheel over and slide on the brake disc. - set this rear wheel aside (apply glue if needed)
6. Slide the second brake disc onto the other wheel - set this front wheel aside FORK ASSY - 1. Slide the fork stanchion into the fork body. ensure orientation is same as picture.
- (the circular side goes in first from the bottom of the fork body). (ensure that the stanchion has the little protrusions at the bottom - if it doesn't you're probably holding a wheel axle :) )
- Slide stanchions back and forth a few times to smoothen its motion.
2. Press steerer tube into the stanchions. Apply glue to this joint if needed. (recommended)
3. Slide the longer pen spring into any one of the bottom holes in the fork body.
4. Press the fork body caps into the bottom of the fork body.
5. Slide your FRONT wheel in-between the fork bodies - secure wheel by sliding in front axle into place. (any one of the axles). then set aside
COCKPIT ASSY - 1. Slide stem through handlebar till it is in the center of the handlebar. (once centered apply glue to keep the stem in place)
2. Slide on brakes - then grips. repeat on other side too (apply glue if needed)
How it should look -
SEAT ASSY - 1. glue the two halves of the seat together. ensure it lines up properly!
Descripción original del autor, publicada en MakerWorld.