
Wolfrom 96 to 1 helicoidal
por Bryand Salamanca en Thingiverse
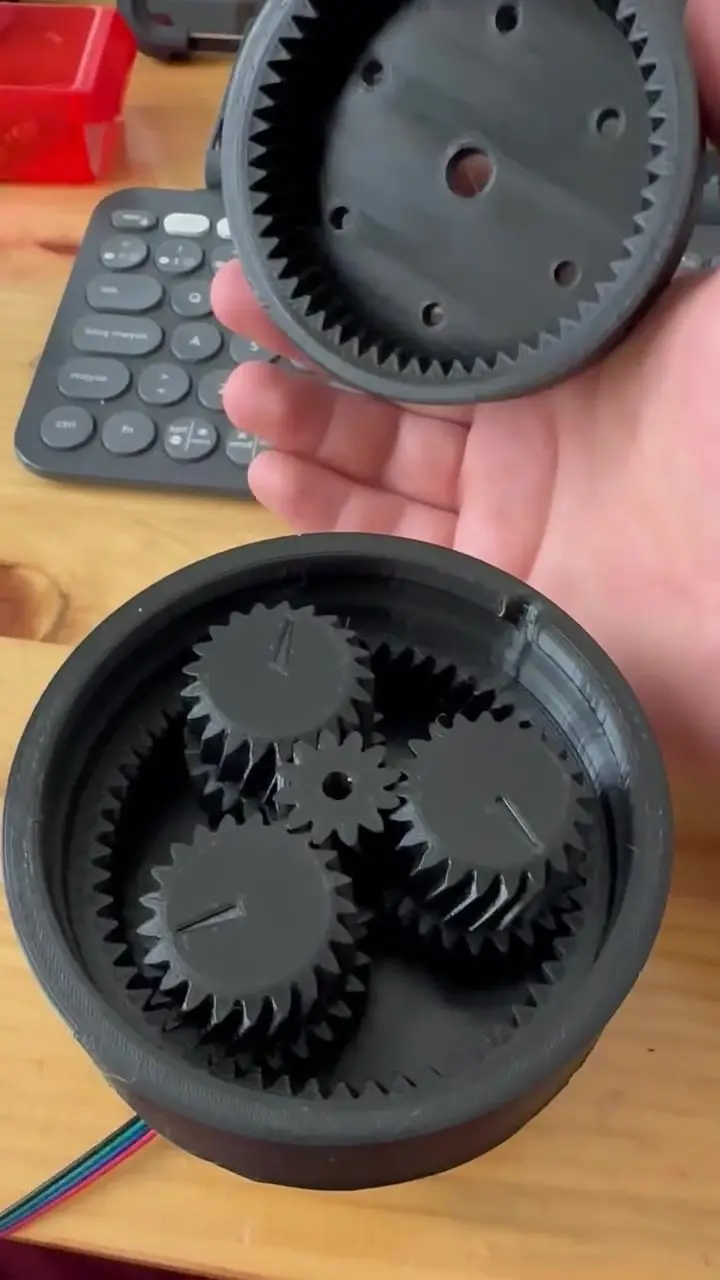
Wolfrom 96 to 1 helicoidal A Wolfrom-type compound planetary gearbox with herringbone (double helical) gears and stepped planets, designed for 3D printing. It reaches a 96:1 reduction in a compact Ø110 mm package. It needs no off-the-shelf bearings: the output ring rides on a built-in ball bearing..
Licencia
Uso comercial permitidoCC BY-SA 4.0 — Atribución, compartir igual
Puedes usarlo y modificarlo dando crédito; las versiones modificadas deben compartirse con la misma licencia.
Al descargar aceptas respetar la licencia y dar crédito a Bryand Salamanca.
Archivos (8)
- Categoría
- Para tu impresora
- Formatos
- STEP, F3Z, OBJ
- Descargas
- 168
- Publicado
Sobre este modelo
Wolfrom 96 to 1 helicoidal A Wolfrom-type compound planetary gearbox with herringbone (double helical) gears and stepped planets, designed for 3D printing. It reaches a 96:1 reduction in a compact Ø110 mm package. It needs no off-the-shelf bearings: the output ring rides on a built-in ball bearing made of 50 steel balls running in a race printed into the housing. Features - Reduction ratio: exactly 96:1 (output turns in the same direction as the motor) - Type: Wolfrom planetary with stepped planets, no carrier - Gears: Herringbone, module 1.5, self-centering with no axial load - Output bearing: 50 × 7/32" (5.5 mm) steel balls in a printed race - Output mounting: 6 × M4 heat-set inserts on a Ø60 mm bolt circle - Size (without motor): Ø110 × 46.5 mm - Input: NEMA 17 (60 mm) by default, any motor can be adapted (mind the output torque) - No supports needed for any part - Editable STEP file included so you can modify and improve the design
How it works Each planet is a single stepped gear with two toothed sections: - Lower stage: the input sun (on the motor shaft) drives the large section of the planets, which also meshes with the fixed ring built into the housing. - Upper stage: the small section of the planets meshes with the output ring. A second sun gear in the middle is an idler: it spins freely on the shaft and keeps the planets centered and aligned. It does not transmit torque.
GearTeethPart Input sun9sol_1 Planet, lower section24planeta (x3) Fixed ring57corona_1 Idler sun12sol_2 Planet, upper section21planeta (x3) Output ring54corona_2 Ratio: i = (1 + Z_fixed / Z_sun) / (1 − (Z_fixed × Z_planet2) / (Z_planet1 × Z_output)) i = (1 + 57/9) / (1 − (57 × 21) / (24 × 54)) = (66/9) / (99/1296) = 96:1 Both stages satisfy the 3-planet assembly condition: (9 + 57) / 3 = 22 and (12 + 54) / 3 = 22. The important part: the balls ⚙️ The output ring (corona_2) is supported by a ball bearing built into the housing. This is the key part of the design. - Quantity: 50 balls - Size: 7/32" (5.556 mm), the easiest size to find. 5.5 mm balls also work. - Material: Steel bearing balls. Avoid airsoft BBs: they are 6 mm and plastic. - Ball circle: Ø96.4 mm - The balls are loaded one by one through the side port once the output ring is in place. A magnetic screwdriver makes this much easier. - Grease the race well before loading the balls.
Motor The gearbox is designed around a NEMA 17 stepper (60 mm body), but any motor can be used as long as you adapt the mount and the input sun. Things to keep in mind: - Shaft: sol_1 has a 5 mm D bore and locks onto the shaft's flat. With a different shaft, edit sol_1 in the STEP file. A round shaft without a flat will slip. - Mount: base_motor uses the standard NEMA 17 pattern (4 × M3, 31 mm spacing). Another motor needs a modified base. - ⚠️ Watch the output torque: the gearbox multiplies the motor torque by 96 (minus friction losses). Output torque ≈ motor torque × 96 × efficiency For example, a 0.4 N·m NEMA 17 could produce close to 38 N·m at the output. That is more than printed plastic teeth can take. Choose the motor, or limit its current, according to the load you actually need. Too much torque can strip the teeth, deform the ball race or crack the housing.
Hardware (McMaster-Carr) The screws and inserts are mainly for assembly and looks. They are not critical to how the mechanism works, so feel free to use whatever you have on hand. PartMcMaster P/NQtyWhere Steel ball 7/32"—50Ball race M3 heat-set insert94459A1408corona_1 (bottom, Ø100 mm bolt circle) M3 socket head screw91292A1138base_motor → corona_1 M4 heat-set insert94459A1506corona_2 (top, Ø60 mm bolt circle) M4 socket head screw91292A1166Output mounting M3 screw for the motor—4base_motor → NEMA 17 Printed parts FileQtyDescription corona_1.obj1Housing with the fixed ring (57T) and the outer ball race corona_2.obj1Output ring (54T) with the inner ball race and M4 inserts planeta.obj3Stepped planet (24T + 21T) sol_1.obj1Input sun (9T), press-fit on the motor shaft sol_2.obj1Idler sun (12T), spins freely on the shaft base_motor.obj1Motor plate Print settings - Material: PETG recommended. It is tougher and handles friction and heat better than PLA. - Supports: Not required. Every part prints without supports. - Layer height: 0.15–0.2 mm - Walls: 3 or more - Infill: 30–50 % - Calibrate horizontal expansion: tolerances matter for the herringbone teeth and the ball race.
Assembly - Install the 8 M3 heat-set inserts in corona_1 and the 6 M4 inserts in corona_2. - Bolt the motor to base_motor with 4 M3 screws. - Press-fit the input sun (sol_1): it is designed as a tight fit. Heat the motor shaft (a soldering iron or heat gun works) and push the sun gear on, aligned with the flat. The plastic softens slightly and grips the shaft once it cools. Don't overheat it: you only need it warm enough for the gear to slide on, not to melt it or damage the motor. - Attach corona_1 to the base with the 8 M3 screws. - Place the three planets (herringbone gears can't be slid in at an angle; they must drop straight into position). - Slide the idler sun (sol_2) onto the shaft between the planets. - Grease the race and fit corona_2 on top of the planets. - Load the 50 balls one by one through the side port, turning the output ring a little as you go. - Run the motor for a few turns to bed in the teeth.
Lubrication White lithium grease is recommended for the whole mechanism: gears, planets and the ball race. It stays in place, doesn't attack PETG and keeps the gearbox running smooth and quiet. Recommendations - Print in PETG, no supports needed. - Use a motor with a flat on the shaft and keep the output torque in mind. - Heat the motor shaft before pressing on sol_1. - Lubricate with white lithium grease.
Credits - Hardware (screws and heat-set inserts) sourced from McMaster-Carr. - NEMA 17 motor model taken from GrabCAD and modified for this design.
Editable files: remix it! 🛠️ The full assembly is included as a STEP file so you can study the design, change the ratio, try other tooth counts, adapt it to other motors or improve the ball race. If you make a remix, please share it. I'd love to see what improvements come out of it. License Creative Commons – Attribution – Share Alike Printed one? Post your Make and let me know how it went!
Descripción original del autor, publicada en Thingiverse.



