VITRAL - Stained Glass Christmas Tree Lamp
por A Arte D en Printables
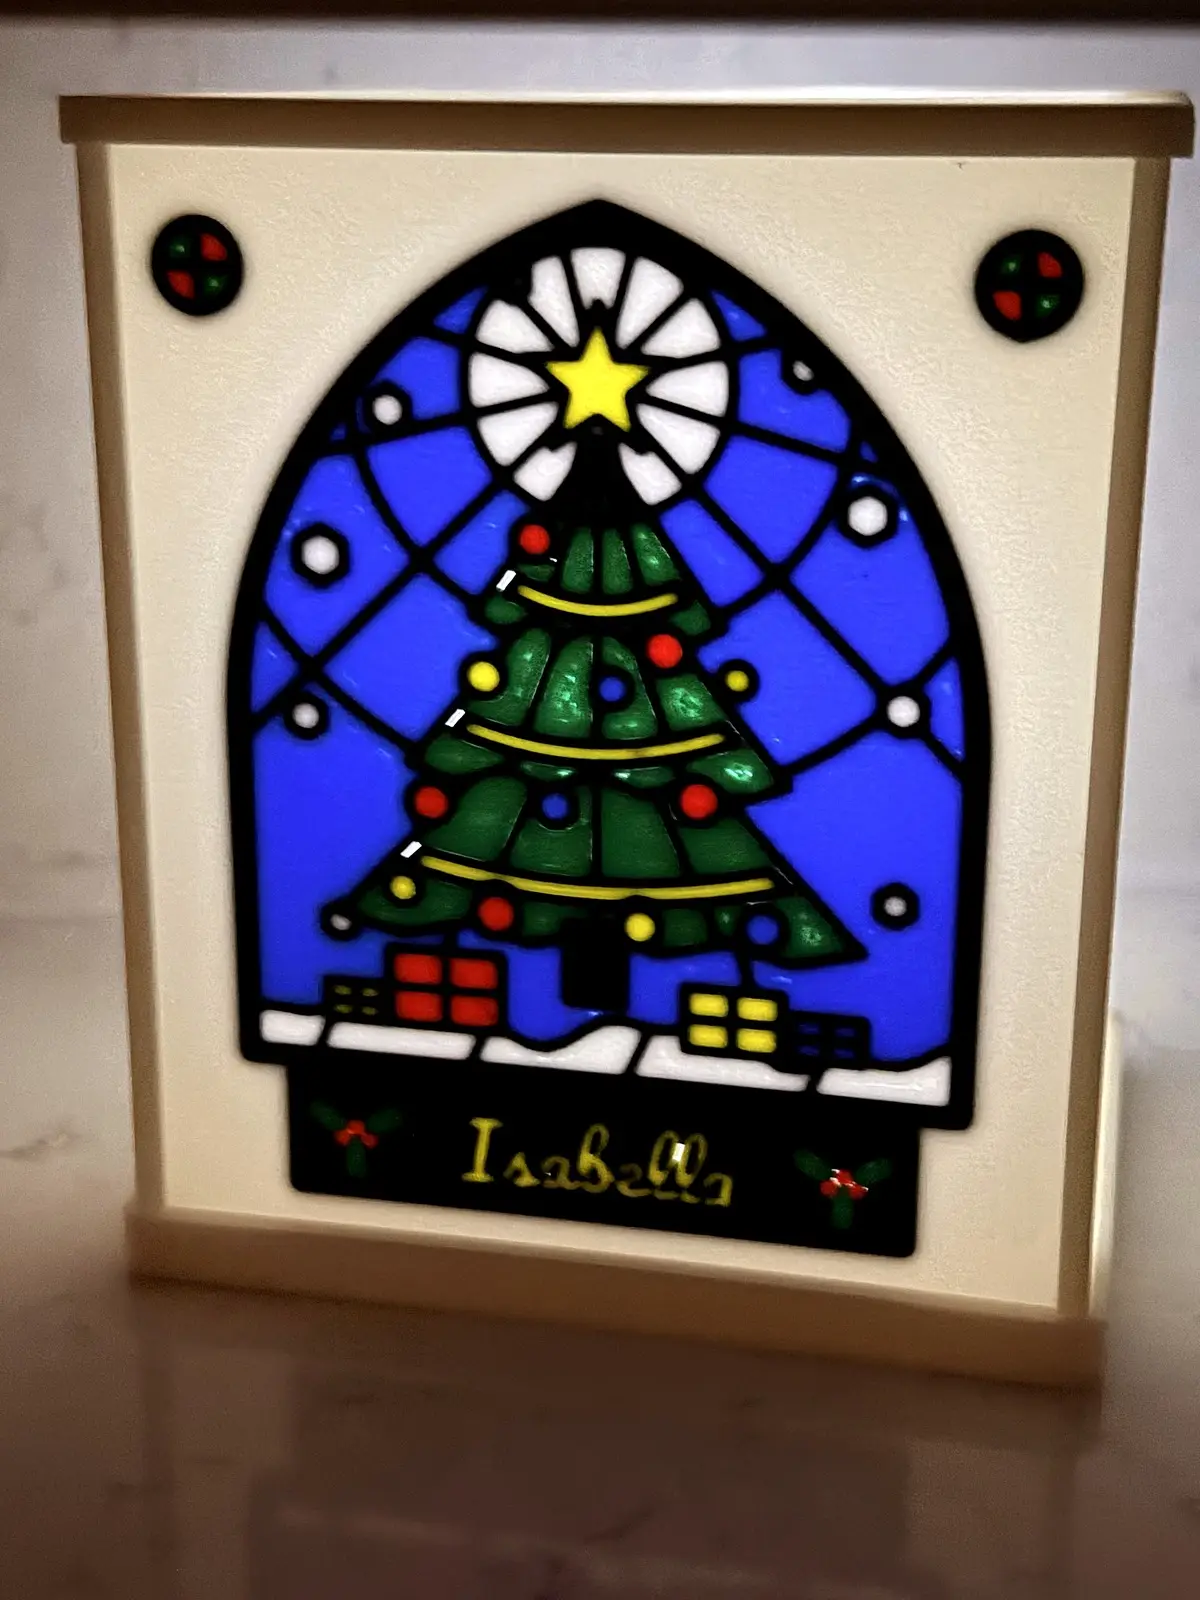
Stained-glass Christmas tree tealight lamp with black lead lines, coloured glass and your name on a glowing plaque.
Licencia
Solo uso personalStandard Digital File License
Licencia estándar de archivos digitales: solo uso personal. No se permite compartir, revender ni subir el archivo a otros sitios, ni vender las impresiones.
Al descargar aceptas respetar la licencia y dar crédito a A Arte D.
Archivos (23)
- VITRAL_diffuser.stl STL · 79 KB
- VITRAL_side_l.stl STL · 7 KB
- VITRAL.scad SCAD · 90 KB
- VITRAL_side_r.stl STL · 7 KB
- VITRAL_base.stl STL · 132 KB
- VITRAL_rear.stl STL · 1 KB
- VITRAL_top.stl STL · 31 KB
- VITRAL_white_0.4.3mf 3MF · 1,0 MB
- VITRAL_6colour_0.4.3mf 3MF · 3,6 MB
- VITRAL_front_Isabella_blue_glass.stl STL · 1,4 MB
- VITRAL_front_Isabella_green_glass.stl STL · 2,0 MB
- VITRAL_front_Isabella_yellow_glass.stl STL · 724 KB
- VITRAL_front_Isabella_red_glass.stl STL · 445 KB
- VITRAL_front_Isabella_white_frame.stl STL · 167 KB
- VITRAL_front_Isabella_white_glass.stl STL · 239 KB
- VITRAL_front_Isabella_black_lead.stl STL · 3,8 MB
- VITRAL_front_Isabella_white_version.stl STL · 4,5 MB
- VITRAL_front_no_name_white_version.stl STL · 4,4 MB
- README.txt TXT · 2 KB
- VITRAL_Assembly_Guide.pdf PDF · 726 KB
- VITRAL_STL_6colour.zip ZIP · 4,4 MB
- VITRAL_STL_white.zip ZIP · 2,3 MB
- VITRAL_fonts.zip ZIP · 149 KB
- Categoría
- Para tu impresora
- Formatos
- STL, SCAD, 3MF, TXT, PDF, ZIP
- Descargas
- 0
- Publicado
Sobre este modelo
A little church window for the shelf or the Christmas table. The front of the lamp is built like real stained glass: black lead lines frame more than 60 coloured panes, with a Christmas tree under a glowing star, red, yellow and blue ornaments, gifts in the snow and a blue sky full of snowflakes. A white diffuser behind the window spreads the light of an LED tealight, so every pane glows. Your name sits underneath on a black plaque in yellow glass letters, between two holly sprigs. Highlights - Built like real stained glass: Full-thickness 1 mm black lead lines and 0.8 mm coloured glass panes on the front face. No paint, no gluing.
- Your name on a glowing plaque: Open VITRAL.scad in OpenSCAD (or use the MakerWorld customizer), type any name and pick one of 5 fonts. Long names shrink to fit between the holly sprigs.
- 6 colours or all white: A ready 6-colour project (2 AMS) and a one-spool white version where the glass glows through thin layers and the lead stays dark.
- Even glow: A white diffuser panel right behind the window lights every pane, not just the middle.
- Slides together, no glue: The same rail box as BLOCK LAMP and AURORA: side walls with rails, the lid locks everything. About 5 minutes to assemble.
- No supports: Every part prints flat. The stained-glass front prints face down for a smooth, glossy front.
What you need - PLA in white, black, red, green, yellow and blue for the 6-colour version (about 174 g, mostly white). Six filament slots are needed for the window plate (two AMS units). Or about 165 g of white PLA for the white version.
- One 1.5" (38 mm) LED tealight in COOL WHITE. A model with a remote is recommended, because the tealight sits inside the lamp.
- LED tealights only. Never use a real flame.
Print profiles Bambu Lab X2D, 0.4 mm nozzle, 0.20 mm layers, 3 walls, 15 % infill, PLA Basic, no supports. 6-colour version: plates 1 to 3, about 4 h 30 min and 174 g; white, yellow and blue on nozzle 1, black, red and green on nozzle 2, colour changes only in the first 4 layers. White version: 3 plates, about 3 h 50 min and 165 g. Fits any 256 x 256 mm bed. The STLs are included for other slicers (the 6-colour front is split into one STL per colour, already aligned). 6 colours (2 AMS) - Plate 1: Stained-glass front with name + diffuser (6 colours) (1 h 30 min, 38 g)
- Plate 2: Base and lid (1 h 45 min, 72 g)
- Plate 3: Rear panel and both side walls (1 h 16 min, 64 g)
- Plate 4: Optional: stained-glass front without a name (1 h 09 min, 25 g)
All white - Plate 1: Stained-glass front with name + diffuser (46 min, 29 g)
- Plate 2: Base and lid (1 h 45 min, 72 g)
- Plate 3: Rear panel and both side walls (1 h 16 min, 64 g)
Customizer - Name: Any name, up to about 10 letters. Long names are scaled down to fit the plaque.
- Font: Rounded (Fredoka), Script (Pacifico), Retro script (Lobster), Festive (Mountains of Christmas), Clean (Poppins). Install the fonts from VITRAL_fonts.zip first.
- Version: 6 colours (yellow glass letters) or all white (the name glows through a thin layer).
- Part: Export the stained-glass front with your name, the diffuser, or any other plate.
- Tealight cup: 38 to 44 mm. The default 40.8 mm fits standard 38-39 mm LED tealights.
Assembly - Switch the tealight on and drop it into the cup at the back of the base.
- Press both side walls into the long slots of the base, rails facing inwards.
- Slide the rear panel into the last rail and the diffuser into the 2nd rail from the front (flat side forward, arch pointing up).
- Slide the stained-glass front into the 1st rail, smooth side out. The two middle rails stay empty.
- Press the lid on with the star vents over the tealight.
Tips - Use a cool-white LED tealight: it keeps the blue and green bright.
- Keep the front face down on the plate: the glass is the first 4 layers.
- Turn off elephant-foot compensation or keep it small. The rails have 0.15 mm clearance per side.
- A panel feels tight? Two strokes of 400-grit sandpaper on its side edges.
Descripción original del autor, publicada en Printables.