
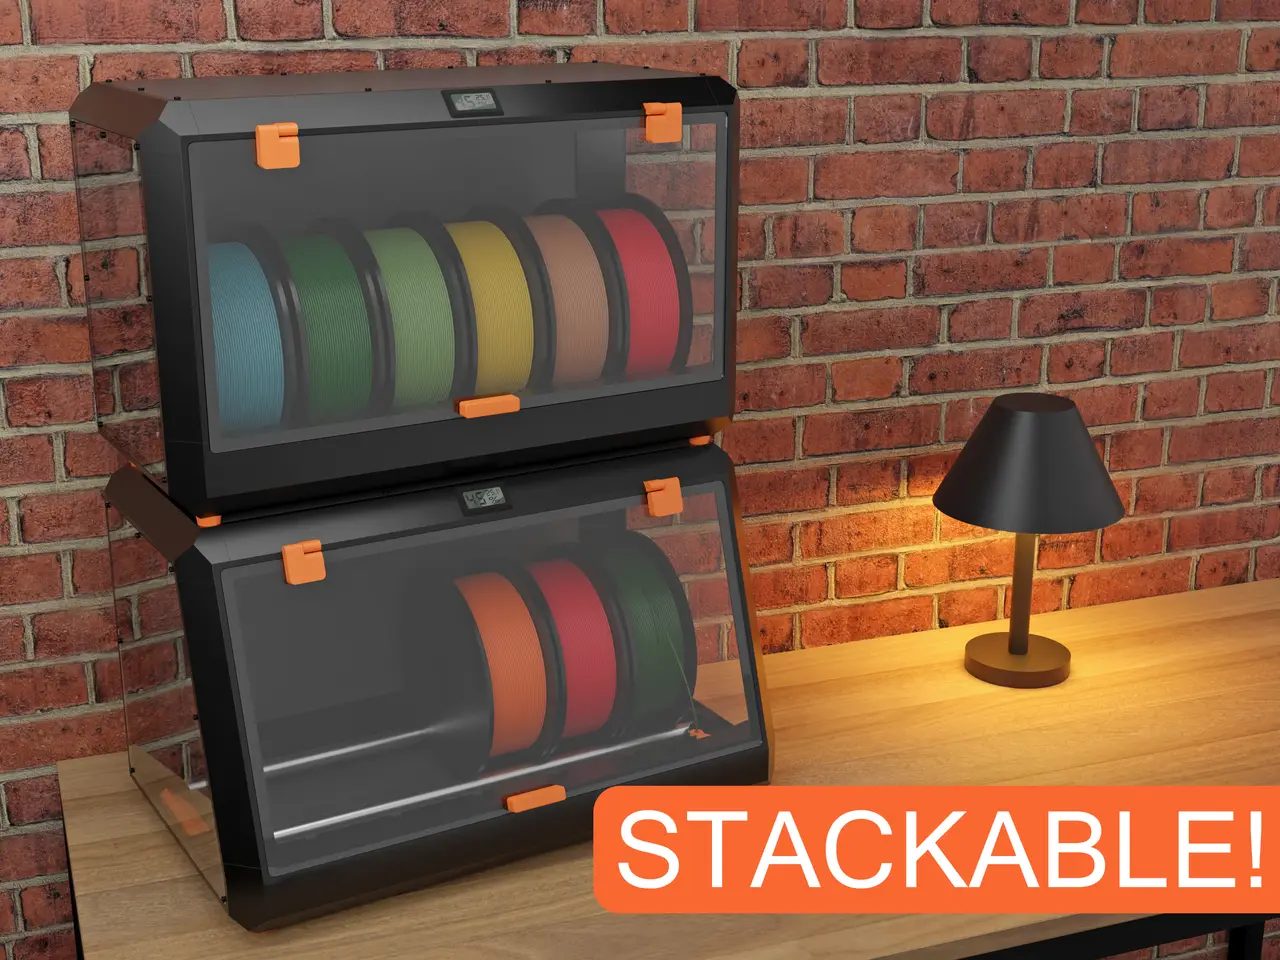
(Un)original Prusa Drybox
por Bram Elema en Printables
The (Un)original Prusa Drybox is a drybox designed to sit on top of the Original Prusa Enclosure and is used to...
Licencia
Solo uso personalCC BY-NC-SA 4.0 — Atribución, no comercial, compartir igual
Uso personal dando crédito; sin fines comerciales y las modificaciones con la misma licencia.
Al descargar aceptas respetar la licencia y dar crédito a Bram Elema.
Archivos (135)
- Front Panel.dxf DXF · 34 KB
- Bottom Panel.dxf DXF · 47 KB
- Back Panel.dxf DXF · 52 KB
- Top Panel.dxf DXF · 51 KB
- Side Panel.dxf DXF · 39 KB
- Front Panel.dxf DXF · 40 KB
- Bottom Panel.dxf DXF · 41 KB
- Back Panel.dxf DXF · 50 KB
- Top Panel.dxf DXF · 50 KB
- Side Panel.dxf DXF · 44 KB
- 2x A1 & 2x A2.3mf 3MF · 37 KB
- A1 & A2 Throughput.3mf 3MF · 60 KB
- A1 & 2 PC4-M10.3mf 3MF · 269 KB
- B2 X2.3mf 3MF · 36 KB
- C1 & C2, 2xD.3mf 3MF · 68 KB
- E1 & E2.3mf 3MF · 50 KB
- F1 & F2.3mf 3MF · 61 KB
- F1 & F2 Standalone.3mf 3MF · 269 KB
- G1 & G2.3mf 3MF · 59 KB
- G1 & G2 Humidity.3mf 3MF · 65 KB
- All corners.3mf 3MF · 147 KB
- 2x A1 & 2x A2.3mf 3MF · 37 KB
- A1 & A2 Throughput.3mf 3MF · 60 KB
- A1 & 2 PC4-M10.3mf 3MF · 269 KB
- B2 X2.3mf 3MF · 36 KB
- C1 & C2, 2xD.3mf 3MF · 70 KB
- E1 & E2.3mf 3MF · 48 KB
- F1 & F2.3mf 3MF · 57 KB
- F1 & F2 Standalone.3mf 3MF · 271 KB
- G1 & G2.3mf 3MF · 60 KB
- G1 & G2 Humidity.3mf 3MF · 67 KB
- All corners.3mf 3MF · 138 KB
- Beam A1.stl STL · 37 KB
- Beam A1_Throughput.stl STL · 57 KB
- Beam A1_PC4-M10.stl STL · 412 KB
- Beam A2.stl STL · 51 KB
- Beam A2_Throughput.stl STL · 70 KB
- Beam A2_PC4-M10.stl STL · 425 KB
- Beam A3.stl STL · 65 KB
- Beam A4.stl STL · 39 KB
- Beam_A1+2.stl STL · 72 KB
- Beam_A1+2_Throughput.stl STL · 112 KB
- Beam_A1+2_PC4-M10.stl STL · 821 KB
- Beam B.stl STL · 54 KB
- Beam C1.stl STL · 68 KB
- Beam C2.stl STL · 82 KB
- Beam C1_20mm.stl STL · 68 KB
- Beam C2_20mm.stl STL · 82 KB
- Beam_C1_RB.stl STL · 78 KB
- Beam_C2_RB.stl STL · 92 KB
- Beam_C1_RB_20mm.stl STL · 78 KB
- Beam_C2_RB_20mm.stl STL · 91 KB
- Beam D.stl STL · 44 KB
- Beam E1.stl STL · 27 KB
- Beam E2.stl STL · 41 KB
- Beam F1.stl STL · 67 KB
- Beam F2.stl STL · 81 KB
- Beam_F1+2.stl STL · 114 KB
- Beam F1_standalone.stl STL · 428 KB
- Beam F2_standalone.stl STL · 442 KB
- Categoría
- Para tu impresora
- Formatos
- DXF, 3MF, STL, BLEND, OBJ
- Descargas
- 11,361
- Publicado
Sobre este modelo
The (Un)original Prusa Heated Drybox is now available!
https://www.printables.com/model/883817-unoriginal-prusa-heated-drybox The (Un)original Prusa Heated Drybox is a heating add-on for the (Un)original Prusa Drybox. The heating add-on gives the extra functionality of drying wet filaments and even constantly heating to reduce the relative humidity. The add-on is available for both the CLASSIC and SLIM Edition of the drybox and is a good project for anyone who wants to learn how to solder and work with electronics. The heating system features a 200W PTC heating element in combination with two fans to blow hot air through the drybox. The heating system is located under the top panel of the drybox ensuring that the drybox still holds up to 6 spools with a diameter of 21 cm. Using the 2mm polycarbonate panels and with all 6 spools the heating system can reach temperatures of up to 45 degrees Celsius or 113 degrees Fahrenheit in 15 minutes making it perfect for drying multiple spools of PLA at the same time*. It can also reach temperatures of up to 65 degrees making it suitable for PETG**. Update July 6, 2024 - Relabelled the top Beam A1 & A2 to Beam A3 & A4 so it is easier to understand what parts to pick for your configuration. Functionally both parts are exactly the same. - Added image with an overview of the location of each part in the frame to the assembly section.
Update June 28, 2024 - Added image with measurements to the gallery
Update May 24, 2024 - A full kit with printed parts for the SLIM Edition is now available through Blurolls!
Update April 21, 2024 - Published 3MF files for the SLIM Edition - Added longer versions of beams A, F & G for the SLIM Edition that can be printed in one piece if you have a large printer.
About The (Un)original Prusa Drybox (CLASSIC) is a drybox made out of printed parts and 2mm acrylic or pc panels. The drybox is designed to match the aesthetic of the Original Prusa Enclosure and works perfectly with it. It features an internal PTFE tube that goes through the center hole on top of the Prusa Enclosure making it not visible from the outside, the PTFE tube can be placed in six slots inside the drybox ensuring a straight path from each spool. The drybox also has two silica gel containers to keep your filament dry. An optional humidity sensor can also be used to track the humidity inside. The drybox isn't sealed but will keep most air out, and to improve its performance you can add a rubber seal. Finally, it fits most 1 kg spools by having a maximum diameter of a little over 21cm. There is also a new SLIM Edition of the (Un)original Prusa Drybox available. This edition can hold up to 6 spools with a diameter of 21 cm just like the CLASSIC Edition. However, unlike the CLASSIC Edition this version can be stacked upon each other, it can also be stacked on top of your CLASSIC drybox. This version does not have the internal passthrough hole to the Original Prusa Enclosure, but you can still directly print from it using the standalone parts. Finally, the filament is a little bit easier to access in the CLASSIC Edition due to the door being at an angle. Support If you like this or any of my other models consider buying me a coffee. https://www.buymeacoffee.com/bramelema If you donate over €5 as a thank you you will be added to a list of supporters below (write the name you want to see here in the comment box). Supporters #1 Mikko Laaksonen, #2 Vespercorp, #3 Anonymous, #4 Andrewlb.com, #5 Peter from Blurolls, #6 Walter Bracke, #7 Alex Krasno, #8 Sarah, #9 Greg & Maud, #10 Arcaik, #11 Joost, #12 Psych0h3ad, #13 T. J. Domsalla, #14 Photastro, #15 Anonymous, #16 Ment57, #17 Jim Callahan, #19 Werner, #20 Svaar Caldersson, #21 Bronco7794, #22 CowboyWillT, #23 Filip, #24 Kukulin, #25 mdandersen, #26 Anonymous, #27 Dennis, #28 JT, #29 Thomas Trueten, #30 Kilsgaard Special thanks to #18 WBSP Thank you everyone for your support!
Buy the panels The parts for this project are available through Blurolls and can be bought here: Classic Edition: - The panels-only kit is unfortunately no longer available - Blurolls or Aliexpress(full kit except for printed parts) - Blurolls or Aliexpress(full kit including printed parts)
Slim Edition: - The panels-only kit is unfortunately no longer available - Blurolls or Aliexpress(full kit except for printed parts) - Blurolls or Aliexpress(full kit including printed parts)
Note: I receive a small portion of each sale which helps me develop future projects like this one Reviews Kanrog Creations Adventures with Dr. Joe Gallery Classic Edition Slim Edition
Both versions of the dry box feature two removable containers for silica gel
The Classic edition also features an internal PTFE tube connected to a PC4-M10 connector which can be used for a nice path directly to the original prusa enclosure. The Slim edition doesn't have this feature.
Print settings I recommend printing with 3 walls and 25% infill. The beams, corners, and hinges have to be printed using supports, all other parts can be printed without. The parts have already been placed in their optimal orientation and are designed to be printed with little and easy-to-remove supports.
Bill of Materials The BoM is the same for both editions of the drybox with the only difference being the amount of filament used for the printable parts. Filament For the Classic edition the printable parts add up to around 1300 grams of filament when using 3 walls and 25% infill. The Slim edition requires around 1250 grams of filament when using the aforementioned settings. Since the drybox isn't exposed to heat any material can be used however I recommend printing with something a little more durable than PLA, such as PLA+, PETG, or ABS. Panels 6 acrylic or polycarbonate (PC) panels with a thickness of 2mm or 3mm are required, I recommend PC for higher durability. The dxf files for the panels are in the files section. Note: the drybox is designed for 2mm panels so 3mm panels will stick out a little bit but now the hinge will also work with the thicker panel. Note: the side panel is needed twice. Screws In total 82 M3*8 screws are needed. M3*10 would also work in most places except for the hinges. There are also 42 M3 nuts required as well as 40 M3 heat-set inserts, For the threaded inserts I accounted for the ones from Ruthex, they require a hole with a diameter of 4mm and a depth of 5.7 but other brands would also work. Other Two tubes are also required with a length of 49 centimeters and a diameter of 1.8 centimeters. Preferably of a low friction material as they are used to hold the spools. Standalone 6 PC4-M10 connectors are recommended Optional A PC4-M10 connector can be used in combination with a PTFE tube to ensure an “easy” path for the filament to your hotend. Two 10*5*2 mm neodymium magnets can be used for closing the door. A generic rectangular humidity sensor can be added. Silica gel can also be used in printable containers to keep your filament dry. When using the drybox with feet, 4 felt or rubber pads with a diameter of 15 mm can be added.
Printed parts CLASSIC EDITION: Name:Amount: Notes: Beam A1_(Throughput) /(PC4-M10)1“_Throughput” adds holes in the bottom back to put a PTFE tube through. “_PC4-M10” replaces the optional throughput holes with PC4-M10 fittings. Beam A2_(Throughput) /(PC4-M10)1“_Throughput” adds holes in the bottom back to put a PTFE tube through. “_PC4-M10” replaces the optional throughput holes with PC4-M10 fittings. Beam A31 Beam A41 Beam B2 Beam C1_(RB)(20mm)1“_20mm” is made for using 20mm diameter rods instead of the regular 18mm ones. “RB” makes the drybox compatible with this raised RepBox 2.5 mount. Beam C2_(RB)(20mm)1“_20mm” is made for using 20mm diameter rods instead of the regular 18mm ones. “RB” makes the drybox compatible with this raised RepBox 2.5 mount. Beam D2 Beam E11 Beam E21 Beam F1_(Standalone)1“_Standalone” adds the standalone feature Beam F2_(Standalone)1“_Standalone” adds the standalone feature Beam G1_(Humidity)1Choose "_Humidity" when using a humidity sensor. Beam G2_(Humidity)1Choose "_Humidity" when using a humidity sensor. Corner A4 Corner B11 Corner B21 Corner C11 Corner C21 Note: Beams A, F & G also have a version that can be printed in one part instead of two (Labelled with “1+2” or "3+4"). Note: Beams A1 & A3 and A2 & A4 are the same parts but labelled differently for more clarity when picking your configuration. SLIM EDITION Name:Amount: Notes: Beam A1_(Throughput) /(PC4-M10)1“_Throughput” adds holes in the bottom back to put a PTFE tube through. “_PC4-M10” replaces the optional throughput holes with PC4-M10 fittings. Beam A2_(Throughput) /(PC4-M10)1“_Throughput” adds holes in the bottom back to put a PTFE tube through. “_PC4-M10” replaces the optional throughput holes with PC4-M10 fittings. Beam A31 Beam A41 Beam B2 Beam C1_(20mm)1“_20mm” is made for using 20mm diameter rods instead of the regular 18mm ones. Beam C2_(20mm)1“_20mm” is made for using 20mm diameter rods instead of the regular 18mm ones. Beam D2 Beam E11 Beam E21 Beam F1_(Standalone)1“_Standalone” adds the standalone feature Beam F2_(Standalone)1“_Standalone” adds the standalone feature Beam G1_(Humidity)1Choose "_Humidity" when using a humidity sensor. Beam G2_(Humidity)1Choose "_Humidity" when using a humidity sensor. Corner A4 Corner B11 Corner B21 Corner C11 Corner C21 Note: Beams A, F & G also have a version that can be printed in one part instead of two (Labelled with “1+2” or "3+4"). Note: Beams A1 & A3 and A2 & A4 are the same parts but labelled differently for more clarity when picking your configuration.
ACCESSORIES (for both editions) Name:Amount: Notes: Silica_Gel_Base1-2OPTIONAL Silica_Gel_Lid1-2OPTIONAL PTFE_Connect _(15deg)(Extended)1-6OPTIONAL, "_15deg" puts the PC4-M10 connector at a 15-degree angle to ensure a more direct filament path. “_Extended” is 35mm longer and puts the PC4-M10 connector closer to the spool Hinge_Connect_(3mm)2Choose for “_3mm” when using 3mm panels. Hinge_Left1 Hinge_Right1 Door_Handle1 Passthrough_Cover1OPTIONAL Stack_14OPTIONAL, Used to stack dryboxes on top of each other. Mount to the corners of the top panel of the lower drybox. Stack_24OPTIONAL, Used to stack dryboxes on top of each other. Mount to the corners of the bottom panel of the upper drybox. Note: only the Slim edition can be used to stack upon another drybox Feet4OPTIONAL French_cleat_mount4OPTIONAL, Compatible with a 19mm (¾ inch) French cleat. French_cleat_bumper0-4OPTIONAL, Can be used to keep the bottom back of the enclosure of the wall.
Assembly The installation process is the same for both versions. The instructions below show images from the Classic edition but the parts from the slim edition are labeled the same. 1) Heat-set inserts Insert the threaded inserts in the correct places using a soldering iron. Install the heat-set inserts in the following way in beams A2, A4 & G2
Install the heat-set inserts in the following way in beam E1, E2, D, G1, A1, A3, B, C1 & C2 Note: G1_humidity has a different way of installing the heat-set inserts
Install the heat-set inserts in the following way in beams F1 & F2
Install the heat-set inserts in the following way in beam G1_humidity & G2_humidity
The heat-set inserts for the door-related parts can be installed like this
2) Assembling the frame Install "Hinge_Connect" into Beam G1 and G2 as shown in the picture above and screw it in from the back. If you chose the standalone version now the PC4-M10 connectors can also be installed. After that start assembling the frame with the M3*8 screws as shown in the pictures below. When using the longer beams (number 3) this step can be skipped. Note: In the image the top two beams are labelled as A1 & A2 whereas they are now labelled A3 & A4, these parts are the same and can be installed in the same way. Note: When using a humidity sensor connect the parts as shown at the top of the image, otherwise use the bottom instruction. The final result should look like the image below (CLASSIC Edition). 3) The panels Once the frame is done it is smart to put the two tubes on which the spools will rest in place, this can also be done later but now it is the easiest to access. If you will be using the optional throughput holes in the bottom/back run a PTFE tube through the hole, under the beams, and then install it in part “PTFE_Connect” with a PC4-M10 connector. The panels can be attached with the M3 nuts and screws, the nuts should fall into the holes inside of the frame. Repeat this step for the left, right, top, bottom, and back panels. If you decided to use the optional feet you can install these by putting the corner screws that hold the bottom panel in place through them first. Note: The front panel doesn't have to be assembled during this step as we will do this later. 4) Finishing touches If you use the silica gel containers you can fill them and place them as shown in the picture above. Right now the humidity sensor and PTFE tube can also be installed. Finally, the door can be installed, this can be done by sliding the hinges into the connectors from the side and securing them to the panel, the door handle can also be installed and the magnets can be glued into place on the handle and the bottom of the frame. Done!
Change log Update February 22, 2024 - A panel kit and a full kit (hardware+panels) are now available through Blurolls!
Update February 5, 2024 A new SLIM Edition of the (Un)original Prusa Drybox is now available. This edition can hold up to 6 spools with a diameter of 21 cm just like the CLASSIC Edition. However, unlike the CLASSIC Edition this version can be stacked upon each other, it can also be stacked on top of your CLASSIC drybox. This version does not have the internal passthrough hole to the Original Prusa Enclosure, but you can still print from it using the standalone parts. Finally, the filament is a little bit easier to access in the CLASSIC Edition due to the door being at an angle. - 3MF files with supports will be added soon - A panel kit will also be available through Blurolls soon
Update January 9, 2024 - Added an extended version of “PTFE_Connect” that puts the PC4-M10 connector closer to the spool.
Update January 8, 2024 - Added French cleat mounting option for a 19mm (¾ inch) French cleat. - Added the ability to raise the drybox above the Prusa enclosure by making it compatible with this model. To achieve this replace beams C1&2 with the RepBox (RB) mount version.
Update December 7, 2023 - Blurolls now has a full kit including the printed parts available!
Update October 24, 2023 - A full kit with everything except for the printed parts is now available through Blurolls on Aliexpress. This kit also includes 24 bearings that can be used for spool rollers.
Update September 29, 2023 - Added optional cover for the internal passthrough to the Original Prusa Enclosure.
Update September 24, 2023 - Added “Hinge_Connect_4mm” for more clearance when using 3mm panels with weatherproofing (sealed panels).
Update September 20, 2023 - Added support for 20mm rods.
Descripción original del autor, publicada en Printables.



