
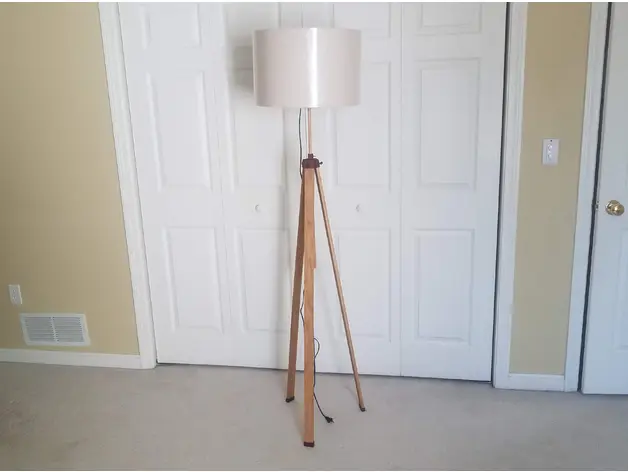
Tripod Floor Lamp
por cu de vaca en MyMiniFactory
This project will guide you through the step-by-step to create a Tripod Floor Lamp.
Licencia
Solo uso personalCC BY-NC-SA 4.0 — Atribución, no comercial, compartir igual
Uso personal dando crédito; sin fines comerciales y las modificaciones con la misma licencia.
Al descargar aceptas respetar la licencia y dar crédito a cu de vaca.
Archivos (3)
- Categoría
- Hogar
- Formatos
- STL
- Descargas
- 94
- Publicado
Sobre este modelo
This project will guide you through the step-by-step to create a Tripod Floor Lamp. It has a lot of steps, but they are not that difficult.
List of printed parts: * 3 feet, 1 for each leg * 1 core to mount the legs angled * 1 lamp socket mount * 1 bumper to protect the vertical rod (print this in some sort of flexible filament like TPU/TPE, if you don't have this kind of filament, I bet you can use any kind of bumper)
List of non-printed parts: Here you find the list of materials to buy if you don't have them. However you might substitute some of the items if you wish. Read carefully
* 3 hardwood board. 1/2 in. x 2 in. x 4 ft. I don't know much about wood and I chose poplar, you can pick any kind of wood you prefer
* 1 hardwood dowel. 1/2 in. x 48 in
* 1 large shade. Large: 17" diameter, 11" high
* 3 big thumb screws. 1/4 in.-20 x 1 in.
* 3 big nuts for the thumb screws above. 1/4 in.
* 1 small thumb screw. #10-32 x 1/2 in.
* 1 small nut for the small thumb screw above.
* 1 lamp cord
* 1 bulb socket
* 1 lamp harp
OPTIONAL: You can paint/stain the wood to achieve the appearance you desire. I decided to use Danish oil Also sprayed the thumb screws and nuts with rust oleum
Assembling instructions: 01) Use the "core" to mark on the wood board the place to drill 02) Using 1/4in drill bit, drill the holes (1 hole for each leg) 03) Paint/stain the parts you want, if you desire to do so 04) Place the nuts on the "core" 05) Put the feet in place 06) Place the legs on the core and secure them using the larger thumb screw 07) Screw the small thumb screw on the small nut 08) Glue the bumper on the tip of the small thumb screw 09) Slide the small thumb screw on it's place, fitting the nut on it's place and use a drop of glue to hold, permanently, the nut in place. Be careful, you don't want to glue the nut and thumb screw together. 10) Assemble the socket, cord and the lamp harp. 11) Put the socket inside the "socket mount". 12) Insert the dowel on the "socket mount" 13) Place the dowel on it's position and secure it tightening the small thumb screw. 14) Place the light bulb on the socket 15) Put the shade 16) Turn it on and enjoy it!! 17) If you make one hit "Post a Make"
If you like this, check my Wall Lamp
=====
If you'd like to support me you can post a make, comment and/or pay me a coffee at PayPal
Descripción original del autor, publicada en MyMiniFactory.



