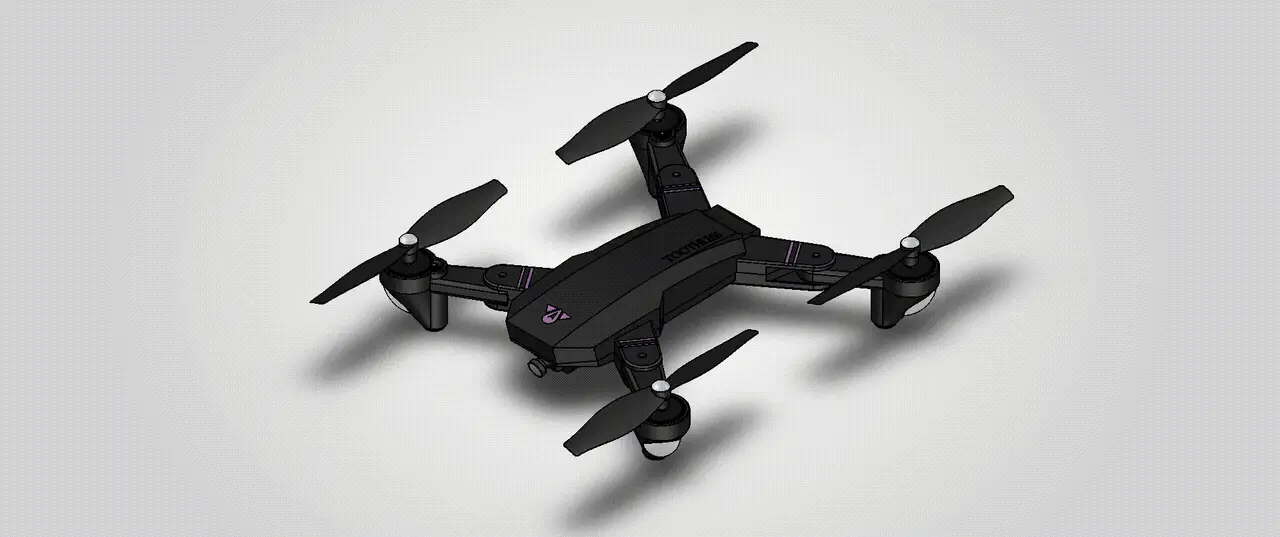
Toothless
por Adriel Babalola en Printables
A Toothless-inspired quadcopter frame with custom body geometry, motor housings and FPV camera mount.
Licencia
Uso comercial permitidoPuedes imprimirlo, modificarlo y venderlo dando crédito al autor.
Al descargar aceptas respetar la licencia y dar crédito a Adriel Babalola.
Archivos (10)
- base1.step STEP · 827 KB
- properllers.step STEP · 292 KB
- motor_housing_unit.step STEP · 229 KB
- brushless_motor.step STEP · 162 KB
- generic_fpv_camera.step STEP · 74 KB
- full_assembly_toothless.step STEP · 2,0 MB
- cover_1.step STEP · 1,7 MB
- motor_housing_unit-opp.step STEP · 229 KB
- properllers_b.step STEP · 293 KB
- drive_compoenet.step STEP · 910 KB
- Categoría
- Varios
- Formatos
- STEP
- Descargas
- 1
- Publicado
Sobre este modelo
Toothless is my take on a Toothless-themed quadcopter, inspired by the Night Fury from How to Train Your Dragon. I've always liked the idea of merging a character's design into something functional, so I wanted to see how much of Toothless's visual identity I could bring into a drone frame without losing the overall quadcopter layout. The design was modelled in SolidWorks, starting with the main body, four arms, motor housings, propellers and outer shell. I also included a generic FPV camera model based on the Foxeer Nano Predator 5. This project was based on a SolidWorks drone design tutorial by NOE HD. However, I ran into quite a few issues with the original dimensions and geometry, so a significant amount of my time went into correcting and reworking the design. Main Body and Frame The main body is made up of upper and lower sections, with four arms extending outwards to support the motor assemblies. One of the biggest problems I encountered was that the original upper and lower body dimensions did not align properly. The upper body was also slightly larger than it needed to be, which created issues when trying to bring the two sections together.I had to revisit the sketches, loft profiles and dimensions, correct the proportions, and adjust the geometry until the two sections aligned much better. I also spent time refining the outer contours and shell features to give the drone a more finished appearance. Motor Housings and Propellers The four motor positions have dedicated housing units designed around generic 0820 coreless brushed DC motor models. I modelled the motor housings, drive components and propellers separately so they could be represented as individual components in the assembly. The motor model is generic for now, since I haven't settled on the actual motor I would use. The same applies to some of the internal mounting dimensions, which will need to be checked against the final hardware selection. FPV Camera I added a front-facing camera housing based on the Foxeer Nano Predator 5. I initially couldn't decide on a specific camera, so I modelled a generic representation to establish its position and fit within the front section of the frame. The camera is intended for FPV video rather than computer vision at this stage. Toothless Theme I wanted the drone to have more personality than a standard quadcopter frame. The purple accents and body detailing are inspired by Toothless's appearance. I also designed some of the body openings and side slots with future lighting in mind. I did how ever try extrdue cutting a night fury emblem on the surface and remove that generic logo there, but unfortunately my loft and thickness made it near impossible to pull it off will require a total redsign of that area so i scraped it after a few hours of well ... trying One feature I'd like to explore in a future version is speed-responsive lighting, where the purple LEDs become brighter or change their lighting pattern as the drone accelerates. I also have an idea of integrating a small speaker and sound playback system to play Toothless-inspired sound effects. This is still a concept and hasn't been implemented. Challenges and What I Changed A considerable part of this project involved troubleshooting the original geometry. Some of the measurements in the tutorial did not produce the expected results when I recreated the design. I encountered lofting issues, sketch alignment problems, and significant differences between the upper and lower body dimensions. Plus there were other models like the oppsites for diagonals like the propellers that need modification or a total overhaul.
Another issue was getting the propellers and their drive components to mate correctly in the assembly. I spent quite some time trying to figure out why some of the propeller mates were not behaving as expected. I also had to work through the motor housing geometry, shell features and the overall fit of the individual components. These were probably the most time-consuming parts of the project, but they gave me a much better understanding of SolidWorks surface modelling, lofts, assemblies, mechanical alignment and also my first animation yayyyyyyyy : ) Components The current CAD assembly includes: - Main upper body
- Main lower body
- Four arm sections
- Motor housing units
- Generic brushless motor model
- Propeller models
- Propeller drive components
- Generic FPV camera housing
- Outer body cover
The internal flight electronics have not yet been fully modelled. I plan to add generic representations of the flight controller, ESC, receiver, battery and other supporting electronics in a future revision. Toothless is currently a SolidWorks CAD project. I haven't physically manufactured or flown it, so the design has not been tested for structural strength, vibration, flight stability or actual component compatibility etc The motor, camera and internal electronics are placeholders or generic representations where applicable. Final component selection, mounting dimensions, propeller clearance and wiring arrangements will need to be verified before a physical build. Assembly Instructions Start by assembling the four arms onto the lower body, ensuring that they are correctly aligned with their respective mounting positions. Attach the motor housing units to the ends of the arms, then fit the brushless motor models and propellers onto their respective mounts. Next, position the upper body over the lower section and check that the mounting points and outer edges align properly before securing the two halves together. Install the front-facing FPV camera in its designated housing. The internal electronics, including the flight controller, ESC, battery and receiver, can then be positioned within the main body using suitable mounting hardware. Finally, check the alignment and clearance of all four propellers and ensure that no components interfere with their rotation. This is the intended CAD assembly sequence; actual fasteners, wiring and component compatibility will need to be confirmed during physical assembly. Future Improvements Some things I'd like to work on in future versions include: - Dedicated mounting points for the flight controller and ESC.
- A removable battery tray.
- Purple LED lighting integrated into the body openings.
- A small sound playback system for Toothless-inspired sound effects.
- Better cable routing and internal component organisation.
- Further refinement of the motor mounts and propeller assemblies.
Credits The original design reference for this project was NOE HD's SolidWorks tutorial: SolidWorks Tutorial #36: How to Make Design and Assembly Drone [Quadcopter] I used the tutorial as a starting point, but had to make substantial dimensional and geometric adjustments during my own modelling process, particularly around the lofts, upper and lower body alignment, motor housings and assembly interfaces. Credit to NOE HD for the original tutorial and learning reference. Thank you so so much 💖. I really learnt.
Descripción original del autor, publicada en Printables.