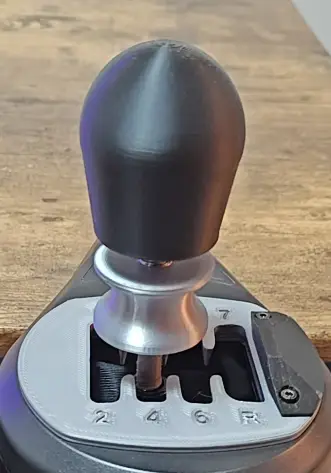
Thrustmaster TH8S Reverse and 7th gear lockout mod + knob
por wild_eye en Printables
Physical lockout for 7th and Reverse gear to avoid accidental shifts.
Licencia
Solo uso personalCC BY-NC 4.0 — Atribución, no comercial
Puedes imprimirlo y modificarlo para uso personal dando crédito. No se permite vender las impresiones.
Al descargar aceptas respetar la licencia y dar crédito a wild_eye.
- Categoría
- Tecnología
- Formatos
- 3MF
- Descargas
- 0
- Publicado
Sobre este modelo
This mod locks out Reverse and 7th gear not letting you get past those gear gates at all to eliminate all possible mistakes. E.G. Since 7th is not used too often you can use/bind 7th as Return to Pits function or any other.
Additional parts you will need: 1 - Qty 1 - spring 0.4mm, 50mm, 10mm (0.4mm wire thickness/diameter, 25mm spring length, 10mm spring diameter) (The wire thickness/diameter can be larger for more resistance, but this works just fine for me as it's what I had lying around. I got mine here : https://a.aliexpress.com/_mNLG1H3 - that one is 50mm but I cut mine in half and used 2 to double the spring. 2 - Qty 2 - M3 screws 10mm length
Print Settings: .16mm layer height for a cleaner print of the pull up lever. The pull up lever has XY Hole Compensation set to 0.250. Depending on the filament you use, the fit can be different. If the lever is too loose on the shaft you can lower it to 0.125 or to 0. If it is still too tight you can increase it. I have included a small test cylinder to test fitment. The cylinder has XY Hole Compensation at 0.250.
Installation: 1 - Open the shifter. 2 - Remove the screw that hold gear plate and cloth. 3 - Put in the new gear and place the cloth back. (FYI - the gear plate I used was premade and it has less mounting screw holes. 4 - Install the shaft/spacer that has the large boarder inside the shifter with the large edge upwards. It will snap into place around the shaft. Seat it all the way at the bottom of the shaft. 5 - Re-install the top half the shifter. 6 - Snap the smaller shaft spacer onto the shaft and seat it all the way down to the cloth. 7 - Place the lockout lever on the shaft and the spring. 8 - Install the thread adapter and the shift knob. The knob and thread adapter I used are here: TH8S Blitz style shift knob and adapter - Free 3D Print Model - MakerWorld 9 - Screw the blocker plate on the right side of the gate plate. (the screws should thread into the plate. You could also use nuts underneath the plate or you can also print M3 x 10mm screws and glue them in place.
Then shift and enjoy
Descripción original del autor, publicada en Printables.