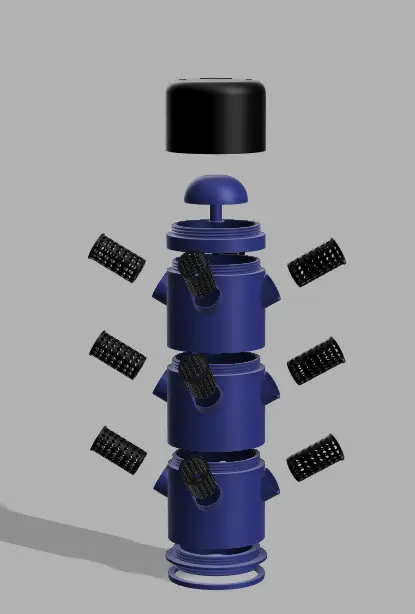
The Mushroom [modular Hydroponics tower] V1.0
por Skyler Randolph en Thingiverse
DIY Hydroponic Tower – Under $100 Hydroponic towers are often intimidating and expensive, but this design solves both problems. It costs under $100 to build, and it's easy to understand. To build this system, you only need a 3D printer, a basic understanding of hydroponics, and the ability to screw.
Licencia
Uso comercial permitidoCC BY-SA 4.0 — Atribución, compartir igual
Puedes usarlo y modificarlo dando crédito; las versiones modificadas deben compartirse con la misma licencia.
Al descargar aceptas respetar la licencia y dar crédito a Skyler Randolph.
Archivos (12)
- nut.stl STL · 145 KB
- flange.stl STL · 496 KB
- SEGMENT.stl STL · 1000 KB
- segment_main.stl STL · 990 KB
- cup_holder.stl STL · 56 KB
- cup.stl STL · 973 KB
- addapter.stl STL · 348 KB
- muchroom.stl STL · 1,2 MB
- watter_defuser_1.stl STL · 1,1 MB
- cap.stl STL · 579 KB
- HYDROPONICS_F3D.stl STL · 16,0 MB
- HYDROPONICS_STEP.step STEP · 18,2 MB
- Categoría
- Jardín
- Formatos
- STL, STEP
- Descargas
- 67
- Publicado
Sobre este modelo
DIY Hydroponic Tower – Under $100 Hydroponic towers are often intimidating and expensive, but this design solves both problems. It costs under $100 to build, and it's easy to understand. To build this system, you only need a 3D printer, a basic understanding of hydroponics, and the ability to screw on a lid. Required Materials Hardware - 5-gallon bucket with a lid - Submersible water pump with a 3/4-inch threaded adapter - 3/4-inch tubing - Outlet timer for the pump
3D Printing Filament - PLA for indoor systems (about 2.5 rolls) - ABS or ASA for outdoor systems to better handle weather and UV rays
Gardening - Rockwool cubes for starting seeds - Seeds - Hydroponic nutrients - pH adjustment chemicals
Links Amazon Link 1 Amazon Link 2 Amazon Link 3 5-Gallon Bucket with Lid Slicer Settings This model was printed on a Flashforge Adventurer 5M Pro using Orca Slicer. To print the 80-degree threads successfully, use these settings: - Layer Height: 0.12 mm (important for getting the threads to work properly) - Wall Printing Order: Inner / Outer / Inner - Infill: 5% Rectangular (you can increase this if you want more durability. I used 5% to save time) - Supports: Don't support the threads. Use support painting to add supports only to the 90-degree overhangs. For the cap, you should be able to flip it upside down to save time and filament. - Optimization: There are probably things that could be done to optimize the print, so I'll leave that up to you!
Project Notes I fill up the bucket through one of the cups And simply cut a hole in the side of the bucket at the top for the cord to run through For each segment you need four cups and four cup holders I got my bucket and lid from Harbor Freight, but everything else came from Amazon. This project is meant to be something anyone can build, no matter their experience level. It uses very minimal electronics, and you don't need a complicated setup to get it working. I've spent over 200 hours designing and prototyping this project, and I'm excited to finally share the first version. All the parts take about a week and a half to print, so it won't take months of running your printer to finish everything. This is just the first version, and I'll be posting more modules and updates soon as I continue working on it. Please don't sell this design as your own. I've put a lot of time and effort into designing and testing it, and I'd appreciate that work being respected. Thanks for checking out the project, and if you decide to build one, I'd love to see how it turns out!
Descripción original del autor, publicada en Thingiverse.