The Limit of Possibility (magic w/o electronics)
por Prime Tower Designs en MakerWorld
This model contains strong magnets. It is not a child's toy. Introducing The Limit of Possibility! Following my popular Enigma Tower, my latest work celebrates the beauty of mathematics & physics at their limits!
MakerWorld entrega los archivos a usuarios con cuenta gratuita
Licencia
Solo uso personalStandard Digital File License
Licencia estándar de archivos digitales: solo uso personal. No se permite compartir, revender ni subir el archivo a otros sitios, ni vender las impresiones.
Al descargar aceptas respetar la licencia y dar crédito a Prime Tower Designs.
- Categoría
- Figuras y arte
- Descargas
- 11,440
- Publicado
Sobre este modelo
This model contains strong magnets. It is not a child's toy.
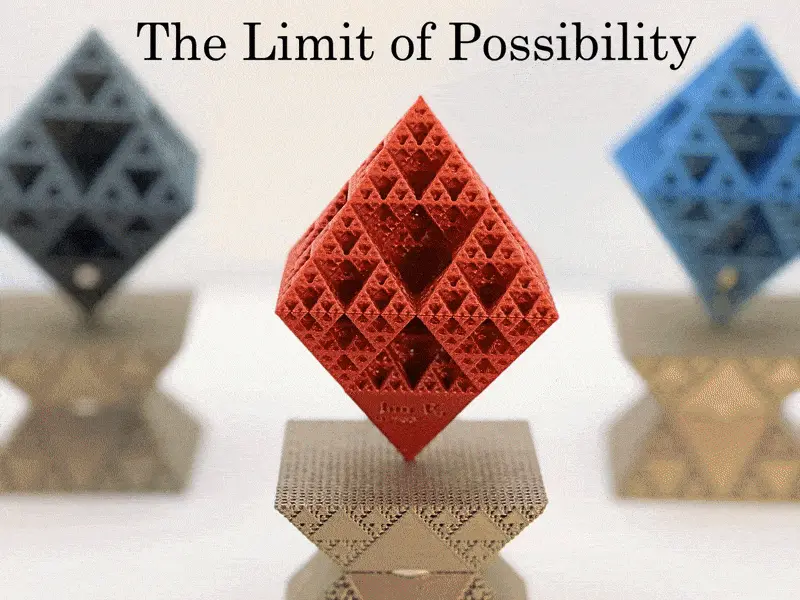
Introducing The Limit of Possibility! Following my popular Enigma Tower, my latest work celebrates the beauty of mathematics & physics at their limits!
This is my first time using a ring-shaped magnet for stabilization. It makes assembly easier and also achieves a stronger balance. As always with magnets, please heed safety warnings (see below). Also a BIG THANKS to TBone_427120 for publishing how to print a Sierpiński fractal pyramid in spiral vase mode. The settings he published reduce the diamond’s weight by ~33% - key to achieving balance.
Boost MeEach Boost fuels more free designs - THANK YOU!Unlike other magnetically stabilized objects you may have seen, the method I've discovered and refined does not require electronics nor does it require magnets to partially surround the object. The base's magnets are positioned strictly below, making the balancing effect particularly striking. Check out my full Passive Magnetic Stabilization collection, including my latest: X-ception.
Limits → Possibilities
- Size Limit: The unlikely balance of this sizable diamond is at the limit of the passive stabilization I’ve been able to achieve with consumer-grade neodymium magnets.
- Recursive Limit: A Sierpiński diamond’s volume trends to 0 as the levels of recursion increase. This infinite limit is mathematically depicted on the diamond’s tip.
- Earnshaw’s Limit: While this diamond represents 5 levels of recursion (so no, it sadly isn’t completely weightless), its light weight from recursive hollowing is what allowed me to stabilize this sizeable object in a way which almost appears like it’s going to float away. That said, Earnshaw’s Theorem states that stable static levitation using permanent magnets (without active stabilization) is impossible, so full free-floating remains beyond the limit of possibility.
- Manifestation Limit: The base of this model is an inverse Sierpiński object. Think regular Sierpiński, but then make the hollow parts solid and vice versa. This solid base represents the tangible, whereas the hollow diamond represents the ethereal. Where do they intersect? Where ideas manifest into reality - at the limit of the possible.
At the end of the day, this sculpture stands proudly in defiance of its limitations to showcase what is in fact possible. The Limit of POSSIBILITY. Required Materials The quantities below are for a single sculpture (diamond + base).
- The Limit of Possibilities kit in the Bambu store contains all required magnets. See the Bill of Materials section on this page for a direct link.
Use the kit for best results. Most generic magnets are unlikely to have the precise strength required to achieve proper balance - I've tried and had comically bad outcomes! The quantities I list in the sub-bullets below are what the model uses, though the kit comes with extra magnets. - One (1) 10x4x3 mm ring-shaped neodymium magnet.
- Ten (10) 25×3 mm round neodymium magnets.
- Four (4) 4×2 mm round neodymium magnets. If you don’t already have a magnet insertion tool, you’ll need two additional 4x2 mm magnets (total of 6) to create one, but either way the kit has enough.
- Super glue to assemble the diamond.
- (Optional) A magnet insertion tool such as the simple one I created. If you choose not to use one, you'll need another way to distinguish relative polarity. Determining which end is absolute N isn't required, but you must be consistent about which end you consider N. You can always use another magnet to assess polarity, though it's easy to lose track of its orientation if it's unlabeled. An insertion tool is a quick print which can save you a headache.
- (Optional) Stainless steel nozzle – this type of nozzle doesn't attract magnets. But if you monitor the print for the next few layers after inserting the magnets, and are ready to take prompt action if needed, hardened steel should be fine (it’s what I used).
Check that all magnets are in good condition, free of chips, to ensure maximum potency. Consistency of Magnet Strength Magnet strength (and size) varies drastically by manufacturer. Using neodymium magnets from Maker’s Supply (Bambu's store) is critical since this model is calibrated to them. If they switch suppliers in the future, results could change. In any case, these are inexpensive parts. Just add them to your next filament order to save on shipping!
If you decide to use other magnet suppliers and are ok tinkering with calibration yourself, note that size also varies significantly among brands. For example, the Maker’s Supply “4×2” magnets are just under 2 mm thick, but the cheap generics I had were about 1.65 mm thick. I expect some magnets could exceed the thickness of the Maker’s Supply ones, and if they protrude above your printed surface, they could damage your nozzle. Safety Warnings Neodymium magnets are not toys.
- Keep them away from pets and young children. Swallowing two magnets can clamp them together inside the digestive tract, leading to severe injury or death if not surgically removed.
- The 25×3 mm magnets are relatively strong. Keep away from pacemakers, and avoid handling them near other magnets or ferrous metals. If they freely collide, they can break or cause finger injuries, and shards can fly off and injure your eyes. They typically ship with spacers which will need to be carefully removed. A good technique is to stack them one at a time, carefully sliding the next magnet onto the stack from the side and then releasing once it begins to slide into place.
How to Print Filaments While I expect most any PLA will work, to improve stability (and to look cool) I used shimmer PLA (Bambu Galaxy & Panchroma Starlight) which are about 5% less dense than regular PLA. Build Plate I suggest a textured PEI plate so that the fragile parts can be easily removed once cool. Smooth plates might be okay, but avoid the super tack style of plate. Base All of my print profiles include both bases. Just print the one you want. You’ll insert magnets afterward (see “How to Assemble”), and they’re not secured in place so that you can adjust as needed.
IMO, base option 1 looks best, especially how its triangular pattern contrasts with the diamond’s. Note that it has a small window through which you can see the magnetic stack. I consider it a happy little accident in the design which looks pretty cool. If you prefer to remove it, you’re going to want to enlarge both the base and the diamond so they have consistent dimensions with each other, though that will reduce stability.
The top half of base option 2 looks good as a standalone base. It can’t hold as many magnets that way, however, so stability will be reduced in that configuration. Sierpiński Diamond While I didn't record an official make video for this model, others have posted their own. I'd still recommend the detailed instructions below, but these videos provide a good look at the process: video 1 / video 2
There are 2 versions:
- Pure diamond: This version shows its magnets and continues the fractal pattern all the way down. It is printed in 2 parts. Since it weighs ~1.5g less than the math-tipped version, it is more forgiving and more likely to stand straight.
- Math-tipped diamond: This version hides its magnets and depicts the mathematical limit to calculate the diamond’s volume (assuming it was a pure fractal). It is printed in 3 main parts + a small filler square. It is at the very limit of balance, so printing it with heavier filaments than what I used, or even with very slight differences in magnetic strength, may cause it to stand at a slight angle.
Besides the filler square, you’ll also notice a “wipe + cooling tower” cube on the plate. This cube slows the layer speed as the print nears completion, resulting in a pointier tip.
It also acts as a makeshift prime tower. Bambu Studio only adds its own prime tower for multi-color prints, to re-prime the nozzle after each filament swap. While this model doesn’t have filament swaps, it does include two pauses for magnet insertion which unprime the nozzle as a side effect. Rather than mar the main model with stray blobs, the unprimed nozzle will deposit any extra gunk onto this disposable cube instead. If you change any objects on this plate, verify in the Preview tab that this cube is the first thing printed at each layer so that it can serve this function.
Unfortunately, I couldn’t use this technique for the pointy fractal objects due to the inherent limitations of spiral vase mode. However, any minor imperfections are far less noticeable on those pieces thanks to their triangular holes.
Descripción original del autor, publicada en MakerWorld.