Tentacle System
All the information below and more can be found on the Tentacle System Home Page (https://3ddoodle.com/tentacle-system/):
Thangs entrega los archivos a usuarios con cuenta gratuita
Licencia
Solo uso personalSin licencia indicada
El autor no indicó una licencia: todos los derechos le pertenecen. Úsalo solo para imprimir en casa y consulta al autor para cualquier otro uso.
Al descargar aceptas respetar la licencia y dar crédito a Howard C.
Archivos (94)
- 1x1 Tentacle Base.3mf 3MF · 469 KB
- 1x1 Tentacle Base.step STEP · 183 KB
- Six Tentacle Members.3mf 3MF · 577 KB
- Tentacle Alligator Clip.3mf 3MF · 560 KB
- Tentacle Alligator Clip.step STEP · 159 KB
- Tentacle Ball.step STEP · 9 KB
- Tentacle Baseplate.3mf 3MF · 435 KB
- Tentacle Baseplate.step STEP · 194 KB
- Tentacle Box.3mf 3MF · 404 KB
- Tentacle Box.step STEP · 158 KB
- Tentacle Clamp-to.3mf 3MF · 792 KB
- Tentacle Clamp-to.step STEP · 206 KB
- Tentacle Cross.3mf 3MF · 1,4 MB
- Tentacle Cross.step STEP · 148 KB
- Tentacle Cup.step STEP · 105 KB
- Tentacle Flatbox.3mf 3MF · 437 KB
- Tentacle Flatbox.step STEP · 139 KB
- Tentacle Glue-on Base.3mf 3MF · 240 KB
- Tentacle Glue-on Base.step STEP · 26 KB
- Tentacle LED Holder.3mf 3MF · 664 KB
- Tentacle LED Holder.step STEP · 428 KB
- Tentacle Magnetic Base.3mf 3MF · 321 KB
- Tentacle Magnetic Base.step STEP · 51 KB
- Tentacle Magnetic Holder.3mf 3MF · 404 KB
- Tentacle Magnetic Holder.step STEP · 283 KB
- Tentacle Manifold.3mf 3MF · 2,1 MB
- Tentacle Manifold.step STEP · 383 KB
- Tentacle Member 50 mm.3mf 3MF · 550 KB
- Tentacle Member 50 mm.step STEP · 112 KB
- Tentacle Member 100 mm.3mf 3MF · 552 KB
- Tentacle Member 100 mm.step STEP · 112 KB
- Tentacle Member.3mf 3MF · 561 KB
- Tentacle Member.step STEP · 110 KB
- Tentacle Standalone Base.3mf 3MF · 319 KB
- Tentacle Standalone Base.step STEP · 2,8 MB
- Tentacle Tee.3mf 3MF · 1,0 MB
- Tentacle Tee.step STEP · 132 KB
- Tentacle Tribase.3mf 3MF · 2,5 MB
- Tentacle Tribase.step STEP · 86 KB
- Tentacle Trident.3mf 3MF · 1,6 MB
- Tentacle Trident.step STEP · 199 KB
- Tentacle Vise.3mf 3MF · 634 KB
- Tentacle Vise.step STEP · 214 KB
- Tentacle Webcam Holder.3mf 3MF · 394 KB
- Tentacle Webcam Holder.step STEP · 259 KB
- Tentacle Z-Rider.3mf 3MF · 275 KB
- Tentacle Z-Rider.step STEP · 94 KB
- Tentacle Z-Topper.3mf 3MF · 334 KB
- Tentacle Z-Topper.step STEP · 49 KB
- Tentacle Lego Base.step STEP · 46 KB
- Tentacle Figurine Grip.step STEP · 4,4 MB
- Pill Bottle Base.3mf 3MF · 829 KB
- Pill Bottle Base.step STEP · 97 KB
- Tentacle Fischertechnik Base.stl STL · 1,2 MB
- Tentacle Fischertechnik Grip.stl STL · 1,5 MB
- Tentacle Rod Grip.3mf 3MF · 416 KB
- Tentacle Rod Grip.step STEP · 397 KB
- Tentacle Pegboard Base.3mf 3MF · 327 KB
- Tentacle Pegboard Base.step STEP · 297 KB
- Tentacle Fischertechnik Grip.3mf 3MF · 415 KB
- Categoría
- Herramientas
- Formatos
- 3MF, STEP, STL
- Descargas
- 81
- Publicado
Sobre este modelo
All the information below and more can be found on the Tentacle System Home Page (https://3ddoodle.com/tentacle-system/):
https://3ddoodle.com/tentacle-system/
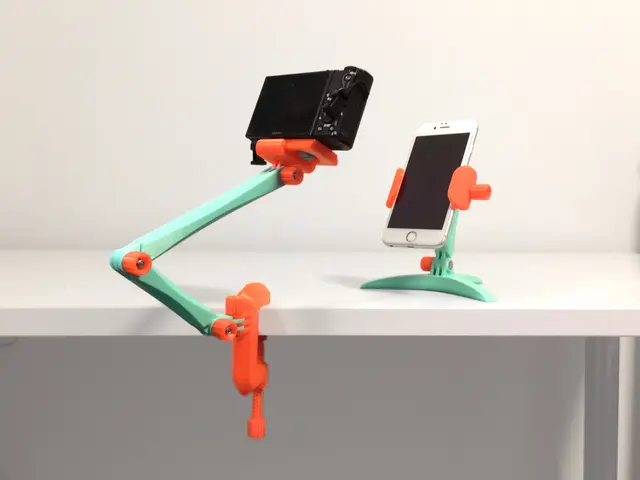
This support system is based on a ball-and-cup connector that has some friction. There are both Gridfinity and non-Gridfinity bases that feature a ball facing upward. Any number of ball-and-cup connectors of various sizes and shapes can be combined to provide support for almost any angle and height. Top it off with one or more grip or support ends so you have a third, fourth or fifth hand to help with your detail projects.
Also included are the .step files for the cup and for the ball, so you can make your own tentacle parts.
These parts were all sliced for PLA and my PLA parts work well. Be sure to pull them straight apart. Do not lever two pieces apart or you can crack one side of the cup or the other.
I use the longer connectors if I need a higher stand, and the small connectors mainly to allow a tighter curve in the tentacle.
If you need a rigid structure, superglue the parts together. Most parts print quickly and use very little filament.
Bases You can use any of the bases with any of the connectors and any of the grip or support ends.
Gridfinity Module as a Tentacle Base You can use the Gridfinity tentacle base with any Gridfinity baseplate. The model name is “1x1 Tentacle Base”.[](url)
Or, you can use it with one of these standalone Gridfinity bases: - Glue-on 1x2 Angled Gridfinity Baseplates (https://www.printables.com/model/729667-glue-on-1x2-angled-gridfinity-baseplates) - 1x1 Stability Base (https://www.printables.com/model/729667-glue-on-1x2-angled-gridfinity-baseplates) - Gridfinity 1x1 Vanity Base (https://www.printables.com/model/511814-gridfinity-1x1-vanity-base)
A Gridfinity Tentacle Base is very good because it helps keep your stand upright even if it is not balanced.
Non-Gridfinity Bases There are a variety of other bases you can use for a tentacle support.
Three-leg standalone base (Tribase)
Three angled legs lead up to a mounting ball. The three legs guarantee it will be stable even on uneven surfaces. It works great with the webcam holder, for example.
Large flat standalone base
This large, flat base is formed from a grid of hexagons mainly to minimize the use of filament but also because it looks more interesting than a simple flat plate.
Glue-on standalone base
This base has a smooth, round bottom you can glue onto something else, or attach adhesive velcro, etc. You could also use it in other models that need a base for connecting tentacle parts. But, there is also a .step file for just the ball and just the cup, specifically so you can include it in your models.
Magnetic standalone base
This base holds twelve 6x2 neodymium magnets so you can attach this base to any steel surface. For example, it could hold a light against the inside of a computer case or a washing machine. Some keychain LED lights are incredibly bright, such as this one (https://www.amazon.com/LRI-FMRC-Freedom-Keychain-Micro-Light/dp/B000IXGBJI?th=1). And, it works great with the webcam holder.
Z-Topper base
This base fits into the hexagonal hole at the top of Z-axis on most Prusa printers. If you find it is too loose you can cut the edge of the small hexigon with a sharp knife, to deform the plastic a little and add friction to the fit. It is based on my Z-Topper Filament Cutter (https://www.printables.com/model/488990-z-topper-filament-cutter), which I use all the time.
Z-Rider base
This base fits into the oblong hexagonal hole on the side of the printed part that slides up and down the Z-axis and holds the X-axis belt's freewheel side. It is based on the Z-Rider (https://www.printables.com/model/471822-z-rider) which I mainly use to move one of Schnippi (https://www.printables.com/@Schnippi)'s Kodamas (https://www.printables.com/model/277965-kodama-no-support-no-infill-needed) up and down during my prints. For… reasons. Perhaps this could be a mount for a small webcam, but it would vibrate whenever the X axis moved.
Connectors Connectors add some flexibility to the sequence of parts you assemble. Too many usually adds too much flexibility, but your needs may vary. I use the fewest number of connectors possible, and also the longest possible. Those two rules make for the most stable structures.
For completely stable structures you can superglue the parts together.
Some connectors expect one ball below them, but they offer multiple balls above, the branching structure is like what you can do with plumbing fittings.
The small, straight connector is about 18mm long from the center of the ball to the center of the connector. There are also longer connectors: 50mm and 100mm.
There is also a .3mf and .gcode for PLA that is set up for six small connectors on one plate. The small ones are less useful because of the two rules mentioned above. But, if you need maximum flexibility, then the short ones are best.
Straight Connectors - Single 18 mm connector - Six 18 mm connectors on one plate - 50 mm connector - 100 mm connector
Descripción original del autor, publicada en Thangs.