
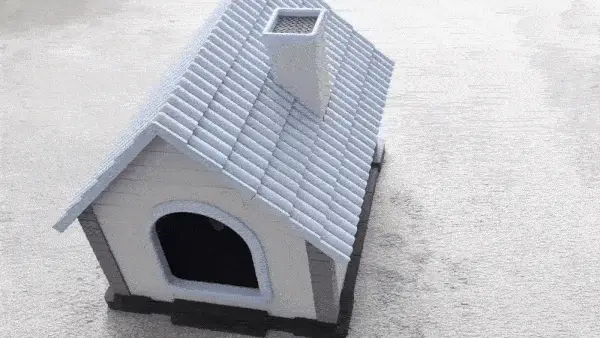
Super cute classic animal / cathouse / doghouse, your pet will love it!
por Ben Burnski en Printables
All the parts are assembled and can be printed in a single print with a build volume of at least 220x220x220 mm!
Licencia
Solo uso personalCC BY-NC-ND 4.0 — Atribución, no comercial, sin derivadas
Solo para uso personal, sin modificarlo y dando crédito. No se permite vender ni redistribuir cambios.
Al descargar aceptas respetar la licencia y dar crédito a Ben Burnski.
Archivos (51)
- Roof connector you need 6x.stl STL · 50 KB
- Wall Part bottom left front.stl STL · 99 KB
- Entrance bottom front .stl STL · 292 KB
- Wall Part top front middle.stl STL · 88 KB
- Wall Part top front right.stl STL · 103 KB
- Wall Part bottom front middle.stl STL · 9 KB
- Wall Part top rear right.stl STL · 99 KB
- Wall Part top middle you need 2x.stl STL · 13 KB
- Wall Part top front left.stl STL · 103 KB
- Wall Part top rear middle.stl STL · 29 KB
- Roof connector angle you need 2x.stl STL · 38 KB
- Wall Part top side you need 2x.stl STL · 12 KB
- Wall Part top rear left.stl STL · 99 KB
- Window Frame Inlay.stl STL · 26 KB
- banner sign inlay big.stl STL · 26 KB
- banner sign inlay small.stl STL · 26 KB
- Entrance bottom inside.stl STL · 331 KB
- Roof connector you need 38x.stl STL · 3 KB
- Wall Part bottom left rear.stl STL · 93 KB
- Wall Part bottom right rear.stl STL · 93 KB
- Wall Part bottom right front.stl STL · 99 KB
- Base Middle Cross.stl STL · 127 KB
- Base Connector you need 4x.stl STL · 138 KB
- Wall Part bottom middle you need 2x.stl STL · 25 KB
- Base Middle left right you need 2x.stl STL · 441 KB
- Base Middle Backside.stl STL · 441 KB
- Window Frame.stl STL · 554 KB
- Entrance top front .stl STL · 449 KB
- banner sign frame small.stl STL · 876 KB
- chimney lid.stl STL · 39 KB
- Base Egde B you need 2x.stl STL · 949 KB
- chimney lid frame.stl STL · 77 KB
- Wall Part bottom rear middle.stl STL · 32 KB
- Base Middle Frontside.stl STL · 446 KB
- Entrance top inside.stl STL · 419 KB
- banner sign frame big.stl STL · 876 KB
- chimney print upside down.stl STL · 1,5 MB
- Base Egde A you need 2x.stl STL · 950 KB
- Roof edge bottom part B you need 2x.stl STL · 4,9 MB
- Roof middle bottom without chimney.stl STL · 4,8 MB
- Roof middle bottom with chimney.stl STL · 6,2 MB
- Roof edge bottom part A you need 2x.stl STL · 4,9 MB
- Wall Edge top A part you need 2x.stl STL · 6,2 MB
- Wall Edge top B part you need 2x.stl STL · 6,2 MB
- Roof middle top with chimney.stl STL · 9,6 MB
- Roof edge top part A you need 2x.stl STL · 8,4 MB
- Roof edge top part B you need 2x.stl STL · 8,4 MB
- Roof middle top without chimney.stl STL · 8,5 MB
- Wall Edge bottom part you need 4x.stl STL · 15,2 MB
- Classic Cat House complete set.3mf 3MF · 26,7 MB
- pet_house_assembly_updated.pdf PDF · 22,1 MB
- Categoría
- Hogar
- Formatos
- STL, 3MF, PDF
- Descargas
- 28
- Publicado
Sobre este modelo
Super cute classic animal / cathouse / doghouse, your pet will love it!!! You don't need a large printer; all the parts are assembled and can be printed in a single print with a build volume of at least 220x220x220 mm! Description Super cool pet house for your cat, rabbit, or dog. Otherwise, you can make it a little smaller, and this cool eye-catcher will still be very large! All parts have connectors and are easy to assemble. A PDF file contains numerous pictures showing how everything is put together. It is built from the bottom up in sections. The file names help you sort the parts and also contain the required quantities. Support material is only required on the print bed, as the grooves here provide stability during printing and the surfaces in the grooves become cleaner. The entire model is assembled and fixed in the grooves with superglue, as are the feet, which also have pins for fixing and holding. These are simply inserted into the feet from above through the housing. Approx. 530 mm wide, 576 mm long, and 485 mm high Options You have a few options: - For example, you can leave out the chimney and print the roof parts without the chimney twice!
- I've included two signs of different sizes, and you can easily add a name to the inlays in your slicer if you want to attach a sign!
Important Notes Please note that printing some parts requires a very well-calibrated printer and is only suitable for advanced users.
Once you have printed all the parts, lay them out in front of you and start putting the individual segments together. Do not use any glue yet! This should only be used when the parts can be put in place, i.e. at the last moment. It is also a good idea to put everything together once. The connectors only fit into the designated places on the parts. Final Assembly Once the last segment, which is at the very top and also includes the handle and the pin, is in place, the connectors are inserted at an angle. Then it is easy to insert everything into the lower part of the hand grenade. Again, only use the superglue carefully at the last moment! If you like this animal house, leave me a “LIKE”! 3D-Druckeinstellungen Recommended Printer Settings I recommend the following printer settings: - PLA or PLA+
- Two or preferably three colors of your choice
- Min. 2 walls
- 10% infill
Important Be sure to check out the attached PDF instructions, and it's best to work from the bottom up! Slicer Tip Here’s a quick tip from me: To create a cool design for the inlays and the ventilation holes on the front and back: - Align the parts flat in your slicer
- Set the first and last layers to 0
- The infill will now be exposed
You can experiment with: - Infill pattern
- Infill density
This gives your design a cool custom touch. Make sure you’ve disabled the feature that creates only a single wall line in the first and last layers.
But you can also print the inlays normally — whichever way you prefer.
Descripción original del autor, publicada en Printables.



