
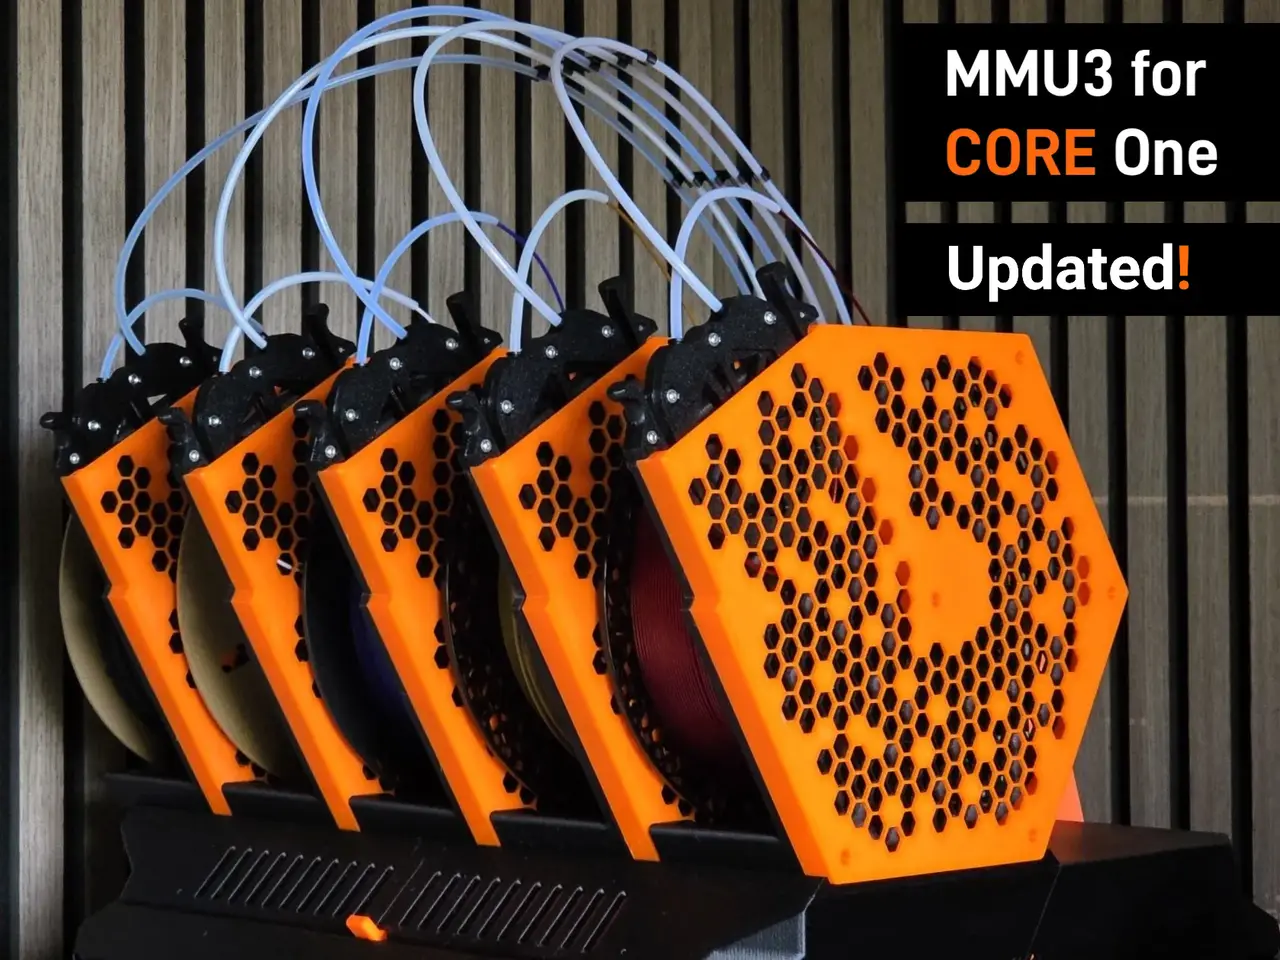
Spool Holder & Buffer for Core One MMU3 Community Version
por Sam en Printables
Adapts a simple and robust set of buffers and spoolholders to a panel assembly, reliably integrating MMU3 to CORE One.
Licencia
Solo uso personalCC BY-NC-SA 4.0 — Atribución, no comercial, compartir igual
Uso personal dando crédito; sin fines comerciales y las modificaciones con la misma licencia.
Al descargar aceptas respetar la licencia y dar crédito a Sam.
Archivos (37)
- platform_a.stl STL · 256 KB
- platform_b.stl STL · 287 KB
- platform_c.stl STL · 206 KB
- platform_d.stl STL · 200 KB
- platform_e.stl STL · 239 KB
- toprail_a.3mf 3MF · 12 KB
- toprail_b.3mf 3MF · 18 KB
- platform_vent.stl STL · 353 KB
- connector_a.stl STL · 5 KB
- connector_b.stl STL · 26 KB
- connector_c.stl STL · 21 KB
- connector_d1.stl STL · 20 KB
- connector_d2.stl STL · 28 KB
- connector_d3.stl STL · 42 KB
- connector_e.stl STL · 4 KB
- connector_ridge.stl STL · 4 KB
- connector_mmu.stl STL · 46 KB
- spoolholder_spindle.3mf 3MF · 327 KB
- spoolholder_ptfe_cutouts.3mf 3MF · 344 KB
- buffer.3mf 3MF · 333 KB
- ptfe_comb.3mf 3MF · 23 KB
- spoolholder_spindle_2kg.3mf 3MF · 304 KB
- spoolholder_roller_v2.3mf 3MF · 141 KB
- rollercarriage.3mf 3MF · 57 KB
- buffer.3mf 3MF · 333 KB
- ptfe_comb.3mf 3MF · 23 KB
- spoolholder_roller_2kg.3mf 3MF · 142 KB
- [OLD]spoolholder_roller_v1.3mf 3MF · 138 KB
- Top Rails v2.step STEP · 221 KB
- Spool Unit (Spindle) v11.step STEP · 17,8 MB
- Roller Carriage v5.step STEP · 824 KB
- Spindle 2KG v1.step STEP · 17,9 MB
- Spool Unit (Rollers) V12.step STEP · 18,7 MB
- MK4 Roller.step STEP · 18,8 MB
- spoolholder_spindle_mk4.3mf 3MF · 319 KB
- spoolholder_roller_mk4.3mf 3MF · 128 KB
- buffer_mk4_v2.3mf 3MF · 165 KB
- Categoría
- Para tu impresora
- Formatos
- STL, 3MF, STEP
- Descargas
- 1,778
- Publicado
Sobre este modelo
CHANGELOG Main Instructions follow. 30/10/25 - Added spoolholder_spindle_mk4, spoolholder_roller_mk4 and buffer_mk4 by request. To keep things simple, these versions cut away some material to get them to fit on a MK4 bed. Reported to function as expected by community members, so no longer marked as experimental (11/01/2026) 09/09/25 - EXPERIMENTAL - Added spoolholder_spindle_2kg, by request. I have not tested the spindle design with a 2kg spool, I have added reinforcement to try to counteract it, but you print this at your own risk. 07/09/25 - Updated to spoolholder_roller_v2, this adds 5mm of width to the roller variant to ensure wider spool compatibility. As a result, the spool units will overhang slightly more on each side, but with a spool weighing them down, I don't anticipate any stability issues. However, if you have any ideas on improving this (or anything else) - DM me and let know! I'm keen to improve the design wherever possible. 30/08/25 - Added spoolholder_roller_2kg, as requested by a community member. 🎉 29/08/25 - Added spoolholder_roller and rollercarriage. Requested by a few people, this removes the central spindles in favour of a bearing-based rolling design. As this project is deadset on reliability, I based my design on the tried-and-true system from the Original Prusa MINI. The build instructions have been updated with a section specifically for this option, some additional hardware will be required. If you wish to convert existing spool units, you will only need to print the new parts; the buffer, rails and rest of the base are unchanged to accomodate this option.
Thank you for your continued support and feedback :) 15/08/25 - Added spoolholder_ptfe_cutouts, a variant with the option to insert PTFE tubes to decrease rolling resistance of the spool about the central hub. The channels are 75mm deep, so I'd recommend cutting a tube to a little less than this, sliding it in and then cutting off any excess to ensure all sits flush. Directly inspired by Vincent's design. Adds approximately 750mm of additional PTFE tubing to the BOM. --------------------------------------------------------------------------------------------------------------------------------
OVERVIEW Reliability was the primary focus of this build, as I have tried various solutions to cleanly manage the Core One, MMU3 and the five spools and buffers. From unreliable auto-rewinders to the maddening entanglements of the Community version solution, it was vital to me that the system was robust. I have now tested 2000+ filament changes without intervention and counting since I installed this modification, my system is using a mixture of spindles and rollers. The system is fully compatible with 1kg spools, including cardboard up to approx. 72mm wide. The basis of the build is mounting a custom plate to the community version base plate, allowing up to five modified spoolunits to sit atop it and feed the MMU with as little resistance as possible. There are also various remixes which expand or add to the system, feel free to take a look through them before deciding how to build your personal system, many of them are excellent :)
BILL OF MATERIALS You can re-use the MMU itself, cassettes, their fasteners, and collets, as well as the PTFE tubing from the base MMU3 system. Therefore, in addition to an MMU3 kit, you will require all of the specified printed parts and the following hardware (minimum): - 22x M3x10 screws
- 31x M3x6 screws (2 of which must have a head no taller than 2mm)
- 2x M3nS nuts
- Approximately 2.5kg of filament, in total.
- Longer “community version" MMU3 cable.
If you wish to use the roller variant of the spool units, you will require an additional: - 20x M3x12 screws
- 20x 608 bearings
- 20x M3n nuts*
- 250g of filament
*optional.
BUILD INSTRUCTIONS I tested, and recommend printing all parts using 3 perimeters, 10% cubic infill at 0.2mm layer height. All parts are oriented correctly, and no parts should require any support material. You may wish to brim some sections using your temperature resistant material if you find warping to be a concern. Begin by printing and constructing the top panel, MMU3 mounting assembly and connectors from the MMU3 Community Version for CORE One, if you have not built it already. The files for these can be found on this page or at the original model. You will need to print the following from PETG, ASA, PC or a similar temperature resistant material: - 1x platform_a
- 1x platform_b
- 1x platform_c
- 1x platform_d
- 1x platform_e*
- 1x platform_vent
- 2x connector_a
- 2x connector_b
- 2x connector_c
- 1x connector_d1
- 1x connector_d2
- 1x connector_d3
- 2x connector_e*
- 2x connector_ridge
- 2x connector_mmu*
*does not strictly need to be a temperature resistant material. Assembly is fairly straightforwards, the printed connectors slide over various raised parts when the four platform panels are pushed together. Additionally, you will require some fasteners for this section: - 2x M3x6 (for the vent at the front)
- 8x M3x10 (to attach the MMU mount)
Descripción original del autor, publicada en Printables.



