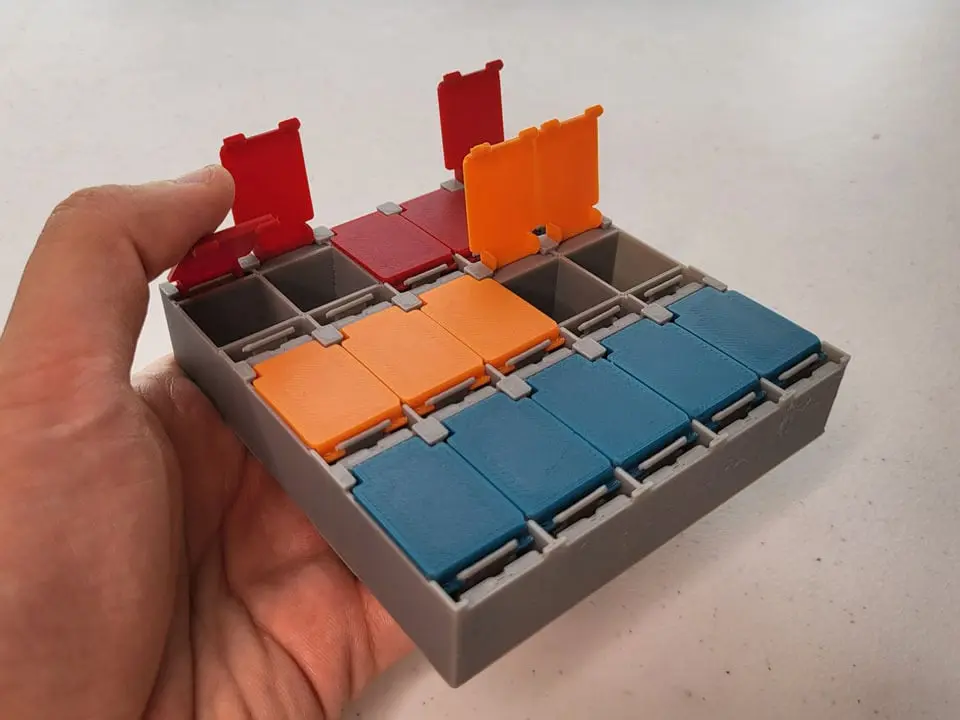
Small Components Spring-Tab-Release Organizer Concept
por William Leu en Thingiverse
While randomly browsing Amazon, it recommended me some SMD resistors. I didn't need any of the components, but I liked the mechanism on the box it came with, and I've never seen a 3D-printed version, so here's an attempt. It has many small bins, each with its own lid. When you pull forward a tab in.
Licencia
Uso comercial permitidoPuedes imprimirlo, modificarlo y venderlo dando crédito al autor.
Al descargar aceptas respetar la licencia y dar crédito a William Leu.
Archivos (13)
- BoxArray_3x5_Raise5mm.stl STL · 659 KB
- BoxArray_3x3_Raise5mm.stl STL · 409 KB
- BoxArray_1x1_Raise5mm.stl STL · 72 KB
- Lid.stl STL · 54 KB
- LidLatch.stl STL · 18 KB
- SpringPusher.stl STL · 4 KB
- PushJig_A.stl STL · 18 KB
- PushJig_B.stl STL · 28 KB
- TopJig.stl STL · 25 KB
- BoxArray_3x5.stl STL · 659 KB
- BoxArray_3x3.stl STL · 409 KB
- BoxArray_1x1.stl STL · 72 KB
- BootlegSMDBox_08.blend BLEND · 2,8 MB
- Categoría
- Organización
- Formatos
- STL, BLEND
- Descargas (todas las plataformas)
- 882
- Publicado
También en
Sobre este modelo
While randomly browsing Amazon, it recommended me some SMD resistors. I didn't need any of the components, but I liked the mechanism on the box it came with, and I've never seen a 3D-printed version, so here's an attempt. It has many small bins, each with its own lid. When you pull forward a tab in front of the bin, the spring-loaded lid swings open. Demo and assembly video at https://youtu.be/SAv6pXw-jdQ Caveats This is more of a 3D-printed curio than anything that's actually going to be practical. - This is one of those containers that take a ton of effort to assemble (i.e., my personal brand of designs) - This is just a proof of concept; do not store something as tiny as SMD components in this thing - the tolerances are not dialed in to be that reliable. - This is just a proof of concept, and it has known issues with material creep warping the parts over time.
Additional Parts/Tools - Replacement pen springs (18mm length, 4.5mm OD)- x1 per bin
- Small pliers recommended. (Needle-nose works best) - Small snips recommended (aka"small wire cutter" or "jewelry snips")
Printing There are two versions: the "base" version and the "raised 5mm" version. The raised version is recommended and will be assumed in the instructions. Any common FDM hard plastic works. All parts should already be oriented with the correct side lying on the bed. - PushJig_A.stl- x1
- PushJig_B.stl- x1
- TopJig.stl- x1 - Optional
- BoxArray_*_Raise5mm.stl- x1 - The number of bins the part you chose has is how many other things you need to print of the things listed below. - Requires supports, but ONLY on the hinges.
- Lid.stl- x Bin Count - Requires supports for all overhangs.
- LidLatch.stl- x Bin Count - This part is tricky because of how thin the contact area with the bed is, if you can get away without supports or a raft, that's ideal. I needed to use a (2-layer) raft with no other supports.
- SpringPusher.stl- x Bin Count
Assembly - Clean up the BoxArray.- Inspect the part; make sure hard-to-see areas didn't get misprinted in a way that invalidates the part. - Clear any stringing. - Remove supports with pliers.
- Clean up Lids.- Remove supports.
- Clean up LidLatches- Remove supports or any loose parts (with the snips). Make sure the part that gets inserted into the box is as clean as possible; the other side (with the indents) isn't as important.
- Insert LidLatch into the box.- Put the LidLatch onto the grippers of PushJig_A. Place it so the side being inserted into the box lies flat on the jig. - Use the jig to press the LidLatch through the bottom and into a slot behind a bin. - Carefully insert the LidLatch into the slot, making sure it's properly aligned with the slot before using more force. Use the TopJig by keying it into the top if needed. Push it in far enough that you can remove the jig without pulling out the LidLatch, and that the LidLatch stays aligned with the slot. - Use PushJig_B to press the LidLatch in more; you should hear an additional snap. The top of the LidLatch should also be about as high as the top of the box. - Repeat for all LidLatches and bin slots.
- Place spring-loaded lids- Place the spring into the hole on the bins that are opposite the LidLatch. Stand the spring up on the notch at the floor of the hole. - Insert a SpringPusher into the hole, with its notch facing down into the spring. Be careful not to knock the spring out of alignment from the floor notch. - Slide a lid into the hole, pushing the SpringPusher down. Then slide it back into its hinge seat. - Repeat for all other lids.
Descripción original del autor, publicada en Thingiverse.