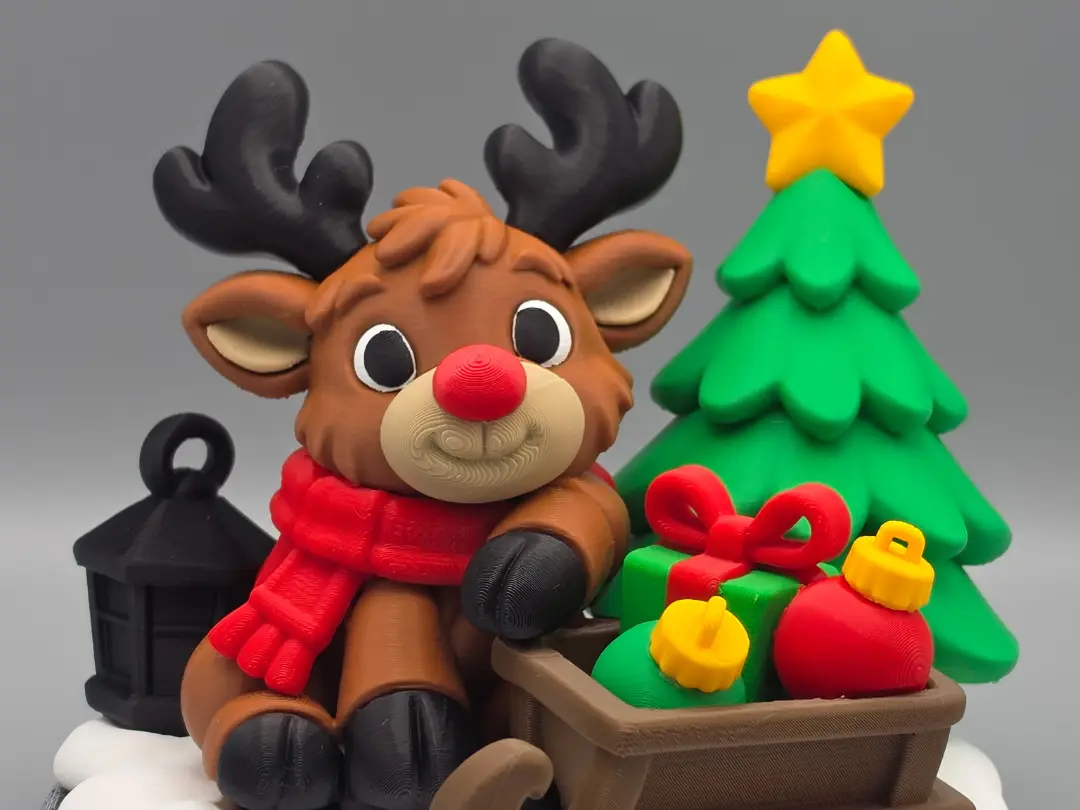
Sleighin' & Chillin' – A Christmas Break!
por Zesty 3D by Art en MakerWorld
Membership💼 Want to sell prints of my designs? Join the Zesty3DbyArt Commercial Seller Membership and gain commercial rights to sell physical prints of eligible models. Your membership also helps support future releases, testing, and new creations.Christmas Reindeer Diorama | Multi-Part FDM…
MakerWorld entrega los archivos a usuarios con cuenta gratuita
Licencia
Solo uso personalStandard Digital File License
Licencia estándar de archivos digitales: solo uso personal. No se permite compartir, revender ni subir el archivo a otros sitios, ni vender las impresiones.
Al descargar aceptas respetar la licencia y dar crédito a Zesty 3D by Art.
- Categoría
- Figuras y arte
- Descargas
- 67
- Publicado
Sobre este modelo
Membership💼 Want to sell prints of my designs? Join the Zesty3DbyArt Commercial Seller Membership and gain commercial rights to sell physical prints of eligible models. Your membership also helps support future releases, testing, and new creations.Christmas Reindeer Diorama | Multi-Part FDM Print | Minimal AMS Required Even Santa's reindeer need a little time to sleigh back and relax! 🛷❤️
Meet Sleighin' & Chillin', an adorable little reindeer who's taking a well-deserved break from holiday preparations! With his cozy red scarf, oversized antlers, bright red nose, and one hoof casually resting on a sleigh full of Christmas goodies, this festive little guy is soaking up every moment of the holiday season.
Surrounded by a cheerful Christmas tree, colorful ornaments, a wrapped present, and a charming lantern, this winter wonderland diorama brings together everything we love about Christmas in one irresistibly cute display!
Designed with the signature whimsical charm of Zesty3DbyArt, this multi-part model offers beautiful color separation without requiring an AMS for the entire print.
Perfect for holiday decorating, Christmas gifts, winter displays, or simply adding a little festive personality to your 3D printed collection! 🎨 Printing Information
- Model Size: Approximately 150 mm tall, consistent with my other diorama models.
- Printing Style: Multi-part FDM print with separate components for cleaner color separation.
- AMS Requirements: Only the eyes and wrapped gift require AMS for the detailed multicolor finish shown.
- Assembly: Required. Glue is recommended for all assembled components.
- Filament: PLA or PLA+ recommended.
- Scaling: Model can be scaled, but be mindful of smaller details and assembly tolerances when reducing size.
Most components are printed individually in their respective colors, making this a great option for makers who want a colorful Christmas display without extensive filament changes.
***Note: The Xmas Balls are located on two separate plate: The plate with the tree and the plate with the scarf and nose. 🛠️ Assembly Instructions Important: This is a multi-part model, and glue is recommended for all assembled pieces to ensure a sturdy, long-lasting display.
Step 1 – Assemble the Snowy Base ❄️ Begin by attaching the white snow layer to the dark stone base. Apply glue to the connecting surfaces, align the pieces, and allow the glue to set before continuing. Step 2 – Assemble the Christmas Ornaments 🎄 Assemble the individual ornament pieces, securing the components with a small amount of glue. Set them aside to dry before placing them in the sleigh. Step 3 – Complete the Christmas Tree ⭐ Attach the yellow star to the top of the Christmas tree using glue. Allow it to dry completely before positioning the tree on the base. Step 4 – Assemble the Reindeer 🦌 Bring your adorable little reindeer to life by carefully attaching the following pieces:
- Eyes
- Mouth and muzzle details
- Bright red nose
- Hooves
- Antlers
- Ears
Apply a small amount of glue to each connection point, ensuring everything is properly aligned.
Important Hoof Placement: The fourth hoof is intentionally designed to sit underneath the corner of the sleigh, rather than attaching directly to the reindeer. Keep this piece separate until the sleigh is positioned during final assembly. Allow the completed reindeer to dry before attaching it to the base.
Step 5 – Position the Sleigh and Decorations 🛷 Once the prepared components have dried, glue the sleigh into its designated position on the snowy base. Attach the wrapped Christmas gift and assembled ornaments in the sleigh, using glue to secure them. Position the separate fourth hoof beneath the appropriate sleigh corner as designed. Step 6 – Add the Christmas Tree 🌲 Place the completed Christmas tree into its designated location behind the sleigh. Secure it with glue and allow it to set. Step 7 – Add the Reindeer ❤️ Carefully position your assembled reindeer beside the sleigh, making sure his raised hoof rests naturally along the sleigh's upper edge. Once satisfied with the positioning, glue the reindeer securely to the base. Step 8 – Add the Lantern 🏮 Complete your festive scene by attaching the little lantern beside the reindeer. Allow all glued components to cure fully before moving or displaying your completed diorama. ❤️ A Little Holiday Magic There's something especially charming about a reindeer who knows how to enjoy the holidays! With his sweet expression, cozy scarf, and sleigh filled with Christmas treasures, Sleighin' & Chillin' captures that playful holiday spirit we all love. Whether displayed on a mantel, tucked into a Christmas village, or given as a handmade holiday gift, this little reindeer is ready to spread some Christmas cheer!
Happy Printing & Happy Holidays! 🎄🦌
Created with ❤️ by Zesty3DbyArt
If you enjoy this design, please consider leaving a boost, sharing your finished print, and checking out my other whimsical holiday dioramas. Your support helps keep the creativity going!
Descripción original del autor, publicada en MakerWorld.