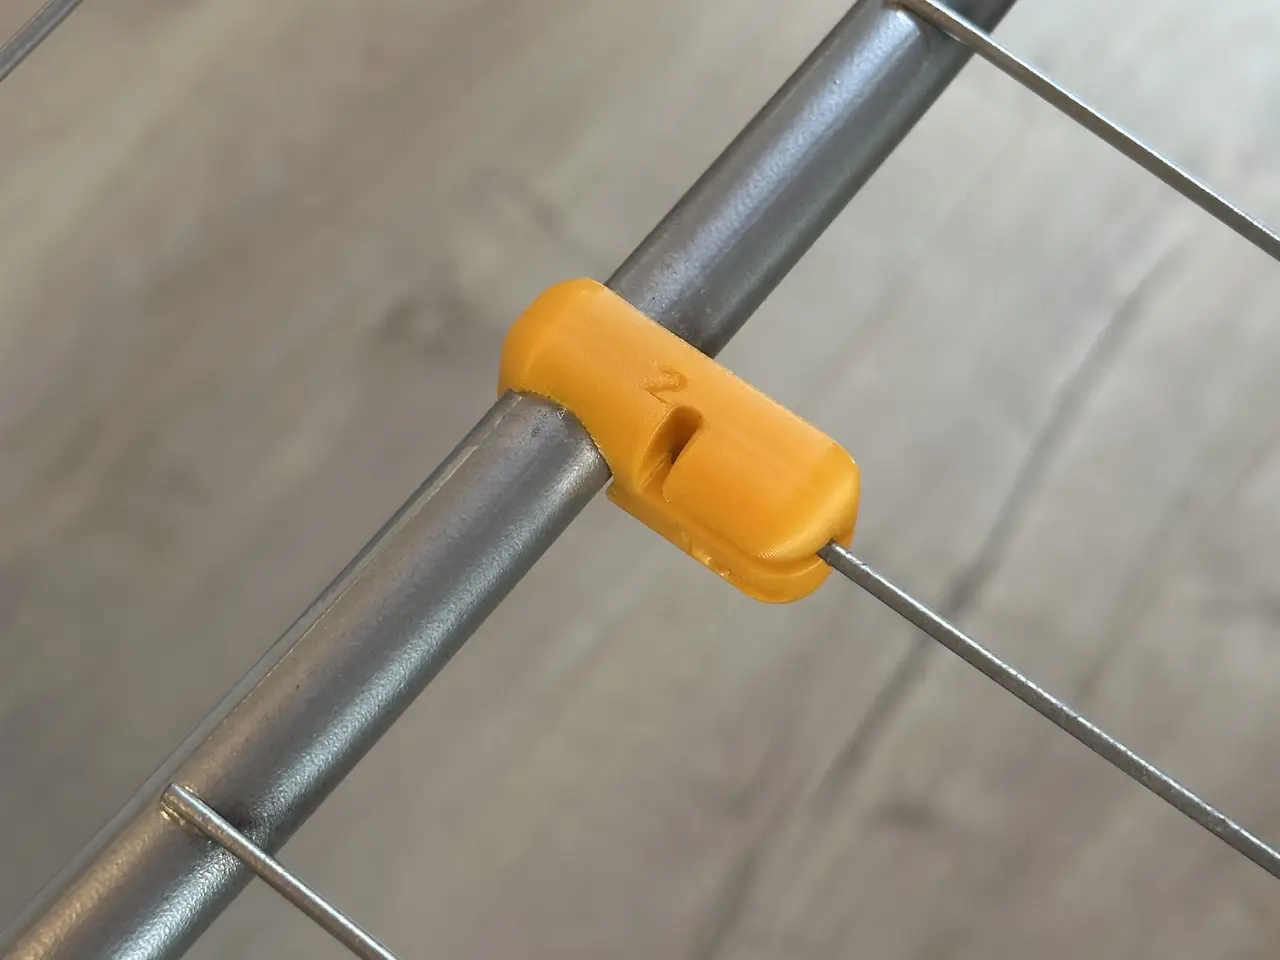
Repair Clip for Clothes Drying Rack - 190 Sizes
por tljuniper en Printables
Fix a broken drying rack with this clip. No additional hardware. Frame sizes 10-20mm and rung sizes 2-6mm (+parametric).
Licencia
Uso comercial permitidoCC BY-SA 4.0 — Atribución, compartir igual
Puedes usarlo y modificarlo dando crédito; las versiones modificadas deben compartirse con la misma licencia.
Al descargar aceptas respetar la licencia y dar crédito a tljuniper.
Archivos (191)
- Clothes_Dryer_Fix_Frame_10_0_Rung_2_0.3mf 3MF · 131 KB
- Clothes_Dryer_Fix_Frame_10_0_Rung_2_5.3mf 3MF · 130 KB
- Clothes_Dryer_Fix_Frame_10_0_Rung_3_0.3mf 3MF · 131 KB
- Clothes_Dryer_Fix_Frame_10_0_Rung_3_5.3mf 3MF · 131 KB
- Clothes_Dryer_Fix_Frame_10_0_Rung_4_0.3mf 3MF · 131 KB
- Clothes_Dryer_Fix_Frame_10_0_Rung_4_5.3mf 3MF · 131 KB
- Clothes_Dryer_Fix_Frame_10_0_Rung_5_0.3mf 3MF · 132 KB
- Clothes_Dryer_Fix_Frame_10_0_Rung_5_5.3mf 3MF · 131 KB
- Clothes_Dryer_Fix_Frame_10_0_Rung_6_0.3mf 3MF · 131 KB
- Clothes_Dryer_Fix_Frame_10_5_Rung_2_0.3mf 3MF · 131 KB
- Clothes_Dryer_Fix_Frame_10_5_Rung_2_5.3mf 3MF · 132 KB
- Clothes_Dryer_Fix_Frame_10_5_Rung_3_0.3mf 3MF · 131 KB
- Clothes_Dryer_Fix_Frame_10_5_Rung_3_5.3mf 3MF · 132 KB
- Clothes_Dryer_Fix_Frame_10_5_Rung_4_0.3mf 3MF · 131 KB
- Clothes_Dryer_Fix_Frame_10_5_Rung_4_5.3mf 3MF · 132 KB
- Clothes_Dryer_Fix_Frame_10_5_Rung_5_0.3mf 3MF · 132 KB
- Clothes_Dryer_Fix_Frame_10_5_Rung_5_5.3mf 3MF · 131 KB
- Clothes_Dryer_Fix_Frame_10_5_Rung_6_0.3mf 3MF · 131 KB
- Clothes_Dryer_Fix_Frame_11_0_Rung_2_0.3mf 3MF · 132 KB
- Clothes_Dryer_Fix_Frame_11_0_Rung_2_5.3mf 3MF · 131 KB
- Clothes_Dryer_Fix_Frame_11_0_Rung_3_0.3mf 3MF · 132 KB
- Clothes_Dryer_Fix_Frame_11_0_Rung_3_5.3mf 3MF · 131 KB
- Clothes_Dryer_Fix_Frame_11_0_Rung_4_0.3mf 3MF · 132 KB
- Clothes_Dryer_Fix_Frame_11_0_Rung_4_5.3mf 3MF · 132 KB
- Clothes_Dryer_Fix_Frame_11_0_Rung_5_0.3mf 3MF · 132 KB
- Clothes_Dryer_Fix_Frame_11_0_Rung_5_5.3mf 3MF · 132 KB
- Clothes_Dryer_Fix_Frame_11_0_Rung_6_0.3mf 3MF · 132 KB
- Clothes_Dryer_Fix_Frame_11_5_Rung_2_0.3mf 3MF · 132 KB
- Clothes_Dryer_Fix_Frame_11_5_Rung_2_5.3mf 3MF · 132 KB
- Clothes_Dryer_Fix_Frame_11_5_Rung_3_0.3mf 3MF · 132 KB
- Clothes_Dryer_Fix_Frame_11_5_Rung_3_5.3mf 3MF · 132 KB
- Clothes_Dryer_Fix_Frame_11_5_Rung_4_0.3mf 3MF · 132 KB
- Clothes_Dryer_Fix_Frame_11_5_Rung_4_5.3mf 3MF · 132 KB
- Clothes_Dryer_Fix_Frame_11_5_Rung_5_0.3mf 3MF · 132 KB
- Clothes_Dryer_Fix_Frame_11_5_Rung_5_5.3mf 3MF · 132 KB
- Clothes_Dryer_Fix_Frame_11_5_Rung_6_0.3mf 3MF · 132 KB
- Clothes_Dryer_Fix_Frame_12_0_Rung_2_0.3mf 3MF · 132 KB
- Clothes_Dryer_Fix_Frame_12_0_Rung_2_5.3mf 3MF · 132 KB
- Clothes_Dryer_Fix_Frame_12_0_Rung_3_0.3mf 3MF · 132 KB
- Clothes_Dryer_Fix_Frame_12_0_Rung_3_5.3mf 3MF · 131 KB
- Clothes_Dryer_Fix_Frame_12_0_Rung_4_0.3mf 3MF · 132 KB
- Clothes_Dryer_Fix_Frame_12_0_Rung_4_5.3mf 3MF · 131 KB
- Clothes_Dryer_Fix_Frame_12_0_Rung_5_0.3mf 3MF · 132 KB
- Clothes_Dryer_Fix_Frame_12_0_Rung_5_5.3mf 3MF · 132 KB
- Clothes_Dryer_Fix_Frame_12_0_Rung_6_0.3mf 3MF · 132 KB
- Clothes_Dryer_Fix_Frame_12_5_Rung_2_0.3mf 3MF · 133 KB
- Clothes_Dryer_Fix_Frame_12_5_Rung_2_5.3mf 3MF · 132 KB
- Clothes_Dryer_Fix_Frame_12_5_Rung_3_0.3mf 3MF · 132 KB
- Clothes_Dryer_Fix_Frame_12_5_Rung_3_5.3mf 3MF · 132 KB
- Clothes_Dryer_Fix_Frame_12_5_Rung_4_0.3mf 3MF · 132 KB
- Clothes_Dryer_Fix_Frame_12_5_Rung_4_5.3mf 3MF · 132 KB
- Clothes_Dryer_Fix_Frame_12_5_Rung_5_0.3mf 3MF · 132 KB
- Clothes_Dryer_Fix_Frame_12_5_Rung_5_5.3mf 3MF · 132 KB
- Clothes_Dryer_Fix_Frame_12_5_Rung_6_0.3mf 3MF · 133 KB
- Clothes_Dryer_Fix_Frame_13_0_Rung_2_0.3mf 3MF · 133 KB
- Clothes_Dryer_Fix_Frame_13_0_Rung_2_5.3mf 3MF · 132 KB
- Clothes_Dryer_Fix_Frame_13_0_Rung_3_0.3mf 3MF · 133 KB
- Clothes_Dryer_Fix_Frame_13_0_Rung_3_5.3mf 3MF · 132 KB
- Clothes_Dryer_Fix_Frame_13_0_Rung_4_0.3mf 3MF · 132 KB
- Clothes_Dryer_Fix_Frame_13_0_Rung_4_5.3mf 3MF · 132 KB
- Categoría
- Hogar
- Formatos
- 3MF, SCAD
- Descargas
- 1,570
- Publicado
Sobre este modelo
Repair Clip for Clothes Drying Rack The metal rungs of drying racks tend to snap off after some time, leaving the metal part dangling. This clip fixes that. You will need to bend the rung so that it securely attaches to the clip. The clip has a separate slot for this so you don't need to measure where to bend. Sizes 📐 The size of my dryer is 14mm for the frame and 2.5mm for the rung -- I believe this is a very common size. The model is parametric, so you can configure any size you want. I have pre-generated the following combinations: - Frames/Pipes/Tubes from 10.0mm, 10.5mm, 11.0mm ... up to 20.0mm
- Rungs/Rods/Lines from 2.0mm, 2.5mm, 3mm ... up to 6mm
The models include .2mm printer slack on both sides and for the rung there's an additional .3mm of wiggle room, so it's easier to slide in even when the bend isn't perfect. Printing 🛠 What I used: - PLA
- 0.16mm layer height
- 5 wall loops
- 25% gyroid infill
- no supports - part is in printing orientation
Installation 📌 1. Preparation: Bend the rung using slot "1" Stick the broken rung into slot "1" as far as it goes and then bend it to 90 degrees. Pull it back out. Note: There are some drying rack models out there with very strong rungs that can't be bent with this part. If that's the case for you, try giving it a go with some pliers instead. 2. Make a T using slot "2" Stick the rung into slot "2" so that it forms the letter "T". 3. Turn clockwise Turn the clip around clockwise until the clip is in line with the rung. 4. Snap onto frame Only now snap the clip assembly onto the frame. Done!
Modifications ⚙ This is an OpenSCAD model, so you can play around with it and change the dimensions or shape if you like. It uses the BOSL2 library, so you'll need to install this to work with the model.
Descripción original del autor, publicada en Printables.