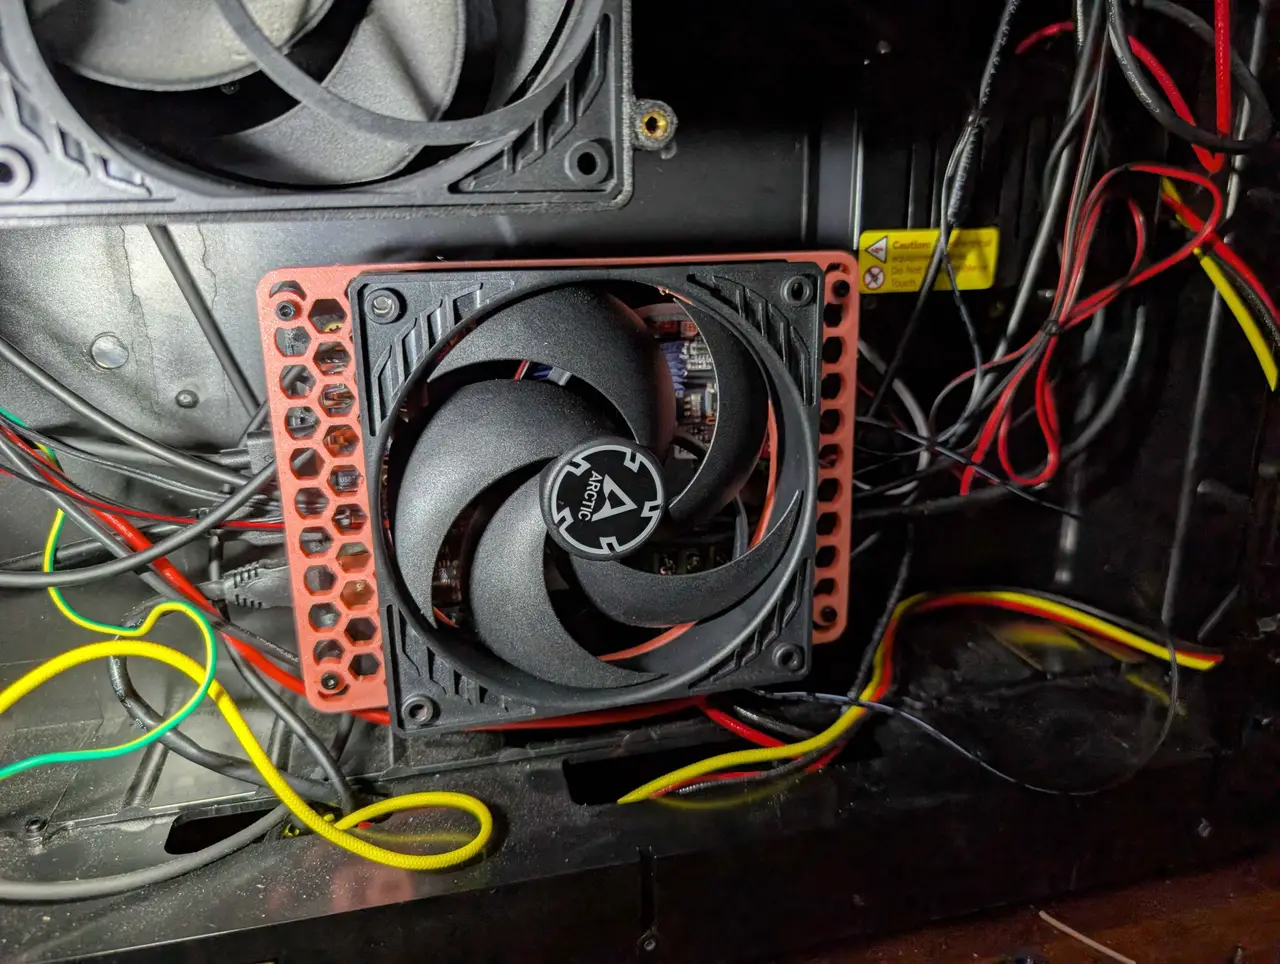
QIDI Plus 4 Mainboard Mounted Fan
por Tim en Printables
Mount your fan onto the mainboard instead of the case
Licencia
Uso comercial permitidoPuedes imprimirlo, modificarlo y venderlo dando crédito al autor.
Al descargar aceptas respetar la licencia y dar crédito a Tim.
Archivos (18)
- plus4_mainboard_fan_mount_base.step STEP · 2,8 MB
- plus4_mainboard_fan_mount_fan_frame_120mm.step STEP · 4,1 MB
- plus4_mainboard_fan_mount_fan_frame_40mm.step STEP · 4,0 MB
- plus4_mainboard_fan_mount_fan_frame_60mm.step STEP · 4,1 MB
- plus4_mainboard_fan_mount_fan_frame_80mm.step STEP · 4,0 MB
- plus4_mainboard_fan_mount_fan_grill_120mm.step STEP · 2,4 MB
- plus4_mainboard_fan_mount_fan_grill_40mm.step STEP · 340 KB
- plus4_mainboard_fan_mount_fan_grill_60mm.step STEP · 718 KB
- plus4_mainboard_fan_mount_fan_grill_80mm.step STEP · 1,1 MB
- plus4_mainboard_fan_mount_base.stl STL · 708 KB
- plus4_mainboard_fan_mount_fan_frame_120mm.stl STL · 623 KB
- plus4_mainboard_fan_mount_fan_frame_40mm.stl STL · 537 KB
- plus4_mainboard_fan_mount_fan_frame_60mm.stl STL · 570 KB
- plus4_mainboard_fan_mount_fan_frame_80mm.stl STL · 563 KB
- plus4_mainboard_fan_mount_fan_grill_120mm.stl STL · 282 KB
- plus4_mainboard_fan_mount_fan_grill_40mm.stl STL · 166 KB
- plus4_mainboard_fan_mount_fan_grill_60mm.stl STL · 188 KB
- plus4_mainboard_fan_mount_fan_grill_80mm.stl STL · 206 KB
- Categoría
- Para tu impresora
- Formatos
- STEP, STL
- Descargas
- 0
- Publicado
Sobre este modelo
I'm in the process of modding the stock panels from the Plus 4 printer, and wanted a way to install the mainboard/CPU fan directly over the mainboard instead. This will work fine if you're using the stock mainboard, but I can't guarantee that airflow will be ok if the fan isn't mounted onto the case when it's reinstalled. But you can always try it and leave an angry comment if it's not cooling properly. I only tested with a 120mm fan, as that's what I intended to use for noise reduction. I have provided alternatives for other fan sizes if that's what you'd prefer. They're shifted towards the top to ensure they're blowing onto the heatsinks on the board. BOM - 8x M4 SHCS bolts for the fan and grill (maybe smaller if the smaller fan sizes take M3 or M2.5 - Alternatively, use standard self tapping fan screws
- 8x M4 hex nuts for the fan
- 4x M3 4x5 Heat Set Inserts
- 8x M3 12mm SHCS bolts - 4 for the fan frame to attach to the base, 4 for the base to attach to the case.
Assembly - Take the case back off, and unplug the stock mainboard/CPU fan.
- Insert the heat set inserts into the fan frame using your favourite hot pokey weapon of choice.
- Unscrew the four corner screws from the mainboard. These can't be re-used as they're too short once the base goes behind the mainboard.
- Slide the base behind the mainboard. Insert 12mm SHCS bolts through the mainboard bolt holes, and through the frame, and then screw them into the stock posts that held the mainboard before. - The stock mainboard screws are self-tapping. I didn't have any that were long enough, so I just tried normal M3 SHCS bolts and it worked fine. Just tighten by hand, not with a power tool or you might burr the plastic.
- Once the mainboard is secured, install the fan onto the fan frame with the M4 bolts, plug it into the mainboard, and screw the frame onto the base with the M3 screws into the heat set inserts. - Make sure the fan is pushing air onto the board. There are usually arrows on the fan which tell you the direction the air flows.
- (Optional) Attach the grill onto the fan on the outer side, if you think things might touch the blades.
Print Settings I used standard Voron settings. 4 walls, 40% hexagon infill, 0.2mm layer lines. I printed this in ABS. As the mainboard can get hot, I would not advise printing this in PLA or PET-G. Anything with a tolerance of temperatures above 100C should be fine.
Descripción original del autor, publicada en Printables.