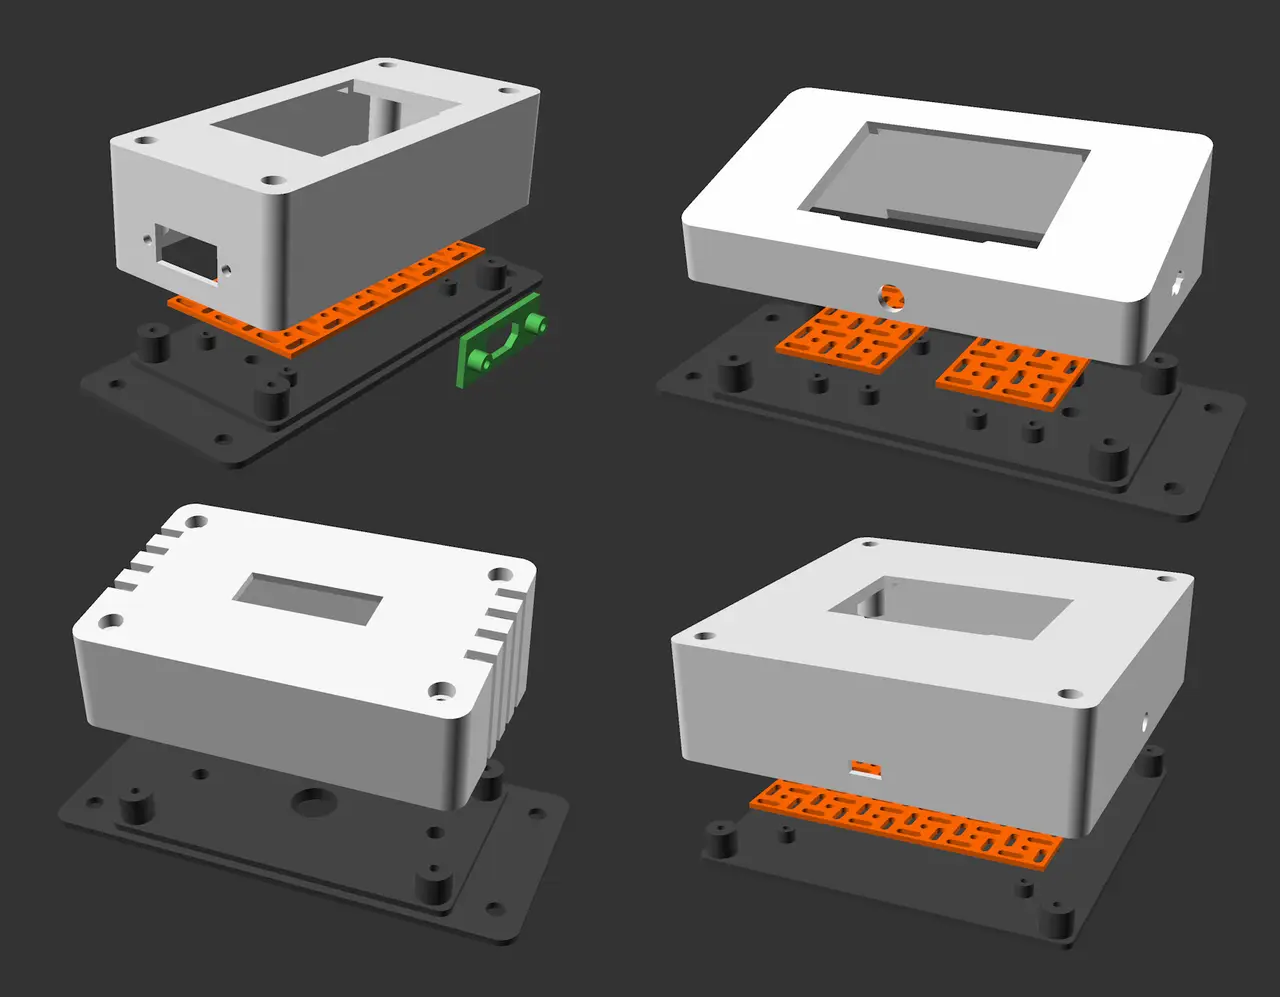
Parametric DIY enclosure - w/o varius OLED/LCD - Example 2.42-inch OLED Blackboard-Version
por Nool3D en Printables
Designed with the ESP32, ESP8266 and Arduino in mind, this case is fully customizable & scalable for different displays.
Licencia
Solo uso personalCC BY-NC-SA 4.0 — Atribución, no comercial, compartir igual
Uso personal dando crédito; sin fines comerciales y las modificaciones con la misma licencia.
Al descargar aceptas respetar la licencia y dar crédito a Nool3D.
Archivos (28)
- Parametric IoT Enclosure ( 2.42 Black-OLED, Swirly-Grid, USB-C, NoWings, ScrewFront) 120x60x40x30.stl STL · 1,3 MB
- Parametric IoT Enclosure ( 2.42 Black-OLED, Swirly-Grid, USB-C, Wings, ScrewRear) 120x60x40x30.stl STL · 1,4 MB
- Parametric IoT Enclosure IO-Shield Typ Blank-DIY-Shield screw domes v2.0.1.stl STL · 79 KB
- Parametric IoT Enclosure IO-Shield Typ Blank-DIY-Shield solid pins v2.0.1.stl STL · 40 KB
- Parametric IoT Enclosure IO-Shield Typ Mico-USB solid pins v2.0.1.stl STL · 41 KB
- Parametric IoT Enclosure IO-Shield Typ HDMI solid pins v2.0.1.stl STL · 41 KB
- Parametric IoT Enclosure IO-Shield Typ Chamfered-Blank-Cover solid pins v2.0.1.stl STL · 40 KB
- Parametric IoT Enclosure IO-Shield Typ Chamfered-Blank-Cover screw domes v2.0.1.stl STL · 85 KB
- Parametric IoT Enclosure IO-Shield Typ Mini-HDMI solid pins v2.0.1.stl STL · 41 KB
- Parametric IoT Enclosure IO-Shield Typ Chamfered-Blind-Frame v2.0.1.stl STL · 79 KB
- Parametric IoT Enclosure IO-Shield Typ MicroSD-Slot screw domes v2.0.1.stl STL · 80 KB
- Parametric IoT Enclosure IO-Shield Typ Mini-HDMI screw domes v2.0.1.stl STL · 81 KB
- Parametric IoT Enclosure IO-Shield Typ MicroSD-Slot solid pins v2.0.1.stl STL · 41 KB
- Parametric IoT Enclosure IO-Shield Typ HDMI screw domes v2.0.1.stl STL · 81 KB
- Parametric IoT Enclosure IO-Shield Typ Micro-USB screw domes v2.0.1.stl STL · 81 KB
- Parametric IoT Enclosure IO-Shield Typ Universal-Mounting-Frame v2.0.1.stl STL · 81 KB
- Parametric IoT Enclosure IO-Shield Typ USB-A screw domes v2.0.1.stl STL · 80 KB
- Parametric IoT Enclosure IO-Shield Typ USB-C screw domes v2.0.1.stl STL · 99 KB
- Parametric IoT Enclosure IO-Shield Typ USB-C solid pins v2.0.1.stl STL · 60 KB
- Parametric IoT Enclosure IO-Shield Typ XT30 screw domes v2.0.1.stl STL · 81 KB
- Parametric IoT Enclosure IO-Shield Typ XT30 solid pins v2.0.1.stl STL · 41 KB
- Parametric IoT Enclosure IO-Shield Typ XT60 solid pins v2.0.1.stl STL · 41 KB
- Parametric IoT Enclosure IO-Shield Typ Sensor-Vents screw domes v2.0.1.stl STL · 493 KB
- Parametric IoT Enclosure IO-Shield Typ Sensor-Vents solid pins v2.0.1.stl STL · 454 KB
- Parametric IoT Enclosure IO-Shield Typ USB-A solid pins v2.0.1.stl STL · 41 KB
- Parametric IoT Enclosure IO-Shield Typ XT60 screw domes v2.0.1.stl STL · 81 KB
- Parametric IoT Enclosure (ESP32, 2.42 Zoll OLED, LCD, Arduino Sensors, Swirly-Grid, IO-Shields) v2.0.1.3mf 3MF · 805 KB
- Parametric IoT Enclosure (ESP32, 2.42 Zoll OLED, Arduino Sensors, Swirly-Grid, IO-Shields) v2.0.1.stl STL · 3,8 MB
- Categoría
- Tecnología
- Formatos
- STL, 3MF
- Descargas
- 2
- Publicado
Sobre este modelo
I was searching for a case for my 2.42-inch OLED, specifically the 'Blackboard' version, which has different dimensions and an extra notch compared to the standard ‘Blueboard’, but couldn't find a perfect fit.
So, I decided to design my own universal, parametric IoT enclosure! Designed with the ESP32, ESP8266, and Arduino in mind, this case is fully customizable and scalable. Need Custom Sizes? I have provided two of the most popular standard examples as ready-to-print STLs here (perfectly tailored for a 2.42-inch 128x64 I2C OLED with a black PCB). However, this project is fully parametric! If you don't want to use the standard sizes, need a specific dimension, custom tolerances, or want to adapt it to fit virtually any OLED, LCD, TFT, touch display, or custom PCB layout, you can use my free web-based Customizer over on my MakerWorld profile: https://makerworld.com/en/models/3187852-parametric-diy-enclosure-w-o-various-oled-lcd#profileId-3715074 CORE FEATURES & UPDATES: Update v2.1: Smart Screw Pillar System To make assembling even the deepest custom enclosures as easy as possible, I have completely rewritten the internal screw pillar logic: * No more extra-long screws needed: The code dynamically splits the internal mounting pillars depending on your chosen screw direction. The entry side (where the screw head sits) always gets a short 10mm stub, while the opposite side generates a tall pillar to meet it. This means standard short M3 screws (e.g., M3x12 or M3x16) will now work perfectly for any enclosure depth! * Flawless Front Faces: If you select the "Screws from Rear / Hidden" option in the customizer, the internal core holes will safely stop inside the plastic. Your front face remains completely clean and free of holes! (Check out the cross-section picture in the gallery to see how the pillars dynamically swap sides!) UPDATE v2.0: Modular IO-Shields & The "Blank Box" * Modular IO-Shield System: Instead of dealing with complex port geometry directly on the main housing, you can add standardized 22x11mm cutouts to any side of the box (Top, Bottom, Left, Right, Front, Rear). You can then use the customizer to generate precisely fitting IO-Shields for 13 different port types (including USB-C, USB-A, Micro-USB, HDMI, MicroSD, XT30/XT60, Sensor Vents, and Blank Plates). * Tool-less or Screwed Assembly: For the IO-Shields, choose between Screw Domes (for M3 self-tapping screws) or Solid Pins (perfect for heat staking or using standard 3mm push-on retaining rings for a tool-less Press-Fit). * Universal Mounting Frames & Chamfers: Elevate your design using the chamfered frames. Use them on the outside for a sleek 45-degree edge, or inside as a solid clamping bracket. * The "Blank Box" (Display Toggle): Don't need a display? Simply turn it off in the customizer. This completely removes the display cutout and mounting pins, giving you a perfectly clean, solid front panel—ideal for pure sensor nodes! UPDATE v1.6: Front Panel Cutouts & Heat Staking Pins! * Front Panel Cutouts: Easily add buttons, status LEDs, rotary encoders, or switches right next to your display! * Display Heat Staking / Pin Mounting Option: Instead of standard screw holes, you can generate solid plastic pins. Slide your PCB over them and secure it using a soldering iron (heat staking) or zip ties for a clean, screwless look! UPDATE v1.5: 3D Preview & Full Swirly Grid Control * Exploded Assembly Preview: When using the customizer, you can select the "Exploded Assembly" view to get a live, colored 3D preview of how the front, rear panel, and mounting grid fit together. * Fully Custom Swirly Grids: You are no longer limited to fixed grid sizes. Define the exact number of columns and rows for your internal mounting plates to fit any PCB size perfectly. * Independent Port Heights: Every single side (left, right, top, bottom) has its own independent port-offset. NOTE: It's a feature, not a bug! You might notice that the customizer allows you to scale the Swirly Grid larger than the enclosure itself, or push cutouts into unusual positions. This is intentional! It gives you absolute freedom for your DIY-Projects, like maximizing mounting space outside the box. Please, use the 3D Preview in the customizer to verify your crazy designs before exporting! Check out my other Parametric Projects! Building on this universal IoT enclosure, I decided to design an exceptionally robust, fully parametric enclosure for 35mm DIN-rail mounting! Take a look at it here: https://makerworld.com/en/models/3520112-din-rail-enclosure-breaker-box-35mm-parametric#profileId-4023405 I hope my 3D model works flawlessly for your projects and hardware setups. If you like this parametric enclosure, I would really appreciate a Like and a picture of your Make. Happy printing!
Descripción original del autor, publicada en Printables.