
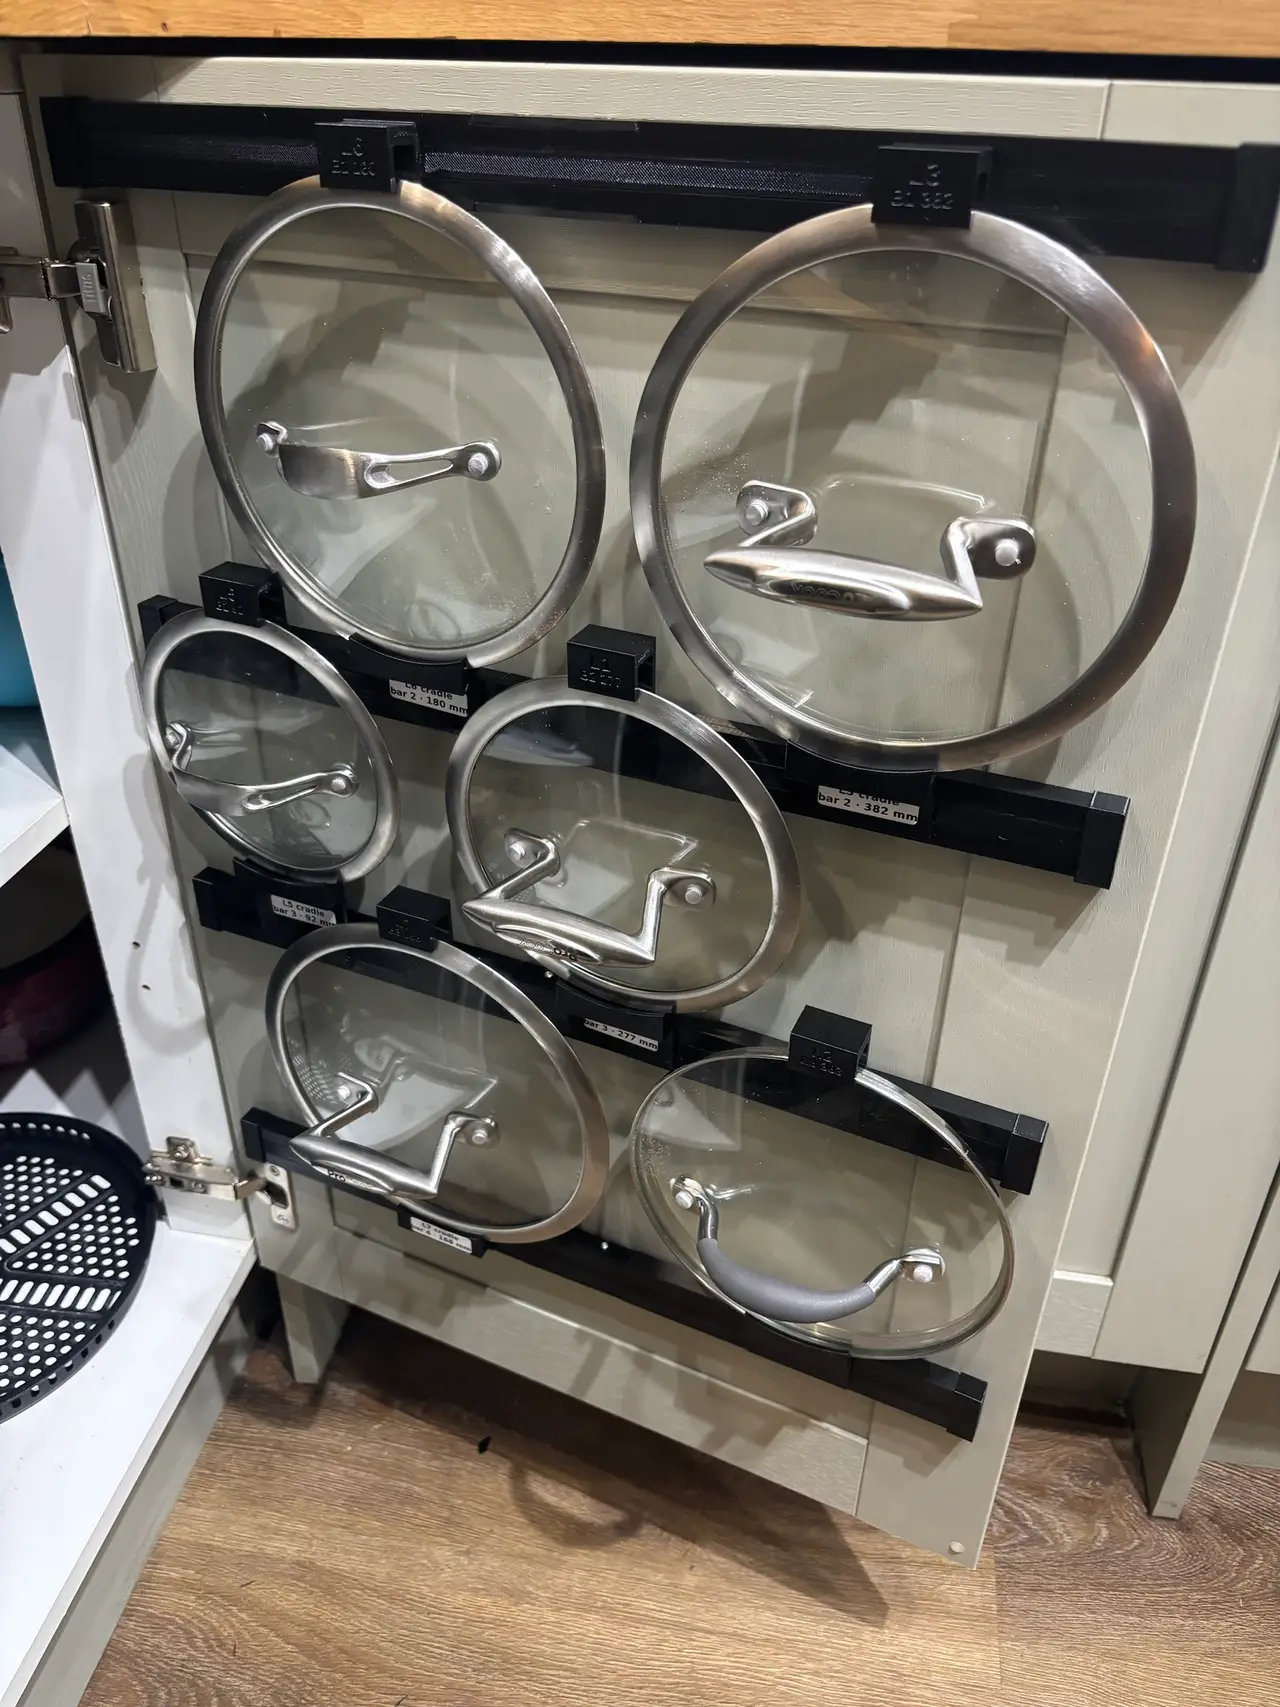
Pan lid rack for the inside of a kitchen cupboard door (Howdens 500 base door)
por MarcoPolo en Printables
Printed rails for a cupboard door, with sliding hooks and cradles for glass pan lids. Make yours at lids.marcuslab.uk.
Licencia
Solo uso personalCC BY-NC-SA 4.0 — Atribución, no comercial, compartir igual
Uso personal dando crédito; sin fines comerciales y las modificaciones con la misma licencia.
Al descargar aceptas respetar la licencia y dar crédito a MarcoPolo.
Archivos (25)
- spacers.stl STL · 2,4 MB
- jigs-plate.stl STL · 6,0 MB
- bar_left.stl STL · 240 KB
- test.stl STL · 354 KB
- bar-L2-cradle.stl STL · 79 KB
- bar_right.stl STL · 240 KB
- endcaps.stl STL · 623 KB
- bar-L5-cradle.stl STL · 79 KB
- bar-L1-cradle.stl STL · 79 KB
- bar-L7-cradle.stl STL · 54 KB
- bar-L6-cradle.stl STL · 78 KB
- bar-L3-cradle.stl STL · 78 KB
- bar-L2-hook.stl STL · 1,1 MB
- bar-L1-hook.stl STL · 593 KB
- bar-L7-hook.stl STL · 879 KB
- bar-L3-hook.stl STL · 973 KB
- fishplates.stl STL · 688 KB
- bar-L5-hook.stl STL · 782 KB
- bar-L6-hook.stl STL · 795 KB
- jigs.scad SCAD · 3 KB
- lid-clips.scad SCAD · 13 KB
- endcaps.scad SCAD · 2 KB
- spacers.scad SCAD · 3 KB
- layout.scad SCAD · 1 KB
- door_layout.py PY · 9 KB
- Categoría
- Hogar
- Formatos
- STL, SCAD, PY
- Descargas
- 1
- Publicado
Sobre este modelo
My glass pan lids lived in a heap on the floor of the pan cupboard and made a racket every time the door shut. Now they hang on the back of the door, six of them, and the door shuts in silence. How it works - Four rails run across the inside of the door, screwed into the frame only (the stiles). Nothing goes into the thin centre panel, so nothing comes out the front.
- Clips slide along the rails on a dovetail. Each lid gets a hook over its top rim (with a roof, so it can't jump out) and a cradle under its bottom rim (with a lip at the front).
- Hanging a lid: top rim up under the hook, lift, swing the bottom in over the cradle lip, let it drop. Taking it out is the same in reverse. No springs or magnets.
- Slot spacers fill the rail between the clips, so nothing slides when the door swings. The end ones are grooved to clear the screw heads and slide in last.
- End caps cover the cut ends of the rails and stop the end spacers creeping out.
- Each rail is two halves, because the 455 mm rail doesn't fit a 256 bed. The halves are joined by flush fishplates on brass heat-set inserts. I tried glue first; it was weak.
- Fitting jigs set the rail spacing off the door edges, so the rails go on level and parallel without measuring.
Will it fit my door? It's designed for a Howdens 500 mm base unit door, a framed shaker style. Measured: - Door: 495 × 715
- Frame (stiles and rails): 70 wide, 15 thick
- Cupboard opening behind it: 464 × 684
- Hinges (Titus): on the left stile, about 50 to 120 mm in from the top and bottom
Check these before you print: - The hinge positions.
- How much room there is behind the door. My cupboard has a shelf with only 55 mm clear; the layout keeps every lid's middle away from it. If your shelf sits at a different height, the layout may not suit.
- Which side the hinges are on. Mine are on the left, seen from inside.
The files here are cut for that door and my six lids. For any other door, use the generator: lids.marcuslab.uk (see below). Your door and your lids: the generator The clip stems and spacer lengths here are made for my lids: 150, 173, 190, 192, 195 and 215 mm across, all with a 12.6 mm deep rim. For your own, go to lids.marcuslab.uk: - Enter your door (size, stiles, rails, frame thickness, hinge side), your hinge plates, the cupboard opening, any shelf close behind the door, your printer bed, and each lid's diameter and rim depth.
- It arranges the lids around the hinges and the shelf, chooses the rails, splits them to fit your bed, places the screws and sizes the jigs. You get a live plan and a 3D view.
- Generate STLs, then Download kit: one zip with every part, plus a fitting sheet (print and buy lists, the order to thread the clips and spacers on, and how to use the jigs).
It runs OpenSCAD in your browser, so nothing is uploaded. Right-hinged doors are handled: the parts are the same, and the plan and sheet are drawn the right way round. Given my numbers, it reproduces this kit exactly. Print one hook and one cradle first and try them on a real lid before printing the lot. If a rim sits proud of its hook, give that lid some extra hook room and regenerate. What you need - Rail, left half × 4: bar_left.stl (PETG)
- Rail, right half × 4: bar_right.stl (PETG)
- Fishplates × 8: fishplates.stl, one plate (PETG)
- Hooks and cradles × 12: bar-L?-hook.stl, bar-L?-cradle.stl (PETG, each engraved with its lid, rail and position)
- Slot spacers × 16: spacers.stl, one plate (PETG)
- End caps × 8: endcaps.stl, one plate (PETG)
- Fitting jigs × 12: jigs-plate.stl, one plate (PLA is fine; they're only used once)
- M3 × 3 × 4.2 brass heat-set inserts × 16 (4 per rail)
- M3 × 8 button-head screws × 16 (2 per fishplate)
- 4 × 20 countersunk wood screws × 16 (4 per rail, into the stiles. I used Spax)
Print settings - Material: PETG for everything that stays on the door. Lids go in warm from the dishwasher, and PLA softens at around 55 °C.
- Clips: print standing on one end, so the dovetail and lips have no overhangs. No supports.
- Spacers: print flat on the floor side, with the slot opening facing up.
Descripción original del autor, publicada en Printables.



