NodeBrix Modular Case System for Heltec LoRa32 v3 and RAK19007 for use with Meshtastic
por Open Source Country en Printables
This is a modular kit to build your own custom portable Meshtastic node devices. RAK19007 support is a work in progress.
Licencia
Uso comercial permitidoPuedes imprimirlo, modificarlo y venderlo sin pedir permiso ni dar crédito.
Al descargar aceptas respetar la licencia y dar crédito a Open Source Country.
Archivos (200)
- gasket_back.stl STL · 123 KB
- gasket_front.stl STL · 154 KB
- gasket_front.step STEP · 117 KB
- gasket_back.step STEP · 109 KB
- front_heltec_buzzer_bme680.stl STL · 4,9 MB
- window_jig_2.stl STL · 2 KB
- encoder_knob_large.stl STL · 3,6 MB
- encoder_knob_small.stl STL · 3,5 MB
- front_heltec_bme680.step STEP · 3,2 MB
- front_heltec.step STEP · 2,9 MB
- front_heltec.stl STL · 4,3 MB
- front_heltec_bme680.stl STL · 4,6 MB
- front_heltec_buzzer_encoder_bme680.step STEP · 3,2 MB
- encoder_knob_large.step STEP · 912 KB
- heltec_button_recessed.stl STL · 420 KB
- front_heltec_buzzer.step STEP · 2,9 MB
- encoder_knob_small.step STEP · 1002 KB
- front_heltec_buzzer_vibrator_encoder_bme680.stl STL · 5,0 MB
- front_heltec_vibrator_encoder.step STEP · 2,9 MB
- front_heltec_buzzer_vibrator_encoder.step STEP · 3,0 MB
- heltec_button.stl STL · 403 KB
- front_heltec_encoder_bme680.stl STL · 4,6 MB
- front_heltec_encoder.step STEP · 2,9 MB
- front_heltec_buzzer_encoder_bme680.stl STL · 4,9 MB
- front_heltec_buzzer_vibrator_bme680.stl STL · 4,9 MB
- front_heltec_buzzer.stl STL · 4,7 MB
- front_heltec_vibrator.step STEP · 2,9 MB
- heltec_button_recessed.step STEP · 11 KB
- front_heltec_buzzer_vibrator.step STEP · 3,0 MB
- window_jig_2.step STEP · 16 KB
- front_heltec_buzzer_vibrator_bme680.step STEP · 3,2 MB
- front_heltec_vibrator_encoder_bme680.step STEP · 3,2 MB
- front_heltec_vibrator_encoder_bme680.stl STL · 4,6 MB
- heltec_button.step STEP · 11 KB
- front_heltec_encoder.stl STL · 4,4 MB
- front_heltec_buzzer_vibrator_encoder.stl STL · 4,7 MB
- window_jig_1.stl STL · 2 KB
- front_heltec_buzzer_vibrator.stl STL · 4,7 MB
- front_heltec_vibrator_encoder.stl STL · 4,4 MB
- front_heltec_buzzer_encoder.step STEP · 3,0 MB
- front_heltec_vibrator.stl STL · 4,3 MB
- front_heltec_buzzer_vibrator_encoder_bme680.step STEP · 3,2 MB
- front_heltec_buzzer_bme680.step STEP · 3,2 MB
- front_heltec_vibrator_bme680.stl STL · 4,6 MB
- window_jig_1.step STEP · 16 KB
- front_heltec_vibrator_bme680.step STEP · 3,2 MB
- front_heltec_buzzer_encoder.stl STL · 4,7 MB
- front_heltec_encoder_bme680.step STEP · 3,2 MB
- frame_heltec_n-type_lanyard_left.stl STL · 804 KB
- frame_heltec_pcb_external_magnets_lanyard_quad.step STEP · 459 KB
- frame.heltec.sma.lanyard.right.stl STL · 660 KB
- frame_heltec_n-type_lanyard_quad.step STEP · 478 KB
- frame_heltec_sma_magnets_lanyard_quad.step STEP · 420 KB
- frame_heltec_n-type.stl STL · 447 KB
- frame_heltec_sma_magnets.step STEP · 167 KB
- frame_heltec_sma_lanyard_quad.step STEP · 421 KB
- frame_heltec_pcb_lanyard_right.step STEP · 206 KB
- frame_heltec_sma_magnets_lanyard_left.stl STL · 660 KB
- frame_heltec_sma.step STEP · 167 KB
- frame_heltec_pcb_external_lanyard_right.step STEP · 261 KB
- Categoría
- Tecnología
- Formatos
- STL, STEP
- Descargas
- 735
- Publicado
Sobre este modelo
Update 5-29-24 Updated 18650 suction cup backs for less supports. ----------------------------------- Update 5-22-24 Uploaded large encoder knob STL that I forgot to include. -----------------------------------
NodeBrix Modular Case System For Heltec LoRa 32 v3 and RAK19007
NOTE: RAK19007 support and this manual are still under development!
What is it? NodeBrix Modular Case System is a set of models for building portable enclosures for two of the currently most popular LoRa boards commonly used for Meshtastic off-grid communications. The system generally consists of front plates, frames to hold the board and backs to hold one or more batteries. I have included all usable combinations of these. A case is initially built by bolting one of each of these together in a stack. There are many options for different use cases. Also, I tried to make sure there was enough room and space for things like header pins and addons. These cases are intended to be modified and experimented on. Model source code and the project file has been included as well as some tool models that may help you modify or put your own spin on things.
Why did I make this? Once upon a time I was a developer of things. I felt there needed to be a system that provided users with swappable options and also was free for users to modify and use in any way they chose. The system should be able to supply some simple builds for new people as well as advanced builds for the hardened veterans. My biggest hope is that users modify and remix parts or all of this system and release it back into the wild.
Licensing? These files are released as Public Domain to benefit everyone. Yes, this means you can use them or derivatives commercially. No attribution is required but if you wish to do so please attribute to or thank “Open Source Country”. You can also copy/paste a feature to your own project and I left some parts and tools in the files that might help. My pixels are your pixels.
Do I like Country Music? Not really. Open Source Country is an idea. We are all citizens, the internet is our home, information is our currency and the only borders are firewalls. If you know, you know.
Printing The Models
Orientation: Most of the models are in the orientation they should be printed in. But feel free to experiment. It’s your time and your filament. The back modules with clip mounts need to be rotated 180 degrees so the two holes for the clip are facing up and yes, use supports.
Supports: Sorry printer enthusiasts, yes you need to use supports. If you want to be that clever troll that prints it at 45 degrees, well, /tiphat. There are probably some Heltec frames and some back modules you could get away with not using supports on. The strap back attachment ezprint version and magnetic back attachment do not require using supports. I also have tried flipping the fronts and sinking the face into the bed for easy printing and had good results.
Support Blockers: The BME680 front plates will need support blockers on the BME680 vent and the connected chimney. The PCB external frames will need support blockers on the antenna hex tube.
Parts & Materials
Nuts and Bolts: 4 M3 hex head bolts and nuts are used to bolt the front, frame and back together at the corners. I have no idea what back modules, frames and fronts people will mix and use. So the length of these bolts varies. 20mm works well on the Heltec 4ah configuration. To be honest you should have a ruler or a set of cheap calipers to measure the thickness of your configuration and go from there. One of the tricks I use is either a pair of lineman’s pliers or side/diagonal cutters and just cut long bolts to fit. M2 button or hex head bolts for internal components like the screen, BME680, RAK19007 power switch, RAK19007 user/reset buttons and also is used to attach the belt clip on certain back modules.
USB-C: USB-C silicone dust plugs are recommended. Also for putting the device into pouches right angle aka 90 degree cables can be helpful. - USB-C Silicon Dust Plugs https://a.co/d/1jmwQX4
Heltec Frames: The carrier plate for the Heltec frames has two screw holes. You will need to remove two of the screen bolts on your Heltec board and reinstall them through the carrier plate back into the Heltec screen. Be careful not to remove all 4 bolts because the ribbon cable attached to the screen is very fragile.
Screen Fronts: The screen openings have room for a 1mm or 3mm acrylic window to protect the screen. I have included two jigs for cutting the windows out of 4” x 6” 1mm acrylic sheets. 1mm is easy to cut with a razor knife and offers great protection in my opinion. 3mm acrylic sheets require a laser cutter, CNC or good shop tools, patience and a steady hand. Acrylic will crack and shatter when you try to separate it if your cuts aren’t true and through. If the window is slightly too big to fit use quality 80 grit sandpaper on the edge(s) and try again. I still need to make jigs for the RAK19007 windows. To fasten the window into the opening you will need glue. I prefer silicone or shoe repair glue. A large gauge (14ga) needle bottle makes it easy to apply and letting the bottle sit in a bowl of hot water makes the glue viscous (“runny”) and flows through the needle easier. All that being said, you could also use super glue (and baking soda?) but I noticed super glue left a white haze on parts of the window but it was still very readable. - 1mm acrylic sheets https://a.co/d/gxVuyVz - 3mm acrylic sheets https://a.co/d/8GPrwv1 - Needle Bottles https://a.co/d/19WiSp6
Buzzer Fronts: On these front parts there is a round 12mm slot for a buzzer to fit in. Super glue the buzzer with the hole facing the part and the wire leads facing away. Either passive or active buzzers can be used. I use active buzzers and was able to have them play ringtones. Passive seems to be the popular choice though so do your homework. The buzzer slot has a hole to the outside of the case so you could alternatively glue an LED in the hole instead of a buzzer. - Passive Buzzers https://a.co/d/hy7j6Ae - Active Buzzers https://a.co/d/f0lLVJH
More information here: https://meshtastic.org/docs/configuration/module/external-notification/ https://adrelien.com/blog/how-to-add-buzzer-to-diy-esp32-heltec-lora-meshtastic-node/
Vibrator Fronts: These fronts have a round 10mm slot for a vibrating module and a small channel for the wires. It’s basically the exact same setup as the buzzer except if you use a buzzer you would choose a different GPIO pin.
- Mini Vibration Motors https://a.co/d/49uhxek
Rotary Fronts: These fronts have a hole for an EC11 rotary encoder with a 15mm shaft. There are also two model files for knobs. The rotary encoder is for using the canned message module in Meshtastic. It allows you to choose from predefined messages and send them standalone without having to use a mobile device. I left the tolerance on the hole just tight enough where you will need to screw the encoder into the hole.
- EC11 Rotary Encoders https://a.co/d/9zSADVF
More information here: https://adrelien.com/blog/how-to-setup-canned-pre-defined-messages-with-rotary-knob-button-for-meshtastic-node/ https://meshtastic.org/docs/configuration/module/canned-message/
BME680 Fronts: These fronts have a vent chimney for the sensor and the sensor board mounts to the front plate with 2 M2 4mm bolts. The BME680 sensor measures temperature, humidity, barometric pressure and air quality (sort of). - BME680 https://a.co/d/bKv1FOo
More information here: https://meshtastic.org/docs/configuration/module/telemetry/
RAK19007 Fronts: These fronts probably require the most work. The user and reset buttons are 6mm x 6mm tactile switches. 5mm tall for recessed buttons and 6mm for pressable but still protected buttons. They are held in place with 2 M2 6mm hex head bolts or 3 M2 6mm grub screws. The button plate model is required if using a RAK front with buttons. The power switch is held in place with 2 M2 4mm bolts. An SS12F55 slide switch is used for power. The optional screen is a 0.96 OLED board and is held in with 4 M2 4mm bolts (any type is fine) and 2 M2 washers. - Micro Tactile Buttons 5mm Tall https://a.co/d/2qAhX23 - Micro Tactile Buttons 6mm Tall https://a.co/d/fs39sei - M2 6mm Grub Screws https://a.co/d/i6nneE8 - 0.96 OLED Screen https://a.co/d/0bhJPGn - SS12F55 Slide Switches https://a.co/d/0Q8RVnt
More information here: https://meshtastic.org/docs/hardware/devices/rak/screens/?rakscreens=OLED
SMA Frames: These frames will probably be the most commonly used. They have a hole with a flat side to fit an SMA connector for an external antenna. This is the same connector as the pigtail (antenna cable) that comes with Heltec boards. The other end of the pigtail is called U.FL or IPEX and connects to the LoRa board. A 3”-5” pigtail should work fine. Be aware RP-SMA is the same size but will require a different antenna. - SMA to U.FL 5” Pigtail https://a.co/d/1vH79z5
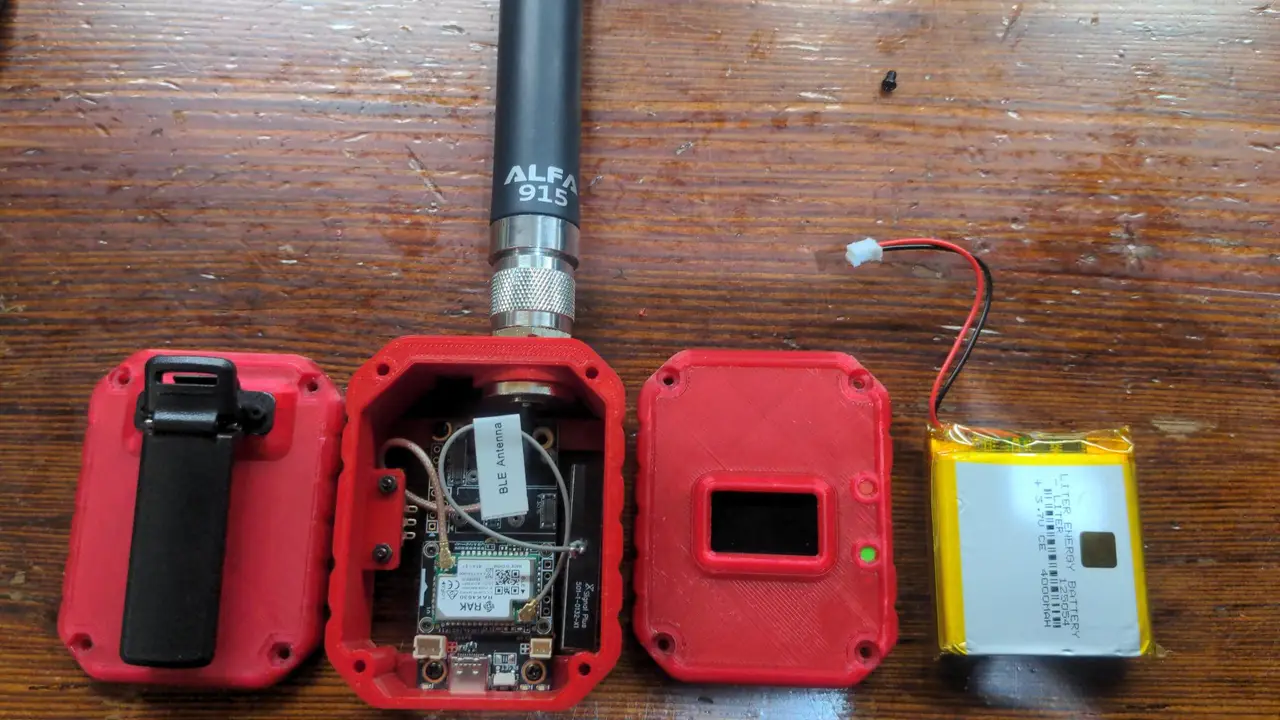
N-Type Frames: These frames use a large N-Type RF antenna connector. Personal note, this is one of the reasons I started this project. These frames are deeper than the other frames and leave a bunch of extra room unused in the case. Maybe good for adding extra components or you could use the 2ah back module and use the extra space in the frame for the battery. I really hope this frame specifically gets modified by people. For this connector I like to buy quality N-Type pigtails. My favorite antenna for this is the Alfa linked below. - N-Type Female Bulkhead Pigtail https://www.digikey.com/en/products/detail/gradconn/CABLE-329-RF-100-A/9859837 - Alfa N-Type 5dbi Antenna https://store.rokland.com/collections/all-helium-antennnas/products/alfa-aoa-915-5acm-5-dbi-omni-outdoor-915mhz-802-11ah-mini-antenna-for-lora-halow-application
Magnet Frames: These frames are only available for the Heltec boards currently. The frame allows 2 30x10x5mm neodymium magnets to be inserted flat on top of each other in the bottom of the frame. They pressure fit into place very tight but you could use glue to help secure them. I have thrown a device using this frame at my old farm truck and it stuck. The magnets are very strong but can be annoying when working on the case. If you can’t find a missing screw or tool, check the magnet area. ;) - 30x10x5mm neodymium magnets https://a.co/d/98kjIIK
Descripción original del autor, publicada en Printables.