Modular Metric Spanner / Wrench Rack for Multiboard
por Dan Marrable en Printables
Keep spanners face-out and easy to grab with labelled, two-tool modules, ring-end pegs and bolt-lock Multiboard mounting
Licencia
Uso comercial permitidoPuedes imprimirlo, modificarlo y venderlo sin pedir permiso ni dar crédito.
Al descargar aceptas respetar la licencia y dar crédito a Dan Marrable.
Archivos (8)
- SpannerRack-Back-08-10-v4.stl STL · 869 KB
- SpannerRack-Front-08-10-v4.stl STL · 325 KB
- SpannerRack-Front-11-12-v4.stl STL · 205 KB
- SpannerRack-Back-11-12-v4.stl STL · 869 KB
- SpannerRack-Back-13-14-v4.stl STL · 869 KB
- SpannerRack-Front-13-14-v4.stl STL · 241 KB
- SpannerRack-Front-16-17-v4.stl STL · 241 KB
- SpannerRack-Back-16-17-v4.stl STL · 869 KB
- Categoría
- Herramientas
- Formatos
- STL
- Descargas
- 0
- Publicado
Sobre este modelo
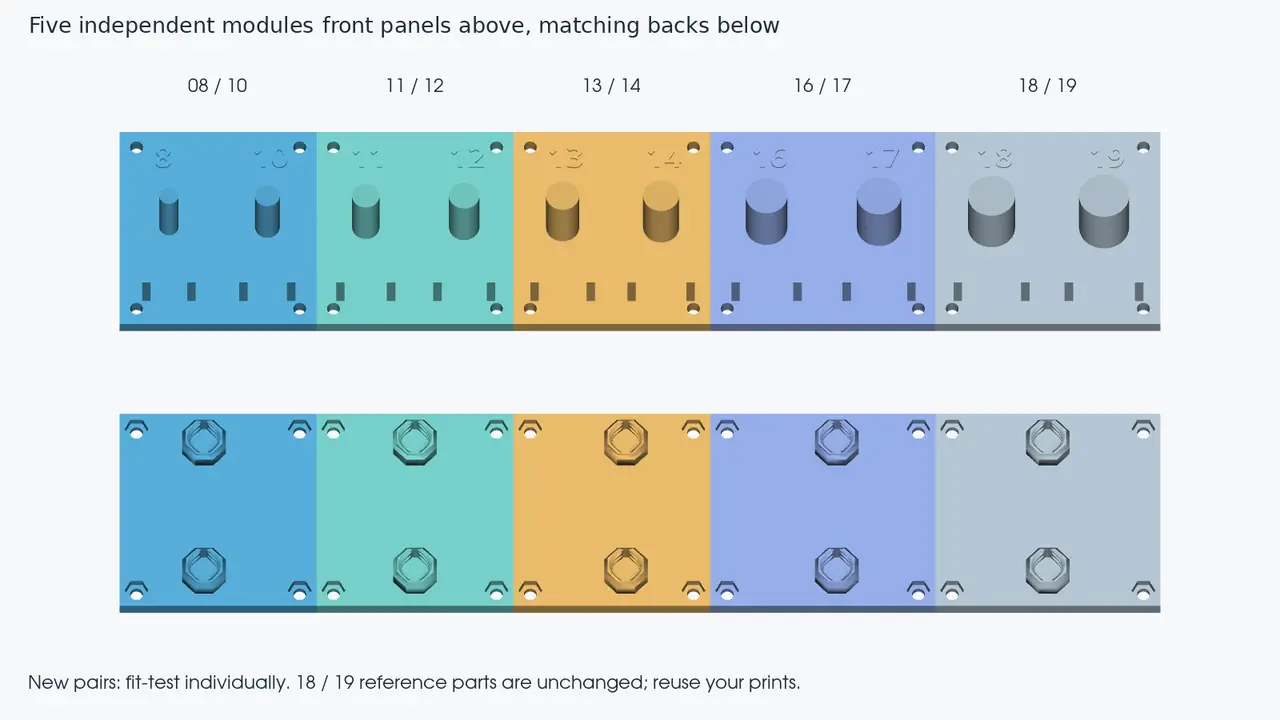
Modular metric spanner / wrench rack for Multiboard I wanted my spanners hanging with their broad faces outward, so I could see the size markings and grab the right one without shuffling the others around. This rack holds each spanner by its ring end, with guides below to help keep it facing forward. Raised size labels make it easy to spot what belongs where—and which tool hasn’t made it back to the wall. Instead of one long print, the rack is split into five independently mounted, two-spanner modules. You can print the pairs you need, arrange them around your workspace, or replace one section without reprinting the whole set. Included sizes Module Spanner sizes Panel width 8 / 108 mm and 10 mm70 mm 11 / 1211 mm and 12 mm70 mm 13 / 1413 mm and 14 mm70 mm 16 / 1716 mm and 17 mm80 mm 18 / 1918 mm and 19 mm80 mm Each module has a separate front holder and rear mounting plate. All panels are 75 mm high. Arranged side by side in the order above, the panels form a nominal 370 mm-wide row. Hanging tools extend beyond the panel height. Features Ring-end suspension with the spanners facing outward. Raised, modelled size labels. Guides to limit sideways movement and twisting. Separate front and back plates joined with M4 hardware. Independently supported modules, with no structural joints between sections. Bolt-lock mounting using official MultiBuild receiver geometry. The design was built parametrically in Onshape, with controls for station spacing, peg clearance, guide openings and mounting offsets. Mounting and hardware For each two-spanner module, you’ll need: Four M4 screws. Four M4 hex nuts. Two compatible MultiBuild snap/Locking T-Bolt connections. Choose screw length to suit the actual printed stack and check that the ends do not foul the board or connectors. The backs use the larger official Bolt-Lock Nub_Positive receiver geometry and the matching Locking T-Bolt. The small-thread receiver is a different interface and is not interchangeable. Keep each front with the back from the same folder. The back plates have different horizontal mounting offsets so the mounting columns line up when the panels sit together. Rotating an offset back plate upside down reverses that offset. In the intended row arrangement, mounting columns are 75 mm apart, with 50 mm between the upper and lower connections. Printing Print at 100% scale in millimetres. Front holders: flat rear face on the bed, with the pegs, guides and labels pointing upward. Back plates: flat front face on the bed, with the receivers and nut pockets pointing upward. Keep support material out of the threads and connector mating surfaces. Start with one module and check the fit before printing the complete set. Spanners of the same nominal size can have different ring shapes, neck widths and flanges. Fit-testing status The 18/19 mm front and corrected larger-thread back have been physically printed and confirmed to fit my tools and mounting connection. The 8/10, 11/12, 13/14 and 16/17 modules have passed CAD regeneration and mesh checks, but their physical tool fit is still awaiting test prints. Check that your spanners seat properly, clear the guides and neighbouring tools, and lift out easily. There are also a few assembly checks to make: Check M4 screw-head and driver clearance near the lower guides. The clearance holes fit the shafts, but some heads or washers may touch the guides. Dry-fit neighbouring panels. The nominal layout has touching edges, without an added allowance for print oversize. Check clearance behind the board at every mounting point, particularly around wooden cleats. Confirm that each locking connection clamps securely rather than simply bottoming out. The rack has not been load-rated or subjected to a sustained full-set load test. Credits The mounting plates incorporate official MultiBuild Bolt-Lock Nub_Positive connector geometry. Credit for the original connector system and matching snap/bolt designs belongs to MultiBuild. If you print a pair, please share a make with your spanner brand and any fit adjustments. That will help establish which tool sets work with the current dimensions.
Descripción original del autor, publicada en Printables.