Mini PC Notebook Slate 1
por brunno537 en Thingiverse
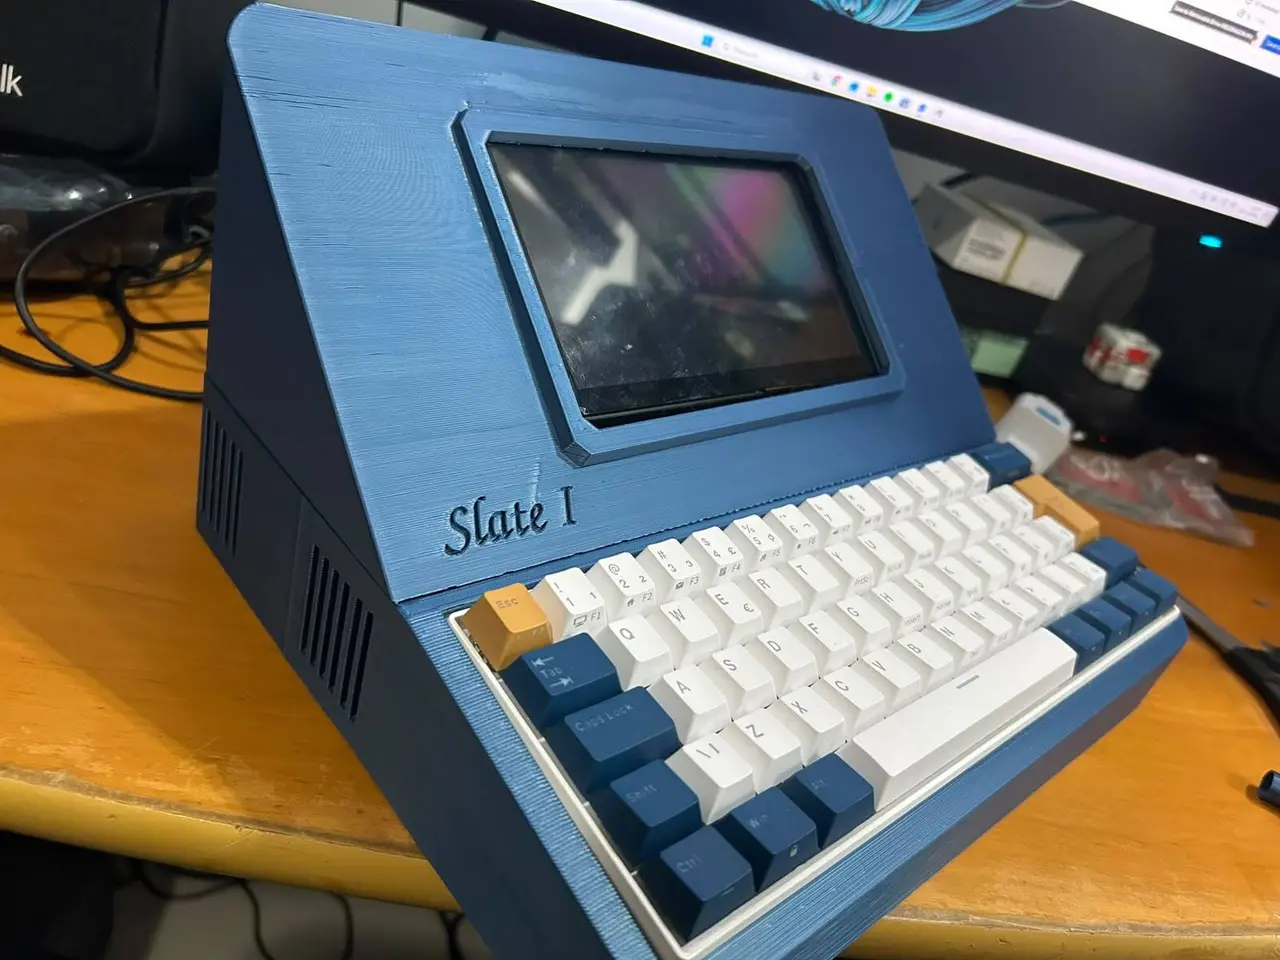
SLATE I — 3D-Printed Retro Computer About the Project The Slate I is a fully functional retro-style computer that I designed from scratch and built using 3D printing. Inspired by personal computers from the 1970s and 1980s, it combines a custom 3D-printed enclosure with modern hardware, including a.
Licencia
Solo uso personalCC BY-NC-SA 4.0 — Atribución, no comercial, compartir igual
Uso personal dando crédito; sin fines comerciales y las modificaciones con la misma licencia.
Al descargar aceptas respetar la licencia y dar crédito a brunno537.
Archivos (5)
- Categoría
- Tecnología
- Formatos
- STL
- Descargas
- 0
- Publicado
Sobre este modelo
SLATE I — 3D-Printed Retro Computer About the Project The Slate I is a fully functional retro-style computer that I designed from scratch and built using 3D printing. Inspired by personal computers from the 1970s and 1980s, it combines a custom 3D-printed enclosure with modern hardware, including a Beelink SER3-L mini PC, a Royal Kludge RK61 mechanical keyboard, a 7-inch touchscreen display, and an integrated speaker. First of all, I'm just a hobbyist. I have no formal training in design or 3D modeling and have never taken any courses in either field. I simply enjoy creating things, experimenting with 3D modeling, learning through trial and error, and bringing my ideas to life. I wanted to challenge myself by designing my very own retro computer, and that's how the Slate I was born! The main goal was to create a compact, self-contained computer with the appearance of a vintage machine, while keeping the modern components as intact and accessible as possible. The entire enclosure was designed by me and printed using Printalot Cobalt Blue PLA filament. It features ventilation openings, custom internal mounts, an integrated keyboard, and a side cutout that provides access to the Beelink's front USB ports and power button. Components Used These are the components I used for my build: | Component | Model / Description | 1- Mini PC | Beelink SER3-L — AMD Ryzen 3 3200U, 16 GB RAM | 2-| Keyboard | Royal Kludge RK61 — 61-key mechanical keyboard | https://pt.aliexpress.com/item/1005004613365439.html?spm=a2g0o.productlist.main.2.4bd27b98XqSPoz&algo_pvid=4d1b2a34-8378-42ab-ac7a-4bdfb0703131&algo_exp_id=4d1b2a34-8378-42ab-ac7a-4bdfb0703131-1&pdp_ext_f=%7B%22order%22%3A%2215%22%2C%22eval%22%3A%221%22%2C%22fromPage%22%3A%22search%22%7D&pdp_npi=6%40dis%21BRL%21759.05%21379.52%21%21%21851.81%21425.90%21%402101ca8b17937757586825064e0f16%2112000061177271366%21sea%21BR%212390245693%21X%211%210%21n_tag%3A-29919%3Bd%3A56fdd705%3Bm03_new_user%3A-29895&curPageLogUid=IRUhS6zAmGfG&utparam-url=scene%3Asearch%7Cquery_from%3A%7Cx_object_id%3A1005004613365439%7C_p_origin_prod%3A&tblci=GiDfli37EK2HQfFbSZNEjzrxx1BA-Ri4szSr8qk1MU9USCCnqXUoz_-J_eKIlK-0ATDtz28 3- Display | JRP7006 — 7-inch IPS touchscreen, 1024 × 600 resolution, HDMI input | https://pt.aliexpress.com/item/1005008753380153.html?spm=a2g0o.order_list.order_list_main.20.7f12caa4nimu7B&gatewayAdapt=glo2bra 4- Filament | Printalot PLA — Cobalt Blue | 5- Speaker | Mini USB-powered speaker with 3.5 mm audio jack, purchased from AliExpress | https://pt.aliexpress.com/item/1005007251402635.html?spm=a2g0o.order_list.order_list_main.11.4f96caa4PECNSI&gatewayAdapt=glo2bra 6- USB Hub | USB hub for additional connections | https://pt.aliexpress.com/item/1005005275921021.html?spm=a2g0o.order_list.order_list_main.40.2f18caa41EVDmz&tblci=GiDfli37EK2HQfFbSZNEjzrxx1BA-Ri4szSr8qk1MU9USCCnqXUoz_-J_eKIlK-0ATDtz28&gatewayAdapt=glo2bra | Mounting Materials | 3M double-sided tape, Super Glue, electrical tape | | Cables | HDMI, USB, USB-C, and 3.5 mm audio cables ( included with the screen display) I designed the entire enclosure myself, with the intention of accommodating the Beelink without requiring any modifications or disassembly of its original housing. The enclosure consists of two main sections: an upper section that holds the display and a lower section that houses the keyboard, mini PC, and internal wiring. I incorporated ventilation openings along the sides to help with airflow and designed a custom internal mounting bracket for the Beelink. Unfortunately, one of the mounting tabs broke during assembly. As a workaround, I installed a mounting tab upside down with a 2 side tape( secured it with 3M double-sided tape.) This solution worked for my build, but I recommend reinforcing the original mounting system or designing an alternative bracket if you decide to build your own Slate I. The enclosure also includes a side opening that gives direct access to the Beelink's two front USB ports and power button, allowing them to be used without opening the computer. During printing, the upper section unfortunately came out with slightly lower print quality than the bottom section, which affected the precision of some of the connecting parts. To join the upper and lower sections, I designed a simple system using small rectangular alignment tabs. However, due to dimensional differences between the printed parts, the fit wasn't as precise as I had hoped. To compensate, I used small pieces of double-sided tape along with the original tabs. I considered permanently bonding both sections with Super Glue, but decided against it because I wanted to preserve the ability to open the enclosure for maintenance, repairs, or future upgrades. For anyone planning to remix the project, I strongly recommend improving this connection system, perhaps using screws, snap-fit clips, or another removable fastening mechanism. Touchscreen Installation The Slate I uses a JRP7006 7-inch IPS touchscreen display with a resolution of 1024 × 600 pixels and HDMI input The screen is connected through HDMI for video output, USB-C for touchscreen functionality, and USB for power. It also provides the 3.5 mm audio connection used by the speaker. The display is powered directly by the Beelink, eliminating the need for a separate power adapter. I designed custom 3D-printed brackets to hold the display in position. These brackets fit into dedicated slots inside the upper enclosure, and I reinforced their attachment using Super Glue. Unfortunately, the display cutout wasn't perfectly aligned, leaving the screen slightly crooked. This doesn't affect functionality, but it's definitely one of the details I would improve in a future revision ( REMIX THIS PLEASE xD) If you're planning to build your own version, I recommend checking the dimensions of your display carefully and adjusting the mounting system if necessary. Even small dimensional differences between displays can affect the final fit. Mechanical Keyboard For the keyboard, I chose the Royal Kludge RK61, a compact 61-key mechanical keyboard. It fits into the lower section of the enclosure, becoming an integral part of the computer's design. I particularly liked how the white, blue, and yellow keycaps complemented the Cobalt Blue case and reinforced the vintage aesthetic. The keyboard connects directly to one of the Beelink's rear USB ports. One aspect I would improve is ergonomics. The keyboard base ended up being relatively tall and thick, making the front edge higher than I originally intended. Although the keyboard works perfectly, I believe lowering the front section and adjusting its angle would make typing more comfortable, especially during longer sessions. This is another modification I encourage anyone remixing the design to explore. USB Hub, Audio, and Internal Wiring Since the Beelink has a limited number of rear USB ports, I added a USB hub to expand the available connections while keeping the front USB ports free for external devices such as flash drives, controllers, and other accessories. The connections are organized as follows: Direct connection to the Beelink: - Royal Kludge RK61 keyboard. - HDMI video connection to the display.
Connections through the USB hub: - Display power. - Touchscreen USB connection. - Speaker power.
The speaker receives power through USB and audio through a 3.5 mm jack connected directly to the display. All cables are accommodated inside the enclosure. Although the internal wiring isn't particularly elegant, everything fits and works as intended. I also improvised a simple strain-relief system for the Beelink's power cable. Because the cable passes through an opening in the enclosure, an accidental pull could potentially disconnect it from the mini PC. To prevent this, I used two small rectangular 3D-printed pieces secured around the cable with electrical tape, positioned inside the enclosure. These pieces act as a mechanical stop. If the cable is pulled from outside, the stop presses against the inner wall of the enclosure, helping prevent the pulling force from reaching the Beelink's power connector. This improvised solution worked for me, but I recommend using a proper cable gland or dedicated strain-relief mechanism for a more reliable and professional result. What I Would Improve in a Version 2 Although I'm very happy with how the Slate I turned out, there are several things I would improve if I were to redesign it: - Better enclosure assembly system: I would replace the simple rectangular alignment tabs with a more reliable and precise fastening system, preferably using screws or removable clips.
- Improved keyboard ergonomics: I would reduce the height of the lower enclosure's front edge and adjust the keyboard angle to provide better wrist comfort.
- More precise display mounting: I would revise the display cutout and its mounting brackets to achieve better alignment and eliminate the slight tilt present in my build.
- Stronger Beelink mounting bracket: I would reinforce the internal supports to prevent breakage during installation and make the mini PC easier to remove or replace.
- Better internal cable management: I would consider adding dedicated cable-routing channels or mounting points to keep the wiring more organized and away from ventilation openings.
Final Thoughts The Slate I is not a commercial product or a professionally engineered computer enclosure. It's a personal project created entirely from scratch by someone who simply enjoys experimenting with 3D printing and electronics. Throughout the process, I encountered several challenges, made mistakes, improvised solutions, and learned quite a lot. Some parts didn't fit perfectly, some design choices could definitely be improved, and the final assembly required a little creativity. But in the end, I managed to turn an idea into a fully functional computer with the retro aesthetic I've always loved. And for me, that's what makes projects like this so rewarding. I'm sharing the files because I believe other 3D printing enthusiasts, DIY builders, and retro computing fans might enjoy building their own Slate I. Feel free to download, print, modify, remix, and improve the design for non-commercial purposes. The project is shared under the Creative Commons Attribution–NonCommercial–ShareAlike 4.0 license (CC BY-NC-SA 4.0), so please give appropriate credit and share any published adaptations under the same license. I would genuinely love to see other people improving the design, experimenting with different hardware, or creating their own unique versions. If you build a Slate I, please share some pictures of your finished project! Thank you for checking out my project, and happy printing! I started this project on March 17th and my daughter was born 2 days later so i delayed this for quite some time and for a good reason ! I dedicated this build to her. =D
Descripción original del autor, publicada en Thingiverse.