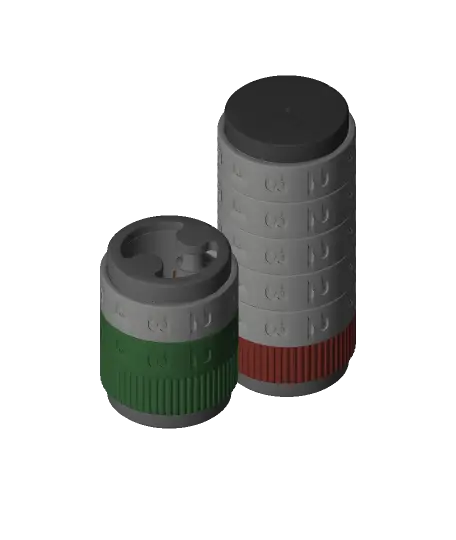
Mechanical Counter Prototype
This proof of concept mechanical counter uses an internal index gear - which hides the entire mechanism.
Thangs entrega los archivos a usuarios con cuenta gratuita
Licencia
Uso comercial permitidoPuedes imprimirlo, modificarlo y venderlo dando crédito al autor.
Al descargar aceptas respetar la licencia y dar crédito a 3D P.
Archivos (13)
- Assembled.3mf 3MF · 2,5 MB
- Number Ring.stl STL · 1,0 MB
- Control Ring.stl STL · 1,2 MB
- Combination Ring.stl STL · 1,8 MB
- Index Gear.stl STL · 412 KB
- Core.stl STL · 469 KB
- Drive Gear.stl STL · 304 KB
- Start with Drive Gear Hole.stl STL · 308 KB
- Core Glue.stl STL · 404 KB
- End.stl STL · 206 KB
- End Open.stl STL · 277 KB
- Start Open.stl STL · 322 KB
- Start.stl STL · 311 KB
- Categoría
- Repuestos
- Formatos
- 3MF, STL
- Descargas
- 154
- Publicado
Sobre este modelo
This proof of concept mechanical counter uses an internal index gear - which hides the entire mechanism.
Mix and match optional parts to construct a counter of various lengths and input styles.
https://youtu.be/M1kdm8jpN80
Customization Input Method - Number Wheel: Rotate the right most number wheel directly. - Control Wheel: A wheel with a textured grip that increments the counter once per full rotation. - Combination Wheel: A wide wheel with both numbers and a textured grip. - Input Gear: a small gear that meshes directly to the first number wheel that can be driver with a motor.
The core is available in both bolted and glue versions. For longer builds, the bolt version is recommended to keep parts aligned.
Number length This counter has been successfully tested at up to 7 digits (9.9 million). Your results may vary. Each gear has a small amount of free movement - this can add up to a subtle misalignment for the current number.
Printing All parts can be printed without supports.
This project requires very accurate printing with minimal-to-no elephant foot, curling, or over extrusion.
Print and test fit a single layer (gear, number ring, and core) to make sure these parts fit before printing any more layers
Assembly Bolt version - Do not overtighten each section. - Use long 3mm bolts or threaded rod - Bolt length should be at least 16mm * (digit count + 2)
Assemble each layer of the counter so that the index gear is is right between 0 and 9 on the wheel. This will allow you to test advancing the next digit.
See the video above for a full assembly.
Can I sell copies of this?
Yes! This project was shared under the Creative Commons - Attribution (https://creativecommons.org/licenses/by/4.0/) license.
This license allows selling copies, but you must provide proper attribution, as detailed in the license itself.
Please note that any other projects linked here (remixes or related projects) may have a different license. Please respect those licenses.
This license applies only to the model files (STL, 3MF, STEP, F3D) included in this project. It does not apply to photos, videos, my logo, or other supplemental graphics attached to or displayed with this project.
Descripción original del autor, publicada en Thangs.