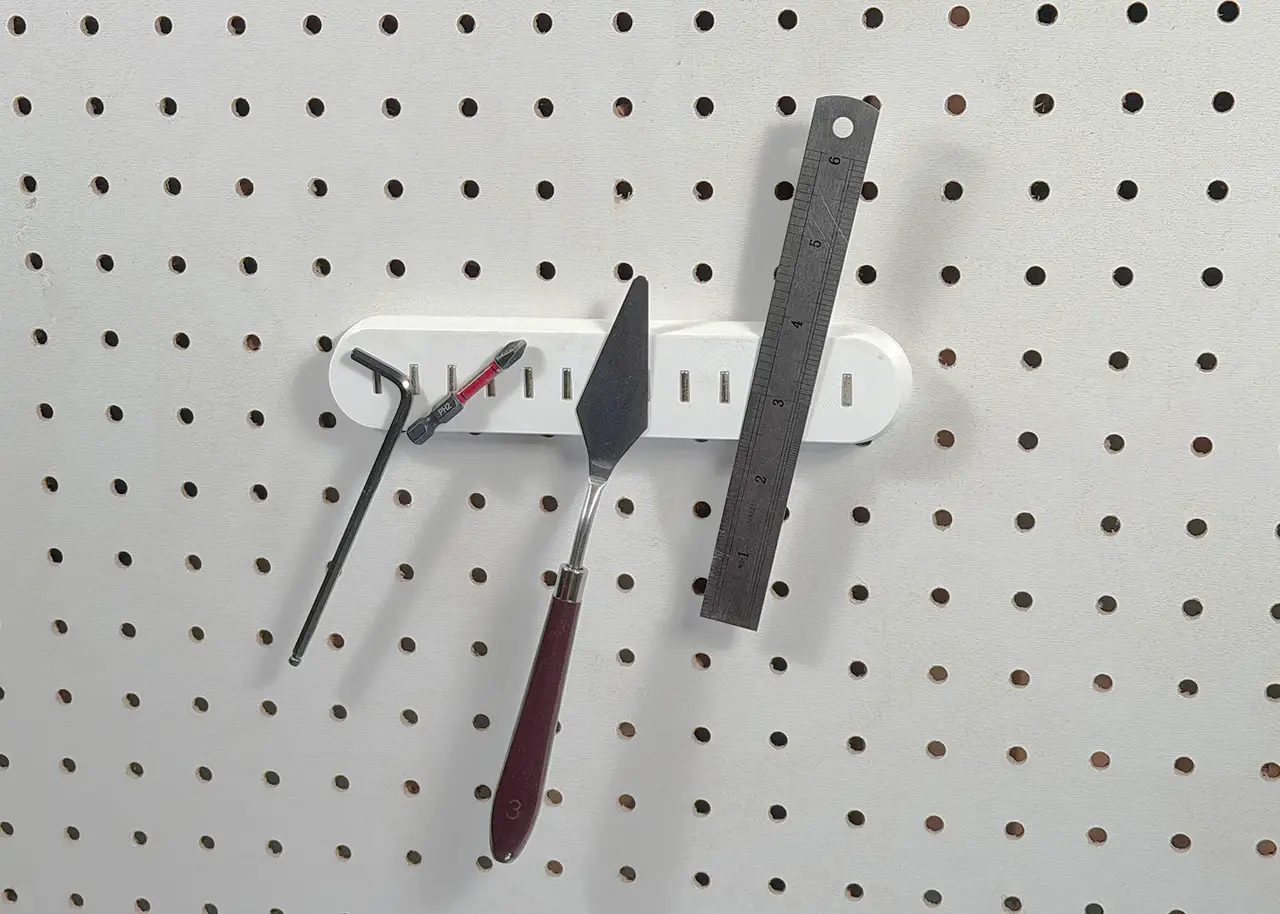
Magnetic Tool Holder Bar for 1/4" Pegboard – 13 Snap-In Magnets, No Glue
por Simmer65 en Printables
Quick access to small steel tools like hex keys, driver bits and steel rulers. A 7-1/2" bar holds 13 magnets that press
Licencia
Solo uso personalCC BY-NC 4.0 — Atribución, no comercial
Puedes imprimirlo y modificarlo para uso personal dando crédito. No se permite vender las impresiones.
Al descargar aceptas respetar la licencia y dar crédito a Simmer65.
Archivos (3)
- Categoría
- Organización
- Formatos
- STEP, SLDPRT
- Descargas
- 3
- Publicado
Sobre este modelo
Quick access for small tools This bar keeps the small steel tools you reach for most right where you can grab them. It has 13 magnets across its front. Pull a hex key, a driver bit or a ruler off with one hand, and when you're done, just put it back against the bar. There's no hook to aim for and no slot to fit it into. The bar hangs on three 3D printed screws that thread into the pegboard holes. The screw heads lock into keyhole slots on the back of the bar, so the bar stays on the board when you pull a tool off. To move it, lift it off the screws. What it holds It works best with light steel tools that have a flat side to sit against the magnets. On my board it holds: - a hex key
- a 1/4" hex driver bit
- a palette knife
- a 6" steel ruler
The magnets are small (1/8" across), so the bar isn't meant for heavy tools. How it goes together - Bar: 7.49" (190 mm) long, with 13 magnet slots across the front, 0.5" (12.7 mm) apart.
- Magnets: 13 cylindrical magnets, 1/8" across and 3/8" long, press into the slots by hand. You don't need glue, a tool or a pause in the print. The front of each magnet is left bare, so a tool touches the magnet, not plastic.
- Keyhole slots: there are three on the back, 3" (76.2 mm) apart. Each has a tapered pocket that fits the screw head.
- Three printed screws: they hold the bar to the board. No hooks are needed.
How the screws work This is version 5 of the printed screw I use on my Screw-In Pegboard Holder for 1/4" Driver Set Case and my Swing-Out Screwdriver Arm. On those, the screws go through the holder into the board. On this bar, the screws go into the board first and the heads stay out for the bar to hang on. - Grips the hole: the special 1/4"-20 thread is slightly oversize, so it bites into the edge of the pegboard hole and holds tight.
- Self-centering: a tapered tip drops into the hole and centers the screw as you start it.
- Flat-blade drive: the head has a slot for an ordinary flat-head screwdriver.
- Locks the bar on: the underside of the head is a cone. It fits the tapered pocket in the keyhole, so the bar can't pull away from the board.
Pegboard compatibility - Standard pegboard with 1/4" (6.35 mm) holes on 1" (25.4 mm) spacing
- The three screws go in one row, three holes apart (3" or 76.2 mm)
- Tested on 3/16" (4.8 mm) thick pegboard
- Not for IKEA Skådis or other slotted boards
Dimensions - Bar: 7.49 × 1.49 × 0.50 in. (190 × 38 × 12.7 mm)
- Magnets: 13 at 0.5" (12.7 mm) spacing
- Mounting screws: 3" (76.2 mm) apart
- Sticks out from the board: 1/2" (12.7 mm)
The STEP file of the bar is included if you want a longer bar or a different magnet size. Print settings The bar and the three screws print together on one plate. I printed them on an Original Prusa i3 MK3S with the stock PrusaSlicer profile. My config file is included. - Printer: Original Prusa i3 MK3S, 0.4 mm nozzle
- Slicer profile: 0.20mm QUALITY @MK3 (PrusaSlicer 2.9.6)
- Material: Generic PETG, 240 °C nozzle for the first layer and 230 °C after; 85 °C bed for the first layer and 90 °C after
- Layer height: 0.2 mm
- Perimeters: 2
- Infill: 15% gyroid
- Top / bottom solid layers: 5 / 4
- Supports: none
- Brim: none
- Orientation: the bar lies on its back with the magnet slots facing up; the screws stand on their heads
Descripción original del autor, publicada en Printables.