
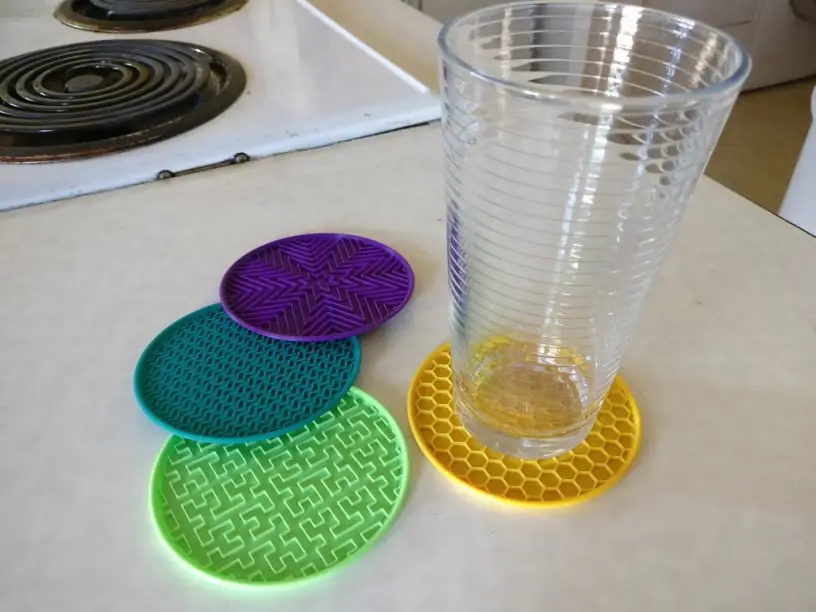
Infill coasters
por jmdbcool en Thingiverse
Slicer settings are important! If you use default settings this will be a functional but boring coaster. I love the patterns created by different types of infill. Wouldn’t it be cool to have some finished 3D printed pieces with the infill exposed? The pattern becomes more than a functional support..
Licencia
Solo uso personalCC BY-NC-SA 4.0 — Atribución, no comercial, compartir igual
Uso personal dando crédito; sin fines comerciales y las modificaciones con la misma licencia.
Al descargar aceptas respetar la licencia y dar crédito a jmdbcool.
Archivos (1)
- Categoría
- Hogar
- Formatos
- STL
- Descargas
- 44,013
- Publicado
Sobre este modelo
Slicer settings are important! If you use default settings this will be a functional but boring coaster. I love the patterns created by different types of infill. Wouldn’t it be cool to have some finished 3D printed pieces with the infill exposed? The pattern becomes more than a functional support, it becomes part of the piece itself. It would be a good tool for learning/demonstration and a neat coffee table conversation piece. Coasters are great for this. The infill catches drips from condensation, like any good coaster should (I hate the flat kind where water just pools on top). Plus, you can choose different infill patterns, which makes for an interesting set. Oh, and coasters should be round. Why are there so many square coasters in the world? Nobody has square cups! The STL itself is simple; the infill patterns are determined by you and your slicer settings (most importantly: zero top layers). I used Slic3r PE; my settings and explanation are included below. If you choose to figure this out in another slicer, post your settings in the comments. There is a little lip on top and chamfer underneath so multiple coasters will nest / stack together without a stand. You can use whatever infill and density you choose. They're easy to print, functional, educational, and they look cool. Enjoy. For extra credit: try a color change where the infill starts (1.8mm– and maybe change back again at 3.4mm where it stops). That would really emphasize the pattern.
Descripción original del autor, publicada en Thingiverse.



