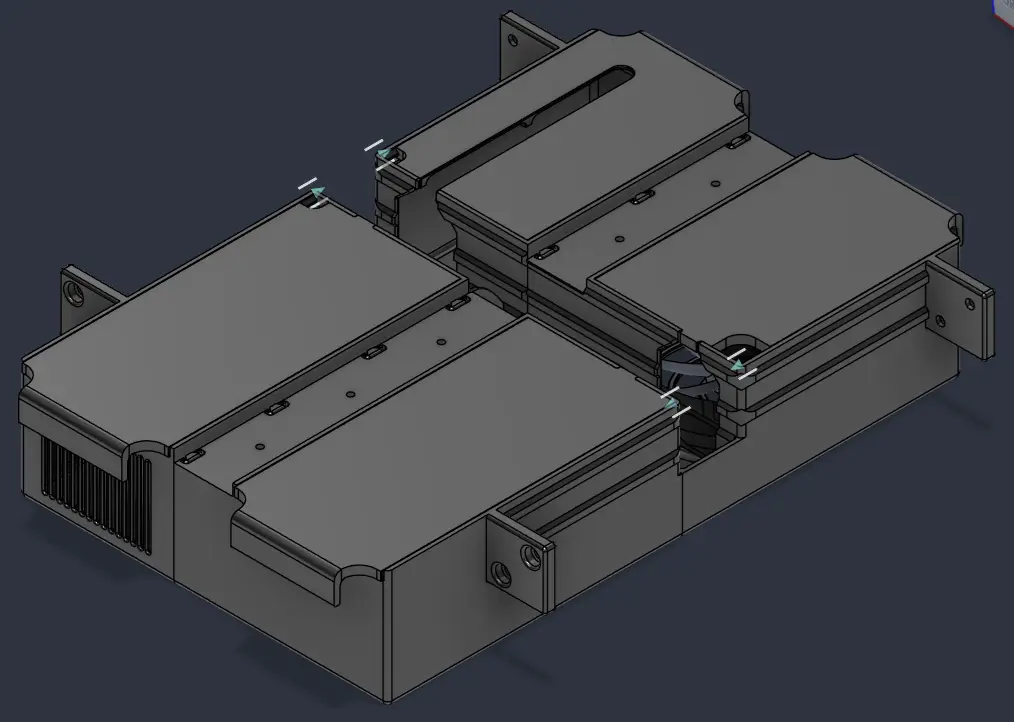
Housing for Ender 3 including BTT SKR mini E3 V3, Raspberry Pi 2W, 120 mm Fans, etc.
por Schnitzeljenney en Thingiverse
Ender 3 Electronics Enclosure This enclosure was designed for the Ender 3 and provides a clean, modular solution for housing all major electronics underneath the printer. The enclosure is designed to accommodate: - Original Ender 3 control board or BTT SKR Mini E3 V3 - Raspberry Pi Zero 2 W - Two...
Licencia
Uso comercial permitidoCC BY-SA 4.0 — Atribución, compartir igual
Puedes usarlo y modificarlo dando crédito; las versiones modificadas deben compartirse con la misma licencia.
Al descargar aceptas respetar la licencia y dar crédito a Schnitzeljenney.
Archivos (31)
- SKR_Mini_E3_v3_Housing_Front-Left_Compact.stl STL
- SKR_Mini_E3_v3_Housing_Front-Right_Compact.stl STL
- SKR_Mini_E3_v3_Housing_Back-Left_Compact.stl STL
- SKR_Mini_E3_v3_Housing_Back-Right_Compact.stl STL
- Lid_Housing_Front_Left.stl STL
- Lid_Housing_Front_Right.stl STL
- Lid_Housing_Back_Left.stl STL
- Lid_Housing_Back_Right.stl STL
- BG_Housing_Ender3.step STEP
- BG_Housing_Ender3.f3z F3Z
- SKR_Mini_E3_v3_Housing_Front-Left_Compact.step STEP
- SKR_Mini_E3_v3_Housing_Front-Left_Compact.f3d F3D
- SKR_Mini_E3_v3_Housing_Front-Right_Compact.step STEP
- SKR_Mini_E3_v3_Housing_Front-Right_Compact.f3d F3D
- SKR_Mini_E3_v3_Housing_Back-Left_Compact.step STEP
- SKR_Mini_E3_v3_Housing_Back-Left_Compact.f3d F3D
- SKR_Mini_E3_v3_Housing_Back-Right_Compact.step STEP
- SKR_Mini_E3_v3_Housing_Back-Right_Compact.f3d F3D
- Lid_Housing_Front_Left.step STEP
- Lid_Housing_Front_Left.f3d F3D
- Lid_Housing_Front_Right.step STEP
- Lid_Housing_Front_Right.f3d F3D
- Lid_Housing_Back_Left.step STEP
- Lid_Housing_Back_Left.f3d F3D
- Lid_Housing_Back_Right.f3d F3D
- Lid_Housing_Back_Right.step STEP
- BTT_SKR_MINI_E3_V3.0.step STEP
- Raspberry_Pi_Zero_2W.step STEP
- LM2596_DC-DC_Buck-Converter.step STEP
- Arctic_Fan_F12.step STEP
- Blade-Fuse.step STEP
- Categoría
- Para tu impresora
- Formatos
- STL, STEP, F3Z, F3D
- Descargas
- 0
- Publicado
Sobre este modelo
Ender 3 Electronics Enclosure This enclosure was designed for the Ender 3 and provides a clean, modular solution for housing all major electronics underneath the printer. The enclosure is designed to accommodate: - Original Ender 3 control board or BTT SKR Mini E3 V3 - Raspberry Pi Zero 2 W - Two Arctic F12 120 mm fans - Multiple fuses for additional circuit protection - DC/DC buck converters to convert 24 DC provided by the PSU into lower voltages for Raspberry Pi, LEDs and cooling fans
The primary goals of this design are: - Improved cooling performance through large 120 mm fans - Additional electrical protection through dedicated fusing of accessories - Clean cable management (defintions may vary :D ) - Easy maintenance and future upgrades - Modular assembly and installation
The large fans provide significantly improved airflow compared to the stock setup, helping to cool the control electronics and additional components such as the Raspberry Pi and buck converters. The integrated fuses provide protection for the increased electrical load introduced by upgrades such as LED lighting, additional fans, and a Raspberry Pi. Design Overview The enclosure consists of two major sections: - Front enclosure - Rear enclosure
Each section is further divided into: - Left half - Right half
The left and right halves are joined using integrated dovetail joints and matching guide features. The parts simply slide together, creating a rigid structure while simplifying printing and assembly. The removable covers contain integrated magnets for secure retention and some include cable-routing cutouts. Numerous openings, slots, and mounting holes are provided throughout the design to support custom cable routing and future modifications. Cable ties are highly recommended to achieve a clean and organized installation. Hardware Used Main Components - Raspberry Pi Zero 2 W https://www.amazon.de/dp/B0DB2JBD9C
- BIGTREETECH SKR Mini E3 V3 https://www.amazon.de/dp/B09LQQP4RF
- 2× Arctic F12 120 mm fans https://www.arctic.de/F12/ACFAN00201A
- LM2596 Buck Converters https://www.amazon.de/dp/B0B5GQTS64
Additional Components - Magnets for the covers https://www.amazon.de/dp/B0C84SYYRC
- Micro-USB (male) to USB-A (female) adapter cable https://www.amazon.de/dp/B00D9SJF1U
- USB-A (male) to Micro-USB data cable https://www.amazon.de/dp/B01COTBHV0
- Standard USB-A to Micro-USB cable for powering the Raspberry Pi The cable only needs to provide a Micro-USB connector and power conductors. In my setup, the power wires are connected directly to one of the buck converters, so almost any spare USB-A to Micro-USB cable will work.
- Automotive blade fuses https://www.amazon.de/dp/B0DBPQBGBQ
- Assorted wires for power and signal connections Example: https://www.amazon.de/dp/B0B15DXZHJ
- Wire end sleeves suitable for your wire gauge
- Connectors Example (WAGO-Style): https://www.amazon.de/Verbindungsklemmen-Set-St%C3%BCck-bestehend-folgenden-Klemmen/dp/B0846QDN1Y?crid=1OMNAJ8PB7BRM&dib=eyJ2IjoiMSJ9.mZ2AfjJCAB9Xyg4X_fxO7cnYCCu9FptH42Ov5F3815x0qVT9PeQR4IyFRm6xZxaR6lYQrZo-9CR3Ld7oCeh3QbYf0aupIdTPZLdT51rOkKTIDpumPV2glHlj0S6SDHT96Bg01TKoEw_QQh5SVBv1mgBwEDWbct2jt3EgxMxDjrNQ1vcBotEvpyluU3b51jtMqvMShE67h1s-RxaX73rf2Gc8caLE-0s3qpDuQg980_w.UeedBZ9AWJkjaYW3Wr9NqaQVYl6KExl2LXHsijcwg9A&dib_tag=se&keywords=wago+klemmen+set&qid=1794257402&s=diy&sprefix=wago+%2Cdiy%2C230&sr=1-3
Optional Cooling Upgrades I additionally equipped the Raspberry Pi, control board, and buck converters with small aluminum heatsinks to further improve cooling performance. Example: https://www.amazon.de/dp/B0CSJMZZYX Required Hardware Cooling Fans Per Arctic F12 Fan - 1× Arctic F12 120 mm fan - 4× M4x35 socket head cap screws - 8× M4 washers (~ 9 mm outer diameter, ~ 1 mm thickness) - 4× M4 nuts
Buck Converter Mounting Per Buck Converter - 2× M2x8 socket head cap screws - 2× M2 nuts - Optional M2 washers Important: If washers are used, ensure they cannot come into contact with exposed circuitry on the buck converter PCB, as this may cause a short circuit.
Control Board Mounting Compatible with: - Original Ender 3 control board - BIGTREETECH SKR Mini E3 V3
Required hardware: - 5× M3x12 socket head cap screws - 5× M3 nuts - Optional M3 washersImportant: If washers are used, ensure they cannot contact exposed PCB traces or solder joints, as this may cause a short circuit.
Raspberry Pi Zero 2 W Mounting Required hardware: - 4× M2x8 socket head cap screws - 4× M2 nuts - Optional M2 washersImportant: If washers are used, ensure they cannot contact exposed circuitry on the Raspberry Pi PCB, as this may cause a short circuit.
Mounting the Enclosure to the Printer Front Section - 4× M5x10 socket head cap screws - 4× M5 washers (~ 10 mm outer diameter, ~ 1 mm thickness)
Rear Section - 4× M5x10 socket head cap screws - 4× M5 washers (~ 10 mm outer diameter, ~ 1 mm thickness)
These screws are used to attach the enclosure sections to the end faces of the lower aluminum extrusions. Additional Mounting Points - 5x M4 hammer nuts (3x for front section, 2x for rear section) - 5x M4x12 socket head cap screws (3x for front section, 2x for rear section) - 5x M4 washers (~ 9 mm outer diameter, ~ 1 mm thickness; 3x for front section, 2x for rear section)
These fasteners are used to secure the enclosure to the underside of the printer's central horizontal bed support extrusion. Cover Magnets - Neodymium magnets https://www.amazon.de/dp/B0C84SYYRC
The magnets can be secured inside the designated pockets in both the enclosure quarters and the covers using super glue. Important: Pay close attention to the magnet polarity before gluing them in place.
Installation 1. Install the Hardware Before mounting the enclosure to the printer, install all electronic components. This is highly recommended because most mounting screws are inserted from the underside of the enclosure and secured with nuts from above, making them difficult to access after installation. Install (and wire): - Control board - Raspberry Pi Zero 2 W - Buck converter(s) - Both Arctic F12 fans - Fuse holders and fuses - Wiring harnesses and connectors
Depending on your specific configuration, additional wiring, wire end sleeves, and connectors may be required. After all components are mounted, perform cable management as desired. 2. Assemble the Enclosure Halves Slide the left and right enclosure parts together using the integrated dovetail joints and guide rails. Repeat this process for both the front and rear sections. 3. Mount the Front and Rear Sections Attach each enclosure section to the end faces of the lower aluminum extrusions using: - 4× M5x10 socket head cap screws - 4× washers (~ 10 mm outer diameter, ~ 1 mm thickness)
per enclosure section. 4. Secure the Central Mounting Points Insert the M4 hammer nuts into the underside of the printer's central horizontal bed support extrusion. Secure the enclosure using: - M4x12 socket head cap screws - M4 washers (~ 9 mm outer diameter, ~ 1 mm thickness) - M4 hammer nuts
5. Install the Covers After all wiring has been completed and tested, install the enclosure covers. The covers are held securely in place by integrated magnets while still allowing easy access for maintenance and modifications. Notes No heat-set inserts were used in this design. Due to the relatively small geometries in some mounting locations, installing heat-set inserts occasionally caused dimensional inaccuracies. Conventional screw-and-nut connections proved to be more reliable and easier to assemble. Compatibility with Foot Adapters This enclosure was specifically designed around the use of my Ender 3 Foot Adapters: https://www.thingiverse.com/thing:7426203 The two Arctic F12 fans are configured to draw fresh air from beneath the printer and push it through the enclosure. Because of this, adequate clearance between the printer and the supporting surface is required. The Foot Adapters provide the necessary ground clearance and significantly improve airflow to the intake side of the fans. Other Modifications Shown in the Photos Some of the pictures may show additional modifications that are not part of this enclosure project. For clarity, here is a list of other upgrades installed on my printer: - Ender 3 Pro V-Slot Covers https://www.thingiverse.com/thing:3379068
Descripción original del autor, publicada en Thingiverse.