Hooks for Skadis
por ORM en Printables
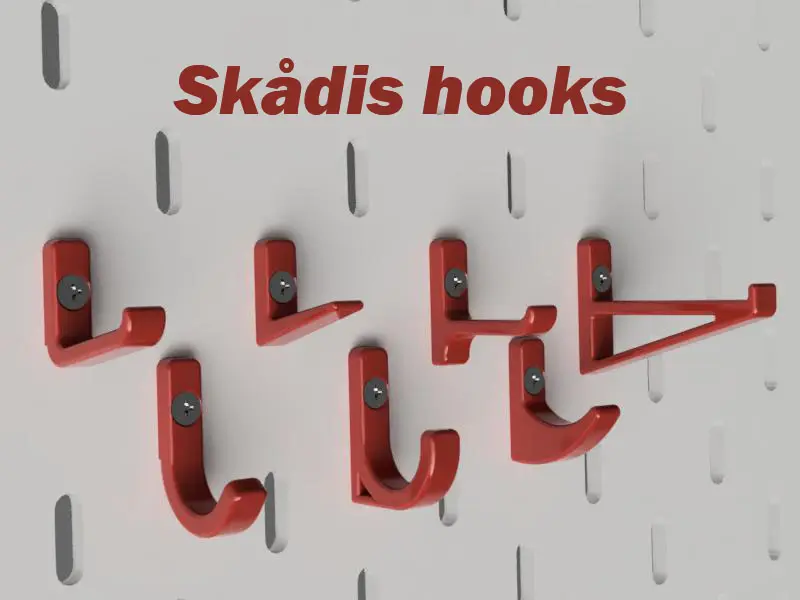
A wide range of hooks in a variety of shapes and sizes that can be mounted on the IKEA Skådis board with T-nut mounting.
Licencia
Solo uso personalCC BY-NC 4.0 — Atribución, no comercial
Puedes imprimirlo y modificarlo para uso personal dando crédito. No se permite vender las impresiones.
Al descargar aceptas respetar la licencia y dar crédito a ORM.
Archivos (65)
- Hook XS Countersunk hole.3mf 3MF · 150 KB
- Hook S Countersunk hole.3mf 3MF · 156 KB
- Hook M Countersunk hole.3mf 3MF · 157 KB
- Hook L Countersunk hole.3mf 3MF · 158 KB
- Hook XL Cuntersunk hole.3mf 3MF · 169 KB
- U-Hook XS Countersunk hole.3mf 3MF · 149 KB
- U-Hook S Countersunk hole.3mf 3MF · 172 KB
- U-Hook M Countersunk hole.3mf 3MF · 177 KB
- U-Hook L Countersunk hole.3mf 3MF · 180 KB
- U-Hook XL Countersunk hole.3mf 3MF · 182 KB
- Pin XS Cuntersunk hole.3mf 3MF · 142 KB
- Pin S Cuntersunk hole.3mf 3MF · 145 KB
- Pin M Cuntersunk hole.3mf 3MF · 141 KB
- Pin L Cuntersunk hole.3mf 3MF · 130 KB
- Pin XL Cuntersunk hole.3mf 3MF · 123 KB
- Slant XS Countersunk hole.3mf 3MF · 161 KB
- Slant S Countersunk hole.3mf 3MF · 160 KB
- Slant M Countersunk hole.3mf 3MF · 147 KB
- Slant L Countersunk hole.3mf 3MF · 137 KB
- Slant XL Countersunk hole.3mf 3MF · 130 KB
- Flat XS Countersunk hole.3mf 3MF · 165 KB
- Flat S Countersunk hole.3mf 3MF · 164 KB
- Flat M Countersunk hole.3mf 3MF · 166 KB
- Flat L Countersunk hole.3mf 3MF · 158 KB
- Flat XL Countersunk hole.3mf 3MF · 149 KB
- Straight XS Countersunk hole.3mf 3MF · 164 KB
- Straight S Countersunk hole.3mf 3MF · 150 KB
- Straight M Countersunk hole.3mf 3MF · 143 KB
- Straight L Countersunk hole.3mf 3MF · 138 KB
- Straight XL Countersunk hole.3mf 3MF · 132 KB
- Rhino M Countersunk hole.3mf 3MF · 152 KB
- Rhino L Countersunk hole.3mf 3MF · 158 KB
- Hook XS Flat hole.3mf 3MF · 149 KB
- Hook S Flat hole.3mf 3MF · 154 KB
- Hook M Flat hole.3mf 3MF · 157 KB
- Hook L Flat hole.3mf 3MF · 158 KB
- Hook XL Flat hole.3mf 3MF · 169 KB
- U-Hook XS Flat hole.3mf 3MF · 147 KB
- U-Hook S Flat hole.3mf 3MF · 171 KB
- U-Hook M Flat hole.3mf 3MF · 176 KB
- U-Hook L Flat hole.3mf 3MF · 180 KB
- U-Hook XL Flat hole.3mf 3MF · 182 KB
- Pin XS Flat hole.3mf 3MF · 140 KB
- Pin S Flat hole.3mf 3MF · 142 KB
- Pin M Flat hole.3mf 3MF · 139 KB
- Pin L Flat hole.3mf 3MF · 129 KB
- Pin XL Flat hole.3mf 3MF · 122 KB
- Slant XS Flat hole.3mf 3MF · 159 KB
- Slant S Flat hole.3mf 3MF · 157 KB
- Slant M Flat hole.3mf 3MF · 145 KB
- Slant L Flat hole.3mf 3MF · 136 KB
- Slant XL Flat hole.3mf 3MF · 129 KB
- Flat XS Flat hole.3mf 3MF · 163 KB
- Flat S Flat hole.3mf 3MF · 162 KB
- Flat M Flat hole.3mf 3MF · 165 KB
- Flat L Flat hole.3mf 3MF · 157 KB
- Flat XL Flat hole.3mf 3MF · 149 KB
- Straight XS Flat hole.3mf 3MF · 163 KB
- Straight S Flat hole.3mf 3MF · 149 KB
- Straight M Flat hole.3mf 3MF · 143 KB
- Categoría
- Organización
- Formatos
- 3MF, F3D
- Descargas
- 2,318
- Publicado
Sobre este modelo
I needed some new hooks for my Skadis tool board and when I was designing the hooks I got carried away and ended up with a whole collection of different shapes and sizes. There are so many different ways to use a hook, and I hope you will find one here that works for you. The hooks are attached to the IKEA Skådis board using T-nuts, this means that the hooks are firmly attached and will not come loose during use. Approximate sizes of the different hooks are shown in the table below, all hooks are 7mm (0.3") wide. HooknameXSSMLXL Hook9mm (0.4")15mm (0.6")21mm (0.8")27mm (1.1")33mm (1.3") U-hook8mm (0.3")14mm (0.6")20mm (0.8")26mm (1.0")32mm (1.3") Pin10mm (0.4")15mm (0.6")20mm (0.8")25mm (1.0")30mm (1.2") Slant13mm (0.5")18mm (0.7")23mm (0.9")28mm (1.1")33mm (1.3") Flat13mm (0.5")18mm (0.7")23mm (0.9")28mm (1.1")33mm (1.3") Stright25mm (1")35mm (1.4")45mm (1.8")55mm (2.2")65mm (2.6") Rhino 19mm (0.7")26mm (1")
If you are looking for hook racks, take a look at this one: Hook rack for Skadis
Installation The hooks is mounted on the Skadis board using a T-nut that is made to fit M3 screws. T-nuts provide a strong and secure hold and are easy to install and remove by using a screwdriver. There are two different versions of the hooks, one with countersunk holes and the other with flat holes, which one to use depends on the type of screw you are using. The screws that will fit should be about 15 mm in length. Place the screw in the T-nut through the holes in the hook and screw it in until the T-nut is about 2-3 mm from the back of the hook, insert the T-nuts vertically through the Skadis holes, then as you tighten the screw the T-nut will turn and lock the hook to the board. You can find and download the matching T-nut from: Skadis T-nut for M3 screw. Printing and print settings Print the hooks lying on their sides for best results. In the model files, the parts are orientated in the direction best suited for printing. Use e.g. PLA for printing with a layer height of 0.2mm or less and a nozzle width of 0.4mm or less. A wall thickness of at least 3 lines and an infill of 50% or 100% if you prefer a solid hook. A support structure for the screw hole is recommended for the printing.
More of my models You might be interested in some of my other models.
AA+AAA Battery dispenser for Skadis
Folding ruler holder for Skadis
Click here if you are interested in seeing more of my models for IKEA Skådis board. Feedback is always good, if you want to encourage me or other designers to make more models, hit like and/or post your makes. If something is not good or if something is missing and can be improved, leave a comment.
Descripción original del autor, publicada en Printables.