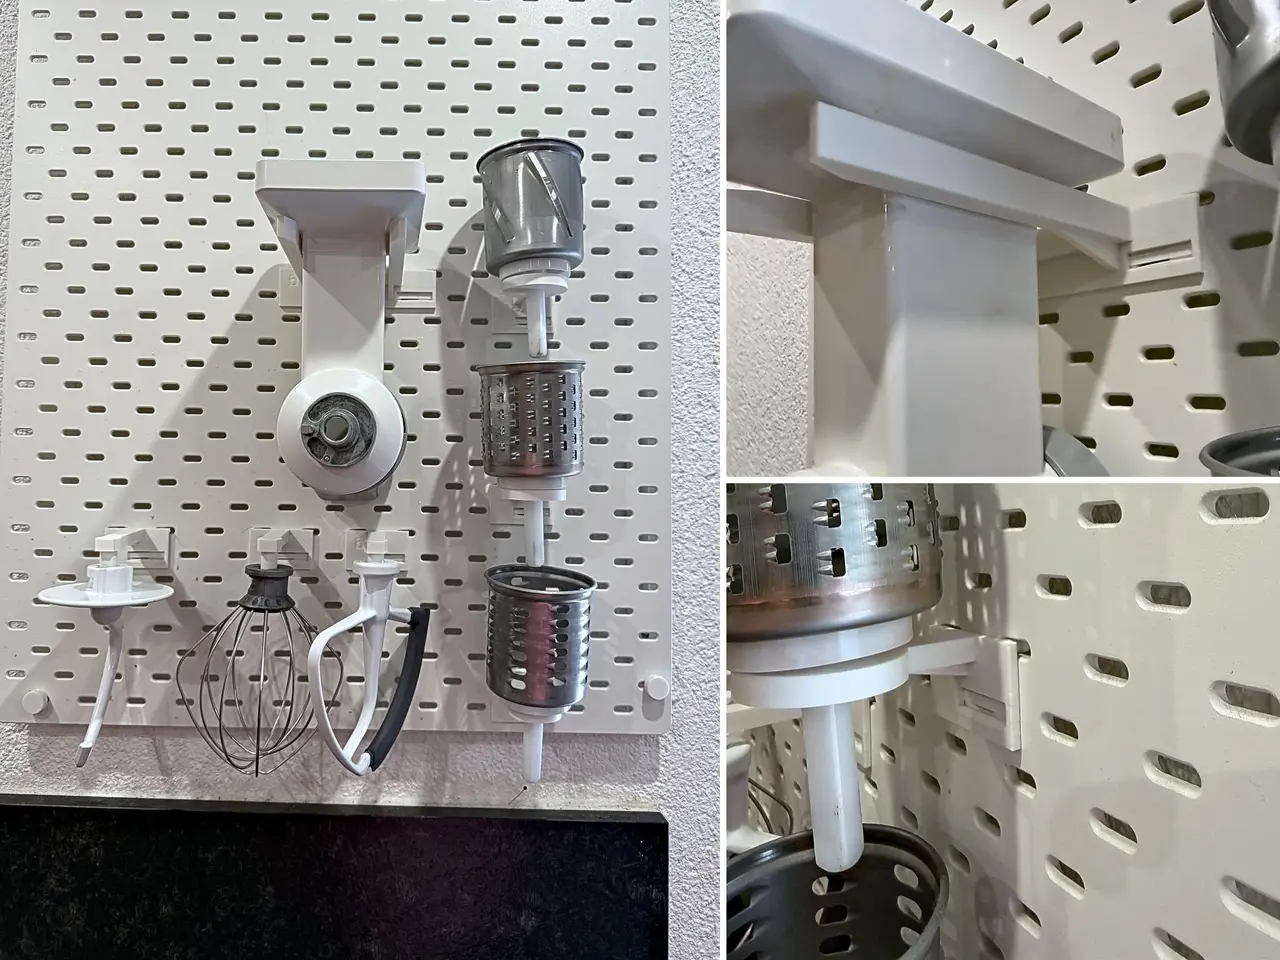
Holders for KitchenAid Beaters and Slicer Attachment on Rotated IKEA SKÅDIS
por Bertlab3D en Thingiverse
Accessory holders tested with the tools of a KitchenAid Artisan 5KSM175 and the MVSA slicer/shredder attachment, for a 5 mm IKEA SKÅDIS pegboard mounted 90° from its normal orientation, so the slots run horizontally. Please check before you print: - The clips only fit a SKÅDIS board with HORIZONTAL.
Licencia
Solo uso personalCC BY-NC-SA 4.0 — Atribución, no comercial, compartir igual
Uso personal dando crédito; sin fines comerciales y las modificaciones con la misma licencia.
Al descargar aceptas respetar la licencia y dar crédito a Bertlab3D.
Archivos (5)
- Categoría
- Hogar
- Formatos
- STL, 3MF, PDF
- Descargas
- 4
- Publicado
Sobre este modelo
Accessory holders tested with the tools of a KitchenAid Artisan 5KSM175 and the MVSA slicer/shredder attachment, for a 5 mm IKEA SKÅDIS pegboard mounted 90° from its normal orientation, so the slots run horizontally. Please check before you print: - The clips only fit a SKÅDIS board with HORIZONTAL slots. On a board in the normal orientation (vertical slots) they do not fit. - Tested with three tools of a KitchenAid Artisan 5KSM175 tilt-head mixer (4.8 l): flex edge beater, dough hook and wire whip. The flat beater was not hung on these holders. - Tested with the KitchenAid slicer/shredder attachment labelled MVSA, with its three drums (slicing, coarse and fine shredding). Other KitchenAid models and attachments were not tested.
What is included - Beater holder (print 3 copies): a 12.5 mm pin with a bayonet lug. Push the tool hub up onto the pin and turn it until the lug locks, just like on the mixer. - Drum holder (print 2 or 3 copies): a round rest with a 15 mm hole. The drum stands on its plastic collar with the square shaft pointing down through the hole. Leave about 80 mm free below each drum holder for the shaft. - Slicer fork (print 1 copy): two arms with 63 mm clear width. The square head plate of the slicer housing slides in from the front.
Tool-free clips (no screws) - Beater and drum holder: put the two upper tabs into the left ends of two neighbouring slots in the same row (40 mm apart). - Slicer fork: it has two clips 80 mm apart, so its four tabs go into four neighbouring slots of one row at the same time. - Press the part flat against the board and slide it about 7 mm to the right until the latch clicks into the slot below. - To take it off: remove the tools first, pull the bottom edge a few degrees (about 3°) away from the board until the latch leaves the lower slot, keep it tilted, slide it to the left and pull it out. - The clips are made for the 5 mm SKÅDIS board.
Printing - Printed and tested exactly like this: Bambu Lab X1 Carbon, 0.4 mm nozzle, 0.20 mm layer height, Bambu PLA Matte (white), Textured PEI plate, 5 walls, 40 % gyroid infill, no supports. - All parts print upside down; the STL files are already oriented that way. - The 3MF project contains exactly the tested six-part plate: 1 slicer fork, 3 beater holders and 2 drum holders, with the settings above. Slicer estimate: 4 h 17 min in total (4 h 10 min printing plus 7 min preparation), 164.6 g. For a third drum holder, print one more drum holder STL. - Only the X1 Carbon print was tested. Bambu Studio lists other printers for this profile internally; those were not tested.
Use and material - Indoor kitchen organizer. Fit-tested with the tools and the attachment listed above on one 5 mm SKÅDIS board; no load, heat or long-term test was done. - Check the print and the mounting before use, and do not hang it where a falling tool could hit someone. - An older PLA drum holder of a different design has been hanging above a hob in our kitchen for about two years. PETG and ASA were not tested with this design.
Files - KitchenAid_Skadis_Beater_Holder.stl - KitchenAid_Skadis_Drum_Holder.stl - KitchenAid_Skadis_Slicer_Fork.stl - KitchenAid_Skadis_Holders_X1C_PLA.3mf (3MF project, the full plate with the print settings) - KitchenAid_Skadis_Holders_Drawing.pdf (key dimensions) There is no STEP file: the parts were modelled as meshes, so a STEP file would only contain the same triangles.
About the pictures: the photos show the printed holders on the board. The clips in the photos still carry a small test code that was engraved during prototyping; the published files do not have it. The animation and the renders are made from the model files; the KitchenAid tools are simplified and the printed parts are shown in orange. KitchenAid and related marks belong to Whirlpool Corporation. IKEA and SKÅDIS are trademarks of Inter IKEA Systems B.V. The names and model codes are used only to identify tested compatibility. This independent design is not affiliated with, sponsored or endorsed by either company. License: CC BY-NC-SA 4.0 (https://creativecommons.org/licenses/by-nc-sa/4.0/). Free to print, share and remix for non-commercial use, with attribution. Mark your changes and share remixes under the same license. Deutsch (Kurzfassung) Halter für die Werkzeuge der KitchenAid-Küchenmaschine und für den Gemüseschneider-Aufsatz, an einer IKEA-SKÅDIS-Lochplatte (5 mm), die um 90 Grad gedreht hängt, sodass die Langlöcher waagrecht laufen. An einer normal montierten SKÅDIS (Langlöcher senkrecht) passen die Clips nicht. Getestet mit drei Werkzeugen der Artisan 5KSM175 (4,8 l): Flexi-Rührer, Knethaken und Schneebesen (der Flachrührer hing nicht daran), und mit dem Gemüseschneider MVSA samt drei Trommeln. Andere Modelle sind nicht getestet. Rührer-Halter (3 Stück) mit Dorn und Bajonett: Werkzeug von unten aufstecken und drehen, bis es einrastet. Trommelhalter (2 oder 3 Stück): Die Trommel steht mit dem Vierkantschaft nach unten im Loch; darunter rund 80 mm frei lassen. Gabel (1 Stück) für das Gehäuse des Gemüseschneiders, Einschub von vorne. Clip ohne Schrauben: Rührer- und Trommelhalter mit zwei Laschen ins linke Ende zweier benachbarter Langlöcher derselben Reihe, die Gabel mit vier Laschen in vier benachbarte Langlöcher. Flach ans Brett drücken und rund 7 mm nach rechts schieben, bis es klickt. Zum Abnehmen die Werkzeuge herunternehmen, die Unterkante etwa 3° vom Brett wegkippen, bis die Rastnase das untere Langloch verlässt, gekippt halten, nach links schieben und abnehmen. Gedruckt und getestet auf einem Bambu Lab X1 Carbon in mattem weißem PLA, 5 Wände, 40 % Gyroid, ohne Stützen, alle Teile kopfüber (die STL-Dateien sind schon so gedreht). Platte aus Gabel, 3 Rührer-Haltern und 2 Trommelhaltern: laut Slicer 4 h 17 min gesamt (4 h 10 min Druck plus 7 min Vorbereitung), 164,6 g. Andere Drucker sind nicht getestet. Für die Küche im Innenraum; Passung getestet, Last-, Wärme- und Langzeittests gab es nicht. Druck und Montage vor dem Gebrauch prüfen. Lizenz CC BY-NC-SA 4.0 (https://creativecommons.org/licenses/by-nc-sa/4.0/).
Descripción original del autor, publicada en Thingiverse.