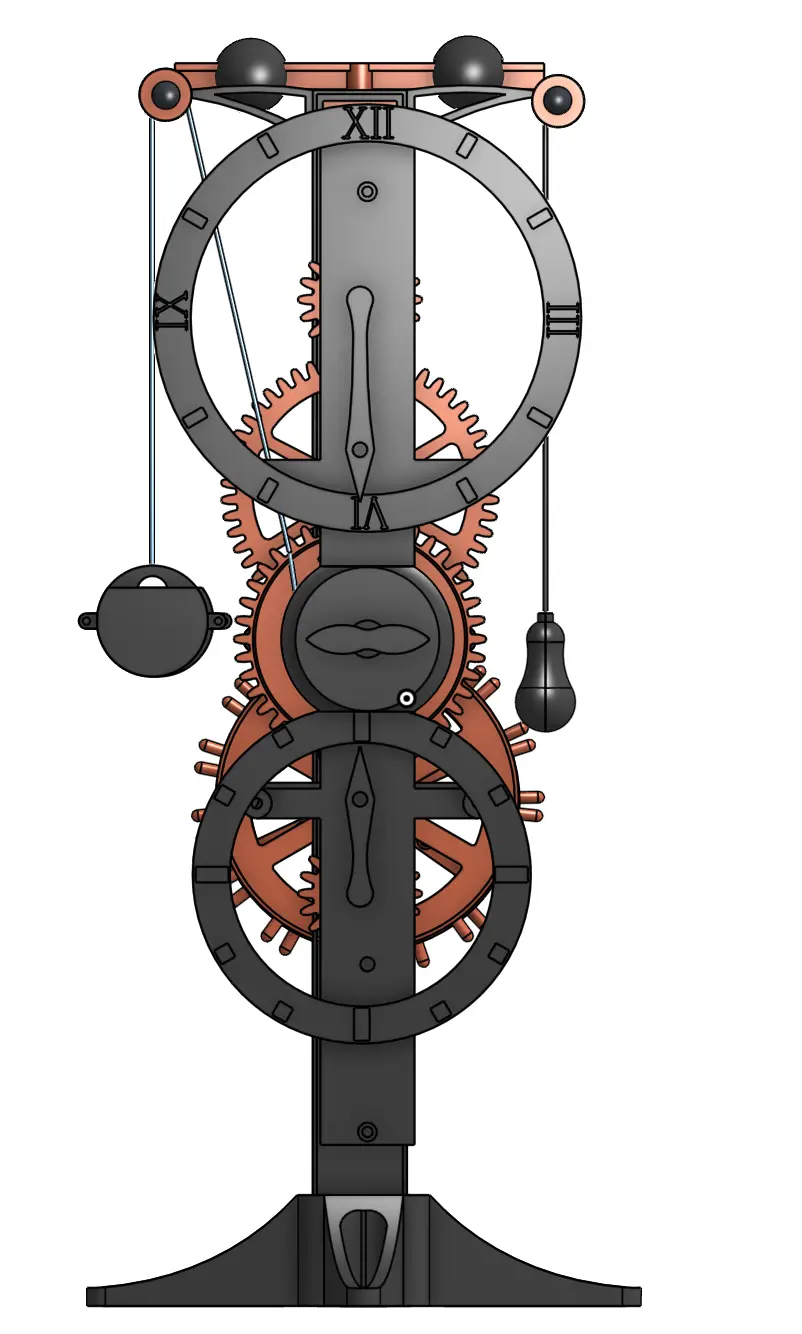
Da Vinci Clock
por Praco en Printables
A digital 3D recreation of the Da Vinci Clock
Licencia
Uso comercial permitidoPuedes imprimirlo, modificarlo y venderlo sin pedir permiso ni dar crédito.
Al descargar aceptas respetar la licencia y dar crédito a Praco.
Archivos (78)
- Da Vinci Clock.stl STL · 36,4 MB
- Assembly 1 - 20mm shaft.stl STL · 28 KB
- Assembly 1 - A1.stl STL · 29 KB
- Assembly 1 - A3.stl STL · 80 KB
- Assembly 1 - 45mm shaft.stl STL · 29 KB
- Assembly 1 - Hour hand.stl STL · 90 KB
- Assembly 1 - 34mm shaft.stl STL · 60 KB
- Assembly 1 - T shape.stl STL · 59 KB
- Assembly 1 - B1.stl STL · 180 KB
- Assembly 1 - Minute Dial.stl STL · 152 KB
- Assembly 1 - Key.stl STL · 57 KB
- Assembly 1 - 10T gear.stl STL · 222 KB
- Assembly 1 - 31mm shaft.stl STL · 28 KB
- Assembly 1 - A2.stl STL · 117 KB
- Assembly 1 - Hour Dial.stl STL · 156 KB
- Assembly 1 - Weight.stl STL · 127 KB
- Assembly 1 - Minute Hand.stl STL · 89 KB
- Assembly 1 - Base.stl STL · 326 KB
- Assembly 1 - G3.stl STL · 450 KB
- Assembly 1 - Partition.stl STL · 196 KB
- Assembly 1 - G2.stl STL · 938 KB
- Assembly 1 - Stud.stl STL · 535 KB
- Assembly 1 - Pulley.stl STL · 1,1 MB
- Assembly 1 - B2.stl STL · 783 KB
- Assembly 1 - T ball.stl STL · 993 KB
- Assembly 1 - G1.stl STL · 1,3 MB
- Assembly 1 - Ratchet.stl STL · 1,0 MB
- Assembly 1 - A42.stl STL · 1,5 MB
- Assembly 1 - A41.stl STL · 1,4 MB
- Assembly 1 - A5.stl STL · 1,6 MB
- Assembly 1 - G4.stl STL · 8,0 MB
- Assembly 1 - G5.stl STL · 8,1 MB
- Part Studio 4 - Weight (2).stl STL · 127 KB
- Part Studio 1 - 31mm shaft (1).stl STL · 28 KB
- Part Studio 2 - G3 (2).stl STL · 450 KB
- Part Studio 4 - T ball (2).stl STL · 993 KB
- Part Studio 2 - Pulley (3).stl STL · 1,1 MB
- Part Studio 1 - Stud (1).stl STL · 535 KB
- Part Studio 3 - B3 (Fixed).stl STL · 878 KB
- Assembly 1 - 31mm shaft.step STEP · 4 KB
- Assembly 1 - A42.step STEP · 31 KB
- Assembly 1 - A41.step STEP · 25 KB
- Assembly 1 - A3.step STEP · 16 KB
- Assembly 1 - 31mm shaft (1).step STEP · 4 KB
- Assembly 1 - A1.step STEP · 10 KB
- Assembly 1 - 45mm shaft.step STEP · 15 KB
- Assembly 1 - A2.step STEP · 17 KB
- Assembly 1 - 34mm shaft.step STEP · 42 KB
- Assembly 1 - 20mm shaft.step STEP · 4 KB
- Assembly 1 - B1.step STEP · 52 KB
- Assembly 1 - T ball (1).step STEP · 15 KB
- Assembly 1 - A5.step STEP · 14 KB
- Assembly 1 - T ball.step STEP · 15 KB
- Assembly 1 - Minute Hand.step STEP · 19 KB
- Assembly 1 - Stud (1).step STEP · 17 KB
- Assembly 1 - Hour hand.step STEP · 21 KB
- Assembly 1 - Partition.step STEP · 21 KB
- Assembly 1 - Stud.step STEP · 17 KB
- Assembly 1 - Weight (1).step STEP · 28 KB
- Assembly 1 - T shape.step STEP · 28 KB
- Categoría
- Educación
- Formatos
- STL, STEP
- Descargas
- 242
- Publicado
Sobre este modelo
. Project Overview This project presents a digital 3D recreation of the historical Da Vinci Clock, (Or you could say Da historical Da Vinci Clock....haha..... sorry.) based on the 15th century conceptual sketches found in Leonardo da Vinci's Codex Atlanticus. The model was built to capture the dynamics of gears, ropes, and a gravity fed weight system. Da Vinci's works inspire me. And i hope this model is able to inspire you too :D The design includes a series of gears and wheels powered by a falling weight. As the weight descends, it turns the gears at a controlled pace, which in turn moves hands or indicators to show the passage of time. I haven't tested this physically myself since i do not own a 3d printer (yet) but it should be functional (though it might not be completely accurate time wise unless you tweak the weights) even if for a little amount of time! I made this because i was fascinated by the design and how it works, and i hope i did it justice. Feel free to edit the parts to adjust anything and let me know if the model works for you! And if you find errors, then please let me know too :) Made in Oneshape. For visuals/Animation of how it works, you can take a look at this video ?fl=pl&fe=sh
Credits to Douglas Bowman for the video, this animation is not mine but simply a demonstration. Extra Parts -For a better functioning model, you'll need the following to act as weights! - 10/ 15 gram tear drop weight (for the weight on the right side)
- metal coins on the weight bucket at the left (2-3 coins should be enough)
- The strings shown in the model are for visual purposes! you'll need actual non-elastic braided nylon, polyester, or micro-cord (roughly 0.75 mm to 1.0 mm in diameter, similar to jewelry cord or lightweight craft/kite string). Assembly instructions - Assemble the shafts in the part B2
- Assemble the pulley, studs and block on top of the part B2
3. Insert T shaped rod in the block
4. Insert T slot spheres in the T shaped part 5.Insert rotating part at teh bottom of the T shaped part
6. Insert 1st gear
- insert the other gears and ratchet as shown on the other side of B2
lt should look like this!
- Put the part B3 on top
- Lodge the key
- insert the Hour/minute dials and hands
- Connect the other side of B2 to B1
- Insert this in the base
- Wrap a string about the left side pulley, and tie one of its ends to the ratchet
- Tie the other end of the thread on the right side to the given part and enclose it with the weights
This bucket like structure is designed to be loaded with small coins or small metal bearings/BBs as ballast. You add or remove coins inside the bucket to calibrate and fine-tune the driving power. Usually, 2 coins are enough for the model to move at an accurate speed. - On the left side pulley, tie another string.
- Clamp the right side thread between the given parts, For a functional model, if you're adding coins to the bucket in the previous step, you can replace this plastic part with a tear drop weight of about 10 to 15 grams
Congrats! You've made a Da Vinci Clock
Descripción original del autor, publicada en Printables.