
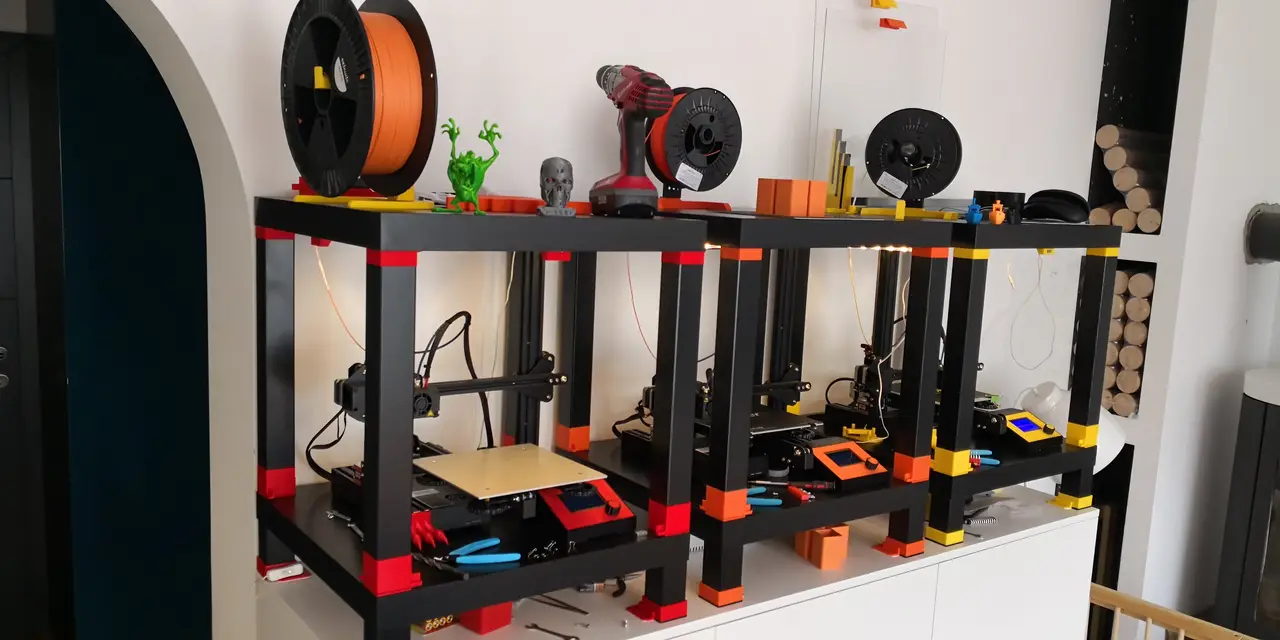
Creality3D Ender 3 IKEA LACK enclosure with IKEA LEDBERG LED lights
por Threedee Bus Driver en Thingiverse
IKEA LACK enclosure inspired by Joseph Prusa's enclosure ;) Each enclosure is made of 2 IKEA LACK tables, 1 LED light LEDBERG also from IKEA, 8 additional wood screws 20x3mm, 6 magnets 20x6x2mm from Aliexpress List of parts to buy per one enclosure: - 2x Ikea LACK table...
Licencia
Solo uso personalCC BY-NC-SA 4.0 — Atribución, no comercial, compartir igual
Uso personal dando crédito; sin fines comerciales y las modificaciones con la misma licencia.
Al descargar aceptas respetar la licencia y dar crédito a Threedee Bus Driver.
Archivos (47)
- EXTRUDER_KNOB_-_TOP_HOLES.stl STL · 132 KB
- LEG_EXTENDER_-_LOWER_56x56x25.stl STL · 30 KB
- FILAMENT_TUBE.stl STL · 239 KB
- LEG_HOLDER_-_ALL_FOUR_51x51x23.stl STL · 97 KB
- FILAMENT_FILTER_BOX.stl STL · 866 KB
- EXTRUDER_KNOB_-_NO_HOLES.stl STL · 497 KB
- FILAMENT_IN.stl STL · 801 KB
- ender3_PLA_-_IKEA_LACK_ENCLOSURE.fff FFF · 13 KB
- SPOOL_HOLDER_COVER.stl STL · 2 KB
- SPOOL_HOLDER_MAIN_-_NO_LOCK.stl STL · 62 KB
- SPOOL_HOLDER_MAIN.stl STL · 82 KB
- SPOOL_HOLDER_LOCK.stl STL · 230 KB
- ENCLOSURE_MAGNET_MOUNT.stl STL · 1 KB
- PLEXIGLASS_MAGNET_MOUNT.stl STL · 23 KB
- PLEXIGLASS_HANDLE.stl STL · 95 KB
- ENCLOSURE_MAGNET_MOUNT.stl STL · 1 KB
- ENCLOSURE_MAGNET_MOUNT.stl STL · 1 KB
- LCD_COVER_LOCK.stl STL · 70 KB
- LCD_BASE_MOUNT.stl STL · 79 KB
- LCD_TOP_COVER.stl STL · 1 KB
- LCD_COVER.stl STL · 93 KB
- LOWER_LEG_EXTENDER_v2-1.stl STL · 110 KB
- LOWER_LEG_EXTENDER_v1-2.stl STL · 191 KB
- LOWER_LEG_EXTENDER_v5-1.stl STL · 182 KB
- LOWER_LEG_EXTENDER_v3-1.stl STL · 112 KB
- LOWER_LEG_EXTENDER_v5-0.stl STL · 105 KB
- LOWER_LEG_EXTENDER_v3-2.stl STL · 111 KB
- LOWER_LEG_EXTENDER_v2-2.stl STL · 109 KB
- LOWER_LEG_EXTENDER_v0-0.stl STL · 116 KB
- LOWER_LEG_EXTENDER_v4-2.stl STL · 183 KB
- LOWER_LEG_EXTENDER_v3-0.stl STL · 108 KB
- LOWER_LEG_EXTENDER_v1-1.stl STL · 192 KB
- LOWER_LEG_EXTENDER_v4-1.stl STL · 185 KB
- LOWER_LEG_EXTENDER_v2-0.stl STL · 104 KB
- LOWER_LEG_EXTENDER_v5-2.stl STL · 184 KB
- LOWER_LEG_EXTENDER_v1-0.stl STL · 261 KB
- LOWER_LEG_EXTENDER_v4-0.stl STL · 107 KB
- SWING.stl STL · 102 KB
- UPPER_LEG_EXTENDER_v3-0.stl STL · 56 KB
- UPPER_LEG_EXTENDER_v2-0.stl STL · 46 KB
- UPPER_LEG_EXTENDER_v3-1.stl STL · 130 KB
- UPPER_LEG_EXTENDER_v3-2.stl STL · 128 KB
- UPPER_LEG_EXTENDER_v2-2.stl STL · 50 KB
- UPPER_LEG_EXTENDER_v2-1.stl STL · 50 KB
- UPPER_LEG_EXTENDER_v1-2.stl STL · 136 KB
- UPPER_LEG_EXTENDER_v1-0.stl STL · 210 KB
- UPPER_LEG_EXTENDER_v1-1.stl STL · 136 KB
- Categoría
- Para tu impresora
- Formatos
- STL, FFF
- Descargas
- 79,495
- Publicado
Sobre este modelo
IKEA LACK enclosure inspired by Joseph Prusa's enclosure ;) Each enclosure is made of 2 IKEA LACK tables, 1 LED light LEDBERG also from IKEA, 8 additional wood screws 20x3mm, 6 magnets 20x6x2mm from Aliexpress List of parts to buy per one enclosure: - 2x Ikea LACK table https://www.ikea.com/us/en/catalog/products/20011408/
- 1x Ikea LEDBERG lights https://www.ikea.com/us/en/catalog/products/00302677/
- 1x 10 pack of Magnets 20x6x2mm (6 magnets used on the handles) https://www.aliexpress.com/item/10pcs-lot-F-20x6x2-mm-N35-Strong-Square-NdFeB-Rare-Earth-Magnet-20-6-2-mm/32860245491.html?spm=a2g0s.9042311.0.0.359d4c4dqmKIxF
- 8x screw for wood 20x3mm
NO SUPPORTS NEEDED FOR PRINT!!! The legs from lower part of the enclosure are cut so the top of the enclosure is the same height as my eyes, so I don't have to stand on my toes to see the top when changing spools ;) There is also a filament guide with dust cleaner at the top, where PTFE tube is inserted from below and the top. The back plexiglass will be fixed and the rest will just be mounted as pleased. You also need to enlarge a little bit the holes on leg extendeners, the leg holders and filament guide with a drilling tool just to fit screws and the PTFE tube perfectly. On plexiglass handles and on magnet mounts is used double sided tape. Magnets are superglued to the printed mounts. Simplify3D profile is in the files list too :) Upper and lower leg extenders ALL POSSIBLE COMBINATIONS between fixed, removable and swing plexiglass. Also the swing for plexiglass is there :) (25 *.stl files added) Some STL pictures might look the same, but when you enter the THINGIE PREVIEW you will see the difference ;) Make sure when you print the upper extender, in slicer turn it upside down!!!! So, you only need to plan each of the 4 sides of the enclosure what kind of variant you want to have and pick the desired upper and lower extender. ENJOY!!!!! ;)
Descripción original del autor, publicada en Thingiverse.



