Compact PET Filament Machine
por mirabatek en Printables
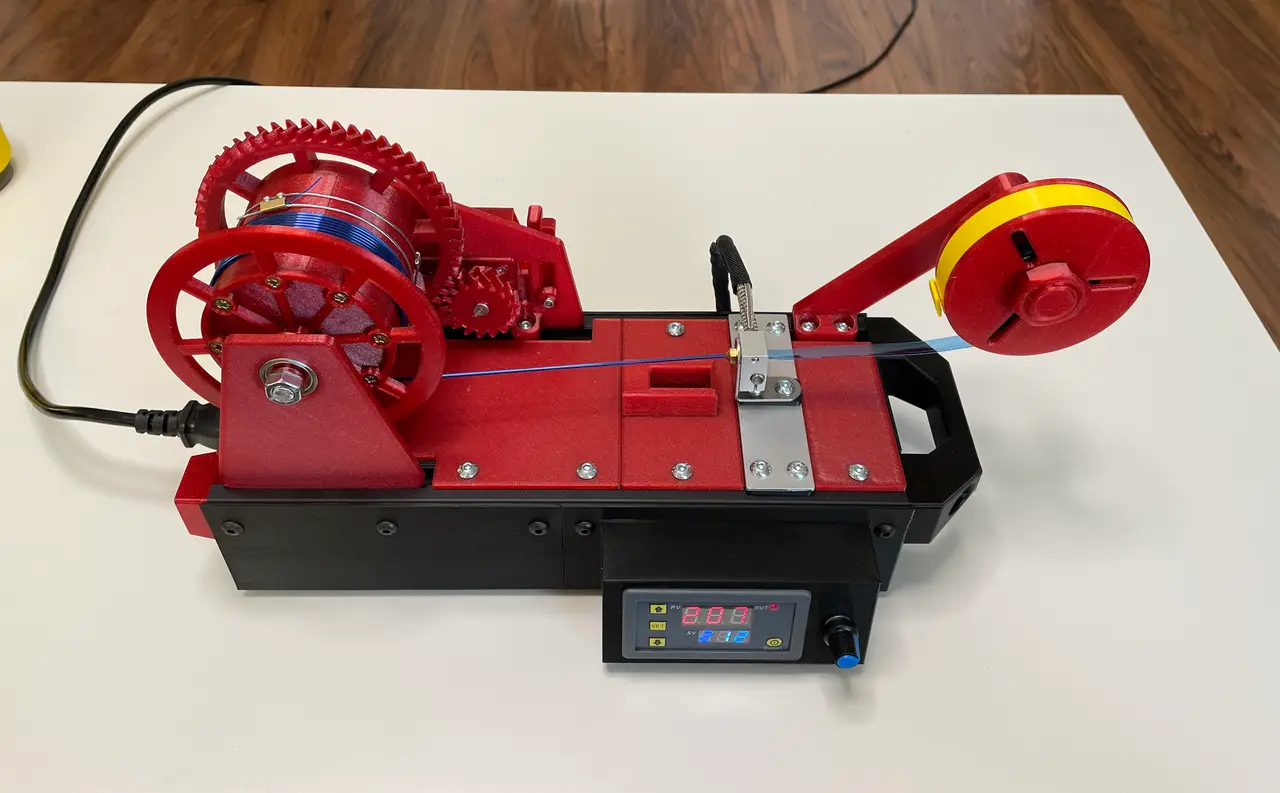
Compact machine to transform strip from PET bottle to filament for 3D printer.
Licencia
Solo uso personalCC BY-NC 4.0 — Atribución, no comercial
Puedes imprimirlo y modificarlo para uso personal dando crédito. No se permite vender las impresiones.
Al descargar aceptas respetar la licencia y dar crédito a mirabatek.
Archivos (33)
- Bottom_Case_Right_EdgeCircles.stl STL · 869 KB
- Bottom_Case_Left_EdgeCircles.stl STL · 698 KB
- Side_Holder.stl STL · 1,2 MB
- Foot.stl STL · 404 KB
- Handle.stl STL · 261 KB
- Cover_Plate_1.stl STL · 1,1 MB
- Cover_Plate_2.stl STL · 560 KB
- TNut_3030_M5.stl STL · 24 KB
- Motor_Plate.stl STL · 1,8 MB
- Bearing_Plate.stl STL · 1,2 MB
- Washer.stl STL · 99 KB
- Distance_Ring_1.stl STL · 98 KB
- Distance_Ring_2.stl STL · 123 KB
- Motor_Mount_Front.stl STL · 1,9 MB
- Motor_Mount_Back.stl STL · 1,1 MB
- Motor_Mount_Lock_1.stl STL · 430 KB
- Motor_Mount_Lock_2.stl STL · 250 KB
- Motor_Cover.stl STL · 788 KB
- Gear_17_Teeth.stl STL · 4,1 MB
- Gear_55_Teeth.stl STL · 8,6 MB
- Spool_Side.stl STL · 579 KB
- Spool_Cylinder.stl STL · 723 KB
- Fan_Mount.stl STL · 985 KB
- Heater_Block_Holder_Template.stl STL · 68 KB
- Heater_Block_Holder_Distance_1.stl STL · 54 KB
- Heater_Block_Holder_Distance_2.stl STL · 52 KB
- Strip_Holder.stl STL · 1,0 MB
- Strip_Holder_Washer_1.stl STL · 523 KB
- Strip_Holder_Washer_2.stl STL · 713 KB
- Strip_Holder_Nut.stl STL · 1,1 MB
- Power_Connector_Cover.stl STL · 495 KB
- Terminal_Cover.stl STL · 423 KB
- Terminal_Holder.stl STL · 400 KB
- Categoría
- Para tu impresora
- Formatos
- STL
- Descargas
- 10,142
- Publicado
Sobre este modelo
Overview: After success of my firts PET Filament Machine I decided to build new one which will be more compact and neat.
Here you can see the new machine in operation:
Assembly Instructions: You can find an instruction video with assemby here: Part 1, Part 2. Bottom: - Print and cleanup all printable parts - Install rubber feet to the bottom case- 4x Rubber Foot - 4x M3 Nut - 4x M3x8mm Screw
- Joint the left and right bottom case together- 2x M3 Nut - 2x M3x8mm Screw - 2x M3 Washer
- Install power supply- 2x M3x6mm Screw - 2x Washer
- Prepare main socket and power switch module- Length of the wires should be about 18cm - Two additional ground wires will be connected to the Al profiles
- Install main socket and power switch module- 2x M3x10 Countersink Screw - 2x M3 Nut - 2x M3 Washer
- Prepare wired for motor speed controller and thermostat- (+)/(-) wires … power supply → motor speed controller … 45cm, AWG18 - (+)/(-) wires … power supply → terminal block … 35cm, AWG18 - (+)/(-) wires … motor speed controller → motor … 55cm, AWG18 - (+)/(-) wires … thermostat → terminal block … 14cm, AWG18 - 2x (+) wires … thermostat → terminal block … 18cm, AWG18
- Connect cables to power supply - Cover terminal block on power supply with terminal cover - Connect cables to motor speed controller - Mount the motor speed controller to the base body - Glue the terminal holder with terminal blocks (5-port, 5-port, 2-port) to the base body with double side tape - Connect +/- cables from power supply to terminal block - Exchange K type thermocouple by smaller version (3x15mm)- Modify the back of thermostat case to connect thermocouple wires without tension
- Connect cables to thermostat - Push the thermostat to the base body - Connect cables from thermostat to the terminal block - Install 40mm side panel fan and connect it to the terminal block- 4x M3x30mm Countersink Screw - 4x M3 Nut - 4x M3 Washer
- Connect cartridge heater to the terminal block - Organize all cables - Cut threads into the Al profiles from side (if you want to mound side feet and handle) - Clear the paint/anodized surface to have good contact for ground wires - Mount the Al profiles into the body- 10x M5x12mm Screw - 10x M5 Nut + TNut_3030_M5
- Connect ground wires to the Al profiles- 2x M5x10mm Screw - 2x M5 Nut + TNut_3030_M5 - 2x M5 Big Washer
- Mound side holders- 2x M5x12mm Screw - 2x M5 Nut + TNut_3030_M5 - 2x M3x10mm Countersink Screw - 2x M3 Nut
Top: - Screw big gear and spool side to the spool cylinder- 16x 3.5x20mm Screw
- Install Cover Plate 1- 2x M5x12mm Screw - 2x M5 Nut + TNut_3030_M5
- Push the bearings into Motor and Bearing Plates- 2x Bearing 608ZZ
- Mount Motor and Bearing Plate (don't tight the screws)- 5x M5x12mm Screw - 5x M5 Nut + TNut_3030_M5
- Mount motor- 4x M3x10mm Countersink Screw
- Mount motor lock mechanism- 1x M3x15mm Screw - 1x M3 Nylon Lock Nut - 1x M3 Washer
- Mount small gear to the motor- 1x M3x10mm set screw - 1x M3 Nylon Lock Nut
- Install the spool- 1x 125mm M8 threaded rod - 2xM8 Nut
- Glue together two parts of the fan mount - Screw the 4020 fan to the fan mount- 3x Nut M3 - 3x Screw M3x25mm - 3x Washer M3
- Install the fan mount to the body and connect the fan to the terminal block- 2x M5x12mm Screw - 2x M5 Nut + TNut_3030_M5
- Assemble heater block holder and install heater block- 1x V6 Nozzle drilled 1.7mm - 1x V6 Heater block - 1x L-shape holder 30x30mm - 1x Al plate 110x30 mm - 6x M5x12mm Screw - 4x M5 Nut + TNut_3030_M5 - 2x M5 Nylon Lock Nut - 2x M5 Washer
- Install cartridge heater and thermocouple into the heater block - Assemble and install strip holder- 2x M5x12mm Screw - 2x M5 Nut + TNut_3030_M5
- Install Cover Plate 2- 2x M5x12mm Screw - 2x M5 Nut + TNut_3030_M5
- Connect motor to the speed controller In my case the polarity is opposite than indicated on the motor to have correct rotation direction. In case the direction is not as you want switch the polarity. - Mount motor cover- 4x M3x6mm Screw
- Mount handle and feet - 4x M8x20mm Screw
- Add steal cord- 1x Approximately 40 cm steel cord 1mm in diameter - 1x Screw terminal - 1x Clip for steel cord (can be substituted with screw terminal)
- Wrap wires to motor and heater block (optional)- 2x Approximately 20cm of woven wire wrap 5mm diameter
Descripción original del autor, publicada en Printables.