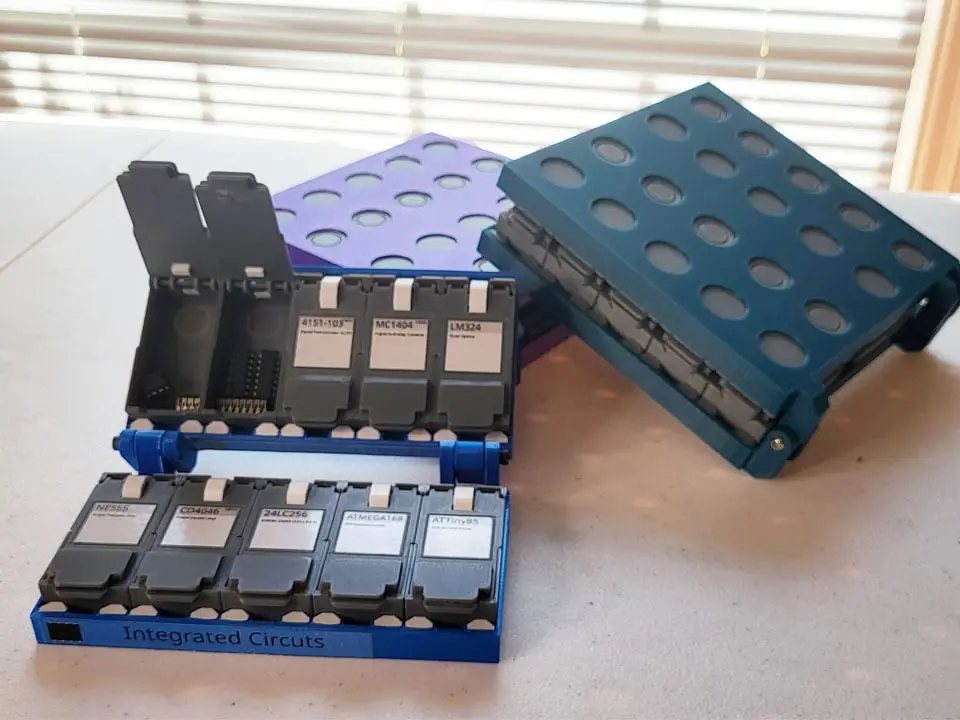
Bistable-Spring-Lid Clamshell Removable Bin Tackle Box
por William Leu en Thingiverse
I was looking at a modular bin system for my medication organizer and used it as inspiration to make a tackle box. Each row has 5 bays, and each bin can take up a single bay or multiple bays to hold more. Each bin has a bi-stable lid mechanism that keeps the lids either open or closed with a...
Licencia
Uso comercial permitidoPuedes imprimirlo, modificarlo y venderlo dando crédito al autor.
Al descargar aceptas respetar la licencia y dar crédito a William Leu.
Archivos (19)
- ClamCase_1x5.stl STL · 348 KB
- ClamCase_2x5_ToFront.stl STL · 646 KB
- ClamCase_2x5_ToSide.stl STL · 443 KB
- Bin_x1.stl STL · 66 KB
- Bin_x2.stl STL · 110 KB
- Bin_x3.stl STL · 153 KB
- Bin_x4.stl STL · 199 KB
- Lift_x1.stl STL · 8 KB
- Lift_x2.stl STL · 12 KB
- Lift_x3.stl STL · 17 KB
- Lift_x4.stl STL · 22 KB
- Lid_x1.stl STL · 213 KB
- Lid_x2.stl STL · 391 KB
- Lid_x3.stl STL · 566 KB
- Lid_x4.stl STL · 741 KB
- Spring.stl STL · 6 KB
- ToothGrip.stl STL · 37 KB
- LabelSVGs.zip ZIP · 92 KB
- SpringHingeArrayBox_19.blend BLEND · 6,9 MB
- Categoría
- Organización
- Formatos
- STL, ZIP, BLEND
- Descargas (todas las plataformas)
- 1,111
- Publicado
También en
Sobre este modelo
I was looking at a modular bin system for my medication organizer and used it as inspiration to make a tackle box. Each row has 5 bays, and each bin can take up a single bay or multiple bays to hold more. Each bin has a bi-stable lid mechanism that keeps the lids either open or closed with a C-shaped leaf spring. The spring was borrowed from my Ring Box design, but the orientation has been modified. A demo and assembly are available at https://youtu.be/RQxL7apyHRM. You can remove the bins from their cases to swap them with other compatible cases, or use them as stand-alone containers that you can later re-stow with their collection. Or replace them if individual bins become broken (just speculating; haven't had one break on me yet). Variations This thing comes in a few variations. After covering them in this section, the rest of this document will assume we're talking about the 5x2 Side Clam Case with 1-width bins. You can easily adjust the assembly instructions for all other variations. - Clam Case 2x5 Front Orientation- 2x5 grid of bays. The bays are oriented so the bins open and close toward/away from the hinge.
- Clam Case 2x5 Side Orientation- 2x5 grid of bays. The bays are oriented so that the bins will open perpendicular to the hinges. This is the preferred variation, so the hinges don't get in the way of the bin lips for opening and closing.
- Clam Case 1x5 (Front Orientation)- A more compact version of the Front Orientation variation, with only 1 row of 5.
3D Printing It is recommended that the Spring and ToothGrip are printed in PETG, because they are functional springs that will flex. Everything else can be printed with your hard plastic of choice (PLA, PETG, etc). PETG parts should be printed with at least 2 layers of perimeter - although it doesn't hurt to make them entirely of perimeter paths. All parts should already be oriented correctly, with the right side lying on the print bed. - ClamCase_2x5_*.stl (x2)- Each side has 10 bays, so 20 bays total.
- Bin_x1.stl (x20) - Lid_x1.stl (x20) - Lift_x1.stl (x20) - Spring.stl (x20)- PETG recommended
- ToothGrip.stl (x80)- x4 per bay - PETG recommended
Extra Parts - Super glue - needed to bond Lift_* parts to the Lid_s.
- M3x20 (x2) screws- For every case, two screws are needed for hinge pins. Any non-countersunk head works, although I'm fond of dome heads for this. May even be possible to use M3x20 grubs for a headless pin. - Also a screwdriver for these screws.
2D Printing - Some labels are included as SVGs. They were originally authored in Inkscape. Most are just source files I've been using, or samples of individual bin sizes, so they will need extra editing to fit your needs.
- Copy and paste whatever labels (at whatever quantity) you need into your own document - Print on label/sticker paper - Cut them out - Place them on the lid, in the debossed rectangles reserved for the labeling area.
Assembly - Remove the model-in supports for the lids. - Bend the print-in-place hinges a bit to exercise them and deburr any rough or fused parts in the hinges. - Place the lifts onto the lids- Place two small dabs of super glue on the lift. One on each side of the T-shaped indexing feature. Do not put enough superglue to cause squeeze-out. - Fit the lift onto the lid on the top side (the side with the debossed rectangle). - Set them aside for 1-5 minutes to allow it to dry - Do this for all lifts and lids.
- Place the spring onto the lid hinges. Place them so they sit on the outside of the box. i.e., the spring should be on the side of the lid with the debossed rectangle.- Do this for all lids and springs.
- Push the lids into the slot at the back of the bins until they snap into place. - Make sure the spring doesn't fall out while pushing the lid in. - Do this for all lids and bins.
- Place ToothGrip pieces in the ClamCase parts. Sockets along the corners of the bays hold the teeth.- Also optional to put a small drop of super glue in the socket before putting the teeth in if they seem loose, but I find that's usually not necessary. It's also messier and makes it harder to replace teeth later (you can remove placed teeth with pliers).
- Screw the case hinges.- Fit the back of the ClamCase parts together so their hinge bores line up. - Push or thread the screw into the hinges, starting from the outside. - Thread in the last 1-2 mm of the screw. The innermost part of the hinge should have a thinner bore so the screw can bite into it.
- Push bins into bays- Always insert the front of the bins first, as they have a lip that cannot be pushed in second. - When the front divot engages the teeth, push the back (where the spring is) down. Moderate force may be required. - Do this for all bins and bays.
To remove bins, release them by pushing up from the bottom. A debossed circle marks the side to push. Warnings - Be careful with the super glue. - Be careful when pushing bins out. This may also require some force and can scrape your thumb and fingers if they get caught on the holes in the case.
Source The source file is included, but it's more of an example of what the final progress of my workflow looks like than an actual parametric or modifiable source file. It is a Blender file, last saved with Blender 5.2.
Descripción original del autor, publicada en Thingiverse.