
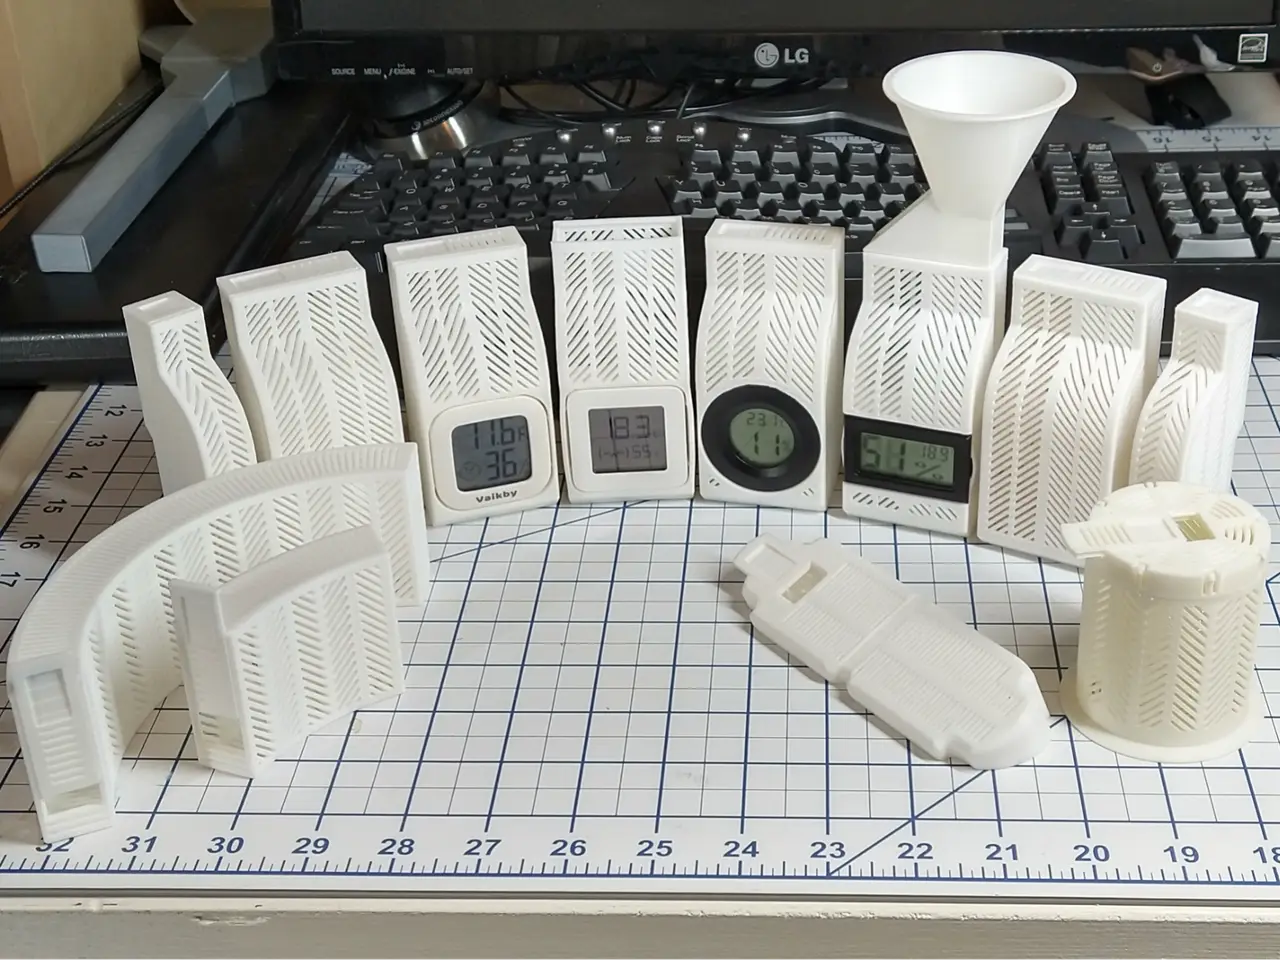
AMS1 Dry Pods Lrg, Sml, Hygro, Trays, & Funnel V20
por mcmaven en MakerWorld
Please Read This! NOTE! These Dry Pods are too wide for the AMS 2 Pro! A new Print Profile for dry Pods that I have designed specifically for the AMS 2 Pro has been posted here: https://makerworld.com/en/models/1321169-ams-2-dry-pod-system-v5#profileId-1357362
MakerWorld entrega los archivos a usuarios con cuenta gratuita
Licencia
Solo uso personalStandard Digital File License
Licencia estándar de archivos digitales: solo uso personal. No se permite compartir, revender ni subir el archivo a otros sitios, ni vender las impresiones.
Al descargar aceptas respetar la licencia y dar crédito a mcmaven.
- Categoría
- Para tu impresora
- Descargas
- 76,821
- Publicado
Sobre este modelo
Please Read This! NOTE! These Dry Pods are too wide for the AMS 2 Pro! A new Print Profile for dry Pods that I have designed specifically for the AMS 2 Pro has been posted here: https://makerworld.com/en/models/1321169-ams-2-dry-pod-system-v5#profileId-1357362
There are many alternate Print Profiles posted here. Some were created a long time ago, and include models of pods that are many versions back. As a result, they may not include improvements and changes that were added to the later versions of the Print Profiles. If you use one of these profiles, please do not complain if a problem that has been fixed in later versions is found in the profile that you print. I have no control over the non-Designer print profiles, and once posted, the poster seems to never look at them again, much less, update them…
This Print Profile includes all the components you need to upgrade your AMS to use loose (silica gel) desiccant. And the additional Dry Pods allow the AMS to hold more desiccant, which will mean longer times between refreshes. And the Spool Pods provide even more space for desiccant, and add weight to spools so they don't bounce as much when they are empty.
For Newbies:
- From Plates 1-7, pick a plate for the hygrometer that you want use. All the Pods on that individual plate will fit into your AMS 1. The remaining plates are optional. If the plate (1-7) that you printed did not include a funnel, then you can print just the funnel.
- There are additional plates for 'Claymore' pods which can be used if you vacuum pack your filament spools for storage, or Spool Pods, which can provide additional desiccant inside the AMS, or add weight to a mostly empty spool so it doesn't bounce around. Spool Pods can be used when storing filament, but they are sealed closed if you use vacuum bags and provide no drying benefit so they are not recommened for this application. If you are using regular plastic bags or a bins, then they work great.
Four types of hygrometers are supported: Bambu or Amazon Round, Bambu or Amazon Rectangular, Xiaomi, and Vaikby.
Note that the Print times defined by the print profiles above are for all the Plates in the respective Print Profile. Plate 1 of the All Dry Pods, Desiccant Trays, and Funnel Print Profile, which includes all the parts that you need to outfit an AMS with a round hygrometer, takes about 14.5 hours to print. If you use the Fast Dry Pods, Desiccant Trays, and Funnel Print Profile, the same Plate takes about 9.75 hours to print, but you give up some surface quality. Printing Plate 2 (without a Funnel) takes about 13.75 or 8.5 hours, respectively. Both Print Profiles generate fully functional and strong parts.
The latest Print Profile has been expanded to make it more friendly to printing with Bambu Handy. Now there are multiple Plates, each configured for a different type of hygrometer or no hygrometer. See the V9 release notes at the bottom.
The “All Dry Pods, Desiccant Trays, and Funnel" Print Profile has been printed by over 30,000 users successfully. My Profile was configured specifically for printing with Bambu PETG-HF, and it took several iterations to come up with the profile settings that would work reliably. However, these Print Profiles have also been successfully printed in PLA, ABS, and ASA. If you have issues with these print profiles please add a comment to say why. I can't improve them if I don't know how they are failing.
Dry Pod Hygrometer options:
- Bambu or compatible Round Hygrometer with vertical or 30 degree tabs, with a hole all the way through it, which should generate more accurate measurements. A 42mm diameter x 14mm deep body and a 46mm diameter bezel is supported. (Plate 1 w Funnel and Plate 2, no Funnel.)
- Bambu or compatible Round Hygrometer with a shallow hole for the hygrometer, which allows the Dry Pod hold more desiccant, but may be less accurate in measuring the overall humidity level of the AMS. A 42mm diameter x 14mm deep body and a 46mm diameter bezel is supported. (Floating).
- Bambu Rectangular Hygrometer. A 45x26x15mm body and a 48x29mm bezel is supported. (Plate 4).
- Xiaomi Bluetooth Thermometer Hygrometer. A 43x43x12.5 mm body is supported (Plate 5).
- Vaikby Hygrometer. (Plate 6).
Rear Desicant Trays are supported. To snap the covers on the tray pods, slide the cover in the against the front, then press the back down.
Spool and Claymore Pods are also supported.
All Pods support the Funnel.
All the hygrometer Dry Pods have a hole all the way through them, which helps generate more accurate measurements and allows you to use a screwdriver or other tool to push the hygrometer out of the pod to replace its battery or change it's settings.
The Rectangular, Xiaomi and Vaikby Hygrometer Pods use small (horizotal or vertical) tabs that mate to hold the hygrometers in place. Note, the requirement to use Supports for these pods, makes it it very difficult to have precise control over the height of the top tabs. It may be necessary to scrape the tabs with a knife to get the hygrometer to snap into place correctly.
It takes about 350 to 375 grams of desiccant to fill all Dry Pods and Desiccant Containers.
The Dry Pod, Spool Pod, and Desiccant Container covers include a detent to hold them in place more securely, but they can be a tight fit. Before you add desiccant, fit the covers into place to prevent fumbling with them when they are full of desiccant. The first time you insert a cover it may take some force, but it quickly becomes easier to slide.
Note: Using the STL Raw Model files and enabling supports may generate supports inside the Dry Pods, which can be hard or impossible to get out. Supports are only needed for Dry Pods with hygrometer openings. None are needed for the Narrow or Wide Dry Pods. If you use my 3MF file, I applied Filament Painting to all the parts to prevent any unnecessary or internal supports. However, some minimal supports are needed for the hygrometer Dry Pods.
The Desiccant Insert Top and Bottom parts snap together. I haven't used any glue with mine. And a full one survived a drop off a desk onto a carpeted floor and did not pop open. But you may still want to glue them because the parts are thin.
Ensure that the covers fit before adding desiccant to the Pods! This may mean using a knife to scrape off any left over support material on the slot entrance.
Also note that the covers are designed to be tight and may be very hard to insert the first time. I put a small bump in the corner of the covers to act as a detent to keep them from sliding out accidently. There is also a matching indent in the top (see images below) that it fits into. Note that this bump makes it hard to insert the cover into the top, especially the first time. But once you get a cover inserted, and work it in and out a couple of times, it slides relatively easily then clicks into place when fully inserted.
Note that the covers need to be inserted in a specific direction. In the picture below, the ‘indent’ the pod track is pointed to by the arrow on the left, that a 'dent' in the cover track (illustrated by the blue circle) that is used to lock the cover in place. The (red) rectangular area in the cover is where you place your thumb to press the cover into place. Also the curved red arrow shows how the cover should be rotated into place when inserting it, then pressed in to the left. Note that the first couple of times a cover is inserted, it can be very tight.
Spool Pods
Spool Pods (Plate 3) have two useful features: 1) Each Spool Pod adds another 82 grams of desiccant to the AMS, and 2) they provide additional weight to spools so they don't bounce around as much when almost empty. Each Spool Pod consists of a Top, Bottom and Cover. The Top and Bottom snap together. Align the Top and Bottom on a table top then press hard on the Top until you hear a snap. You may have to put some shoulder into it, because it takes a fair amount of force to snap them together, but no glue should be needed because these really lock tightly together. After making sure that the cover slot surface that interfaced with the supports in the top is clear, press the Cover into the Top. The first time it may take a lot of force, but it slides easily after a couple of uses.
Descripción original del autor, publicada en MakerWorld.



