AMAZON FIRE TV CUBE TV CRADLE
por SGTCOPELAND98 en Printables
Wanted to get my new Cube up and off the desk and not in the way. Created this with Claude's help. My design AI help.
Licencia
Solo uso personalCC BY-NC-SA 4.0 — Atribución, no comercial, compartir igual
Uso personal dando crédito; sin fines comerciales y las modificaciones con la misma licencia.
Al descargar aceptas respetar la licencia y dar crédito a SGTCOPELAND98.
Archivos (8)
- Categoría
- Tecnología
- Formatos
- SCAD, STL
- Descargas
- 0
- Publicado
Sobre este modelo
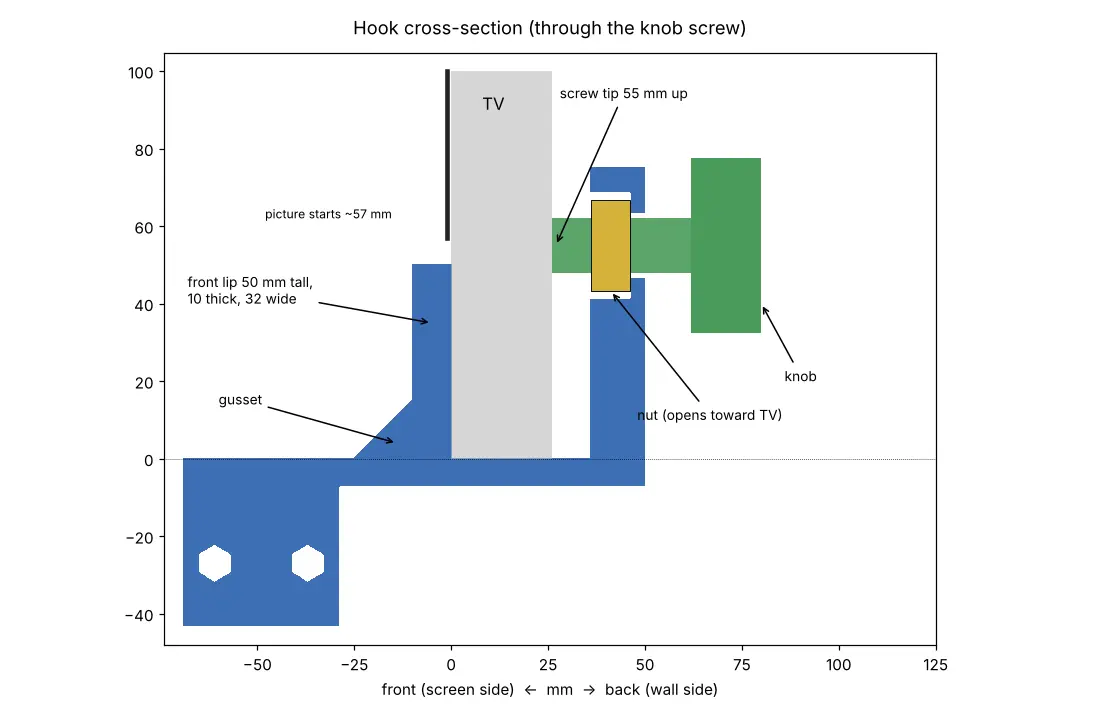
A clamp-on shelf that holds an Amazon Fire TV Cube out in front of your TV, just below the bottom edge. No drilling, no adhesive. Two hooks grip the TV's bottom edge and tighten from behind with big printed knurled knobs. UPDATE — PRINT THE V2 HOOKS (hook_right_v2 / hook_left_v2) V1 works and is what I'm running, but the rear jaw (where the knob screw and nut go through) flexes slightly under clamping. V2 fixes that: - Rear jaw 14 → 20 mm thick, so the wall behind the nut goes from 3.6 to 9.6 mm - New 10 mm 45° brace in the inside corner between the bar and the rear jaw (sits under the TV's thinner bottom edge) - Everything else is the same: front lip, bar, arm, bolt pattern. The cradle, knob screws and nuts are unchanged and fit both versions. Print settings are the same as V1. The pair still fits on one plate (each hook is 118 × 125 mm). Note: with the thicker jaw, the knob screw clamps TVs 20–36 mm thick at the clamp point (V1: 14–36 mm). If your TV is thinner than 20 mm there, use V1. Designed for a Samsung UN65D8000 (wall-mounted), but it fits other TVs that meet these: - TV thickness 14–36 mm, measured about 55 mm up from the bottom edge (that's where the knob screw presses) - At least 52 mm of frame below the picture (the front lip is 50 mm tall) - About 95 mm of clear space below the TV (the cradle hangs 91 mm down) - About 55 mm of space behind the TV for the knobs The .scad file has these as parameters if you need to adjust them. PARTS (all PETG, no supports) - hook_rightv2 x1 and hookleft_v2 x1 — recommended (already mirrored, no slicer mirroring) - hook_right x1 and hook_left x1 — original V1, only for TVs thinner than 20 mm at the clamp point - cradle x1 - knob_screw x2 (each file holds one screw) - jaw_nut x2 (each file holds one nut) HARDWARE - (Quantity x4) M5x20 button-head bolts + (Quantity x4) M5 hex nuts (cradle to hooks, no washers) - Rubber or felt pads for the screw tips and the inside of the front lips PRINT SETTINGS (Prusa MK3S+, 0.4 mm nozzle, PrusaSlicer, Prusa PETG) - Hooks (V1 or V2): 0.20 mm, 6 perimeters, 5 top / 5 bottom, 40% gyroid. Print flat as loaded. - Cradle: 0.20 mm, 3 perimeters, 4 top / 4 bottom, 20% gyroid. Floor down. - Knob screws: 0.15 mm, 4 perimeters, 30% gyroid. Knob down. - Jaw nuts: 0.15 mm, 100% infill. - No supports, no brim. Bridges fan 100% helps the cradle's slot tops. - PrusaSlicer may warn about bridging on the hooks (a ~14 mm nut-pocket roof) and the cradle (bolt slot tops). Both are safe to dismiss. TIP: Print one knob screw and one jaw nut first and test the thread fit before printing the rest. I printed both knobs and then printed one nut for testing though. ASSEMBLY 1. Press a jaw nut into each hook's rear jaw from the TV side. 2. Thread a knob screw in from behind until the tip just pokes through. Add a pad to the tip. 3. Press M5 nuts into the pockets on the outside of the hook legs. 4. Set the cradle between the hooks and bolt from inside the cradle out. Leave loose. 5. Hang the hooks on the TV's bottom edge, away from the remote sensor and vents. Slide the cradle where you want it and tighten the bolts. 6. Tighten the knobs by hand until snug. Don't crank them; TV back panels are thin plastic. 7. Drop in the Cube, ports facing the rear cable notch. Re-check the knobs after a day and again after a week as the pads settle. Use at your own risk and check that your TV's back panel can take light clamping pressure.
Descripción original del autor, publicada en Printables.